Block list
General usage
The following common options are available for (most) blocks:
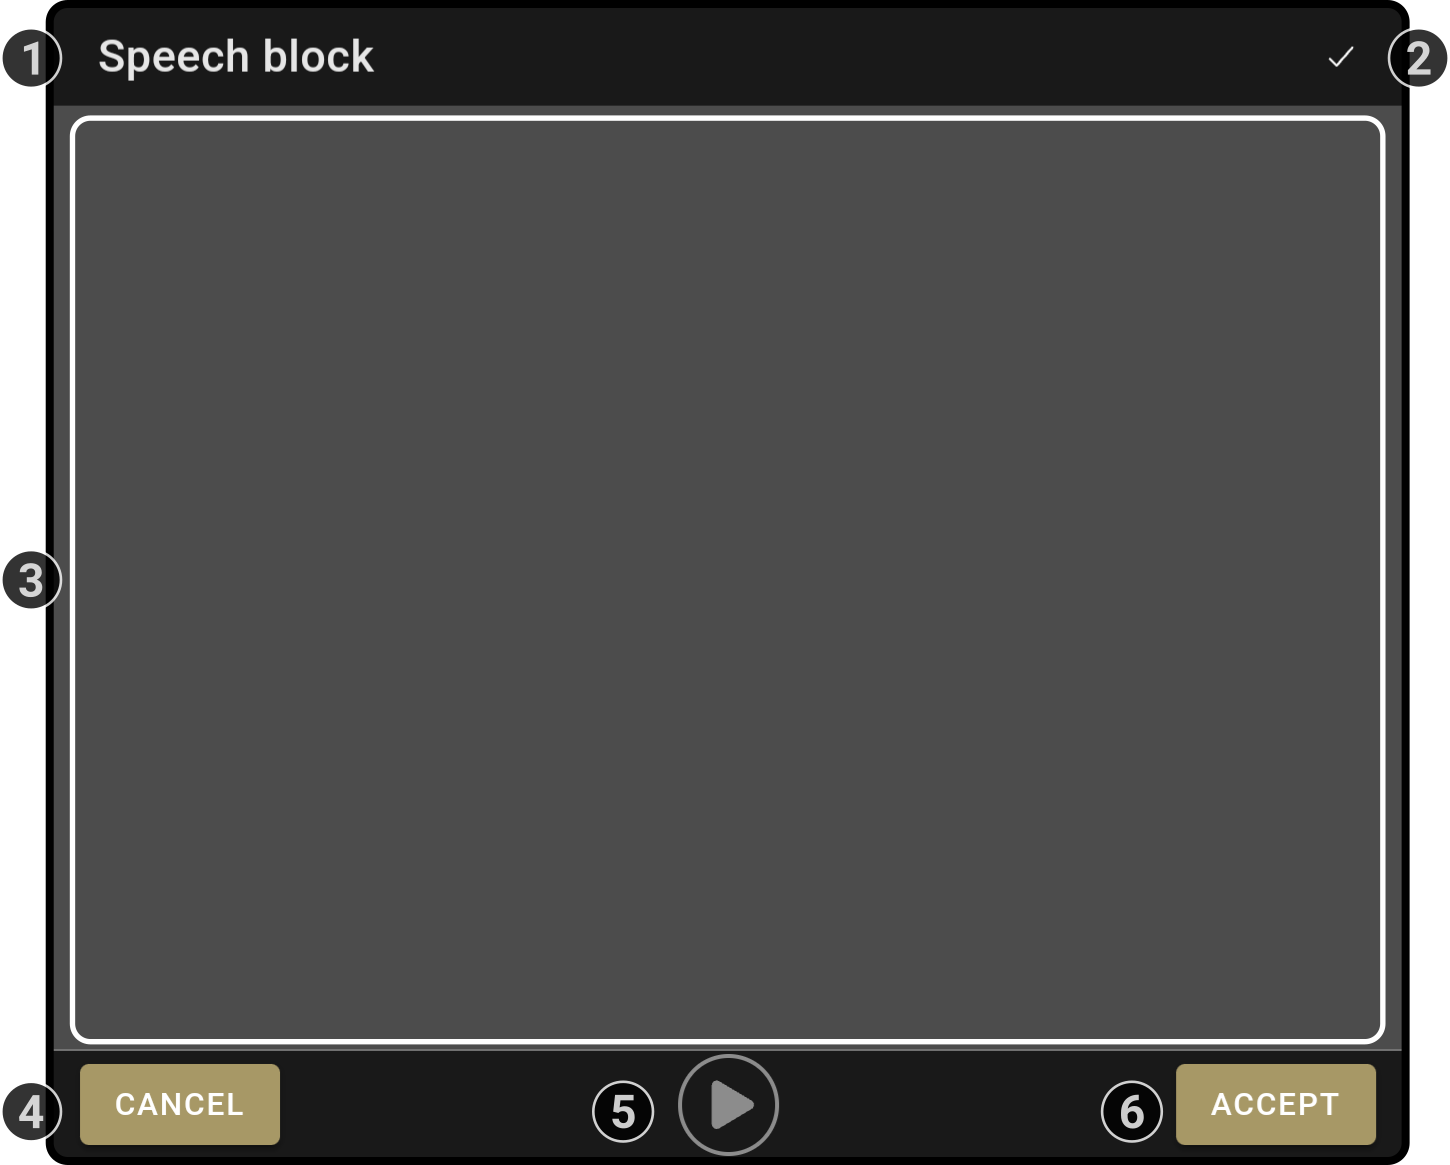
This modal contains the following parts:
-
A title bar containing the name of the block or setting
-
A
 icon to apply the changes
 -
A central area containing the settings specific to the related block
-
A cancel button to undo the changes from the previous settings
-
Controls for playing only the block
-
An accept button to apply the changes
Restrictions
Some blocks will not be shown when connected to a device incompatible with the blocks. For example, the 'Head motion' block will not be shown for devices where the head cannot move.
Categories
The composer blocks have been sorted into various categories:
-
Movement
-
Speech
-
Entertainment
-
Flow control
-
Events
-
Input/Output
-
Math
-
Media
-
Domotics
| Some blocks are only available in the advanced composer. |
Simple blocks
The following blocks are available for both the simple and advanced composer.
 Go to POI block
Function
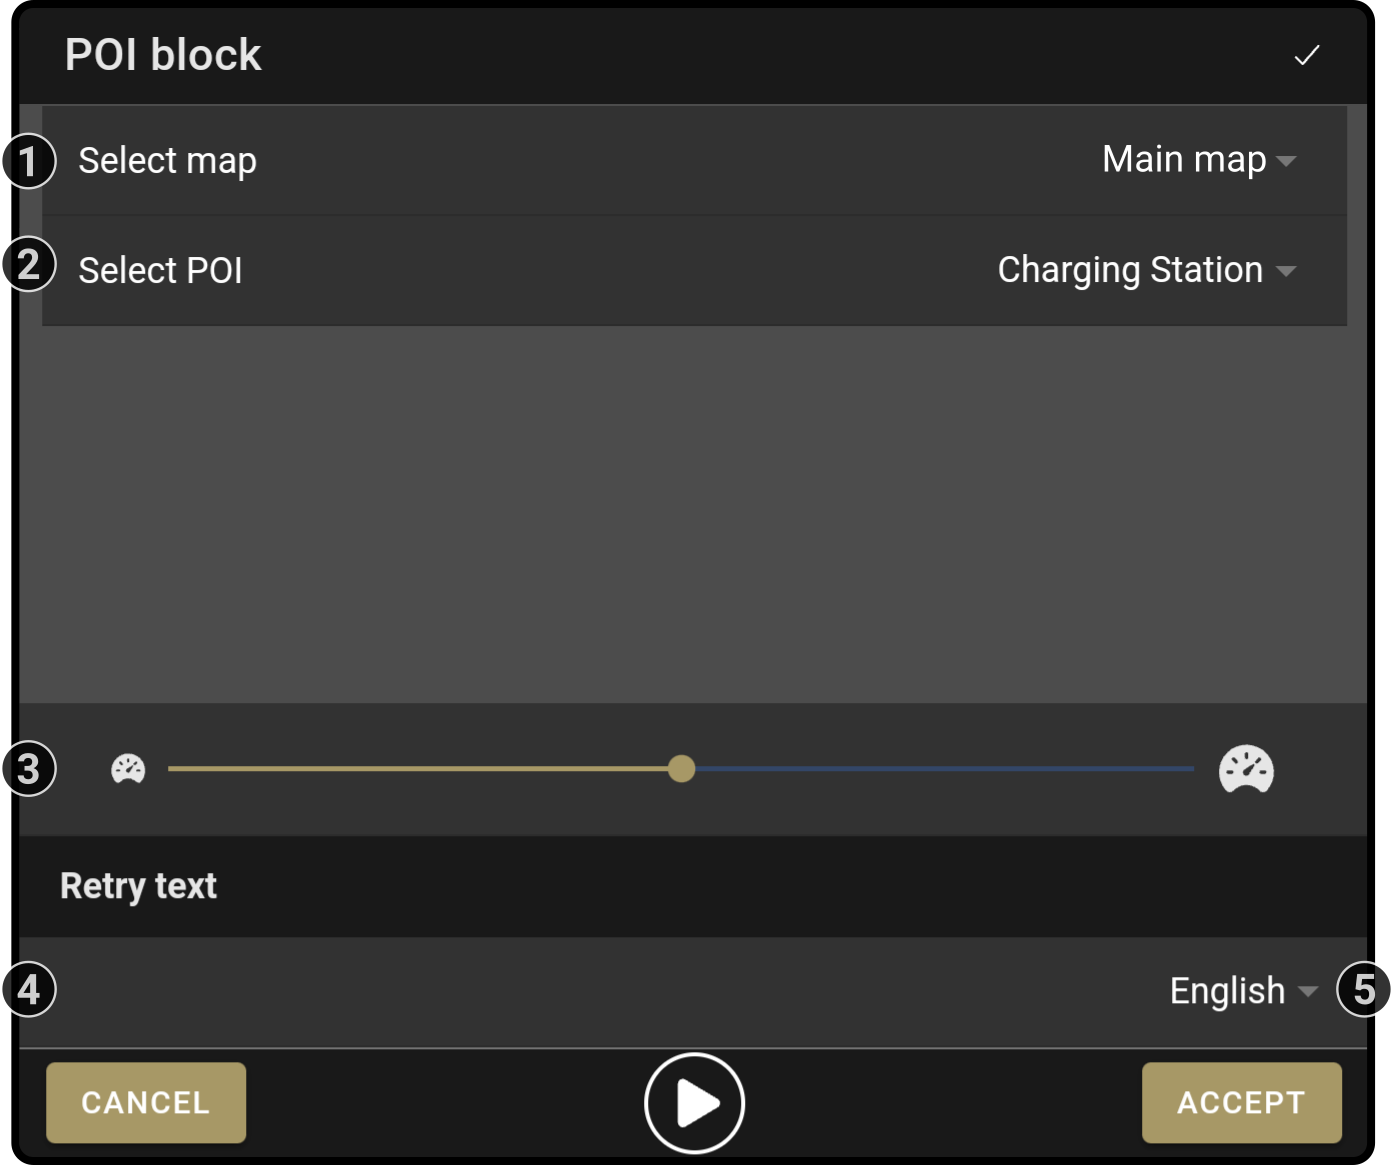
This block will move the device to a specified POI on the currently selected map.
Settings
-
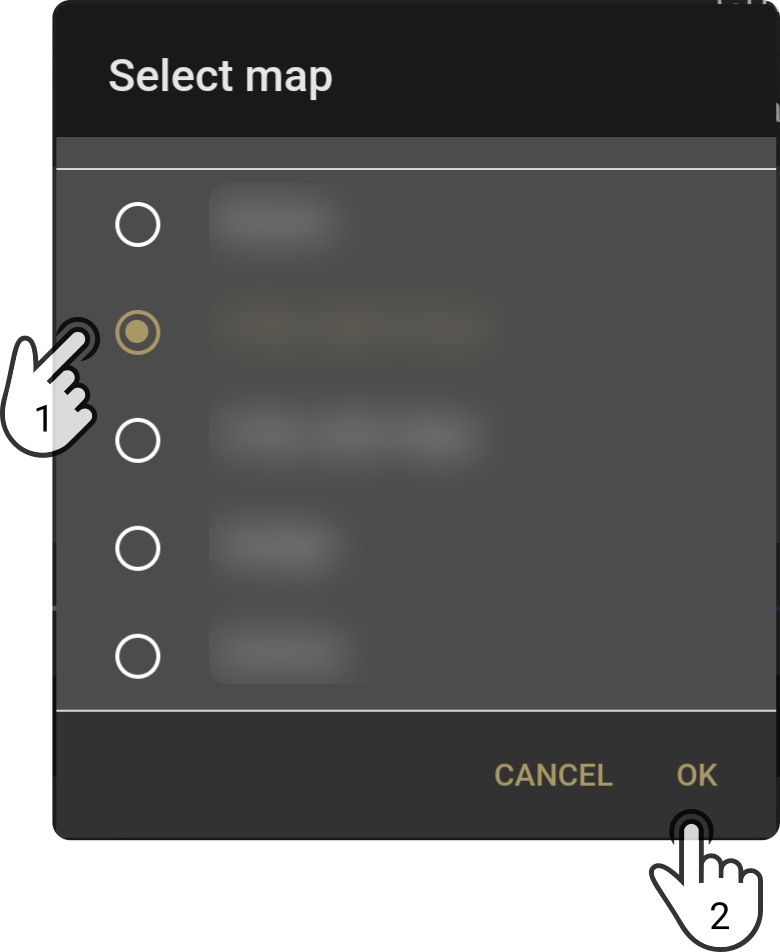
Select the map containing the POI for the device to move to
-
Tap the map to use
-
Tap the button 'OK' to apply the new map
-
-
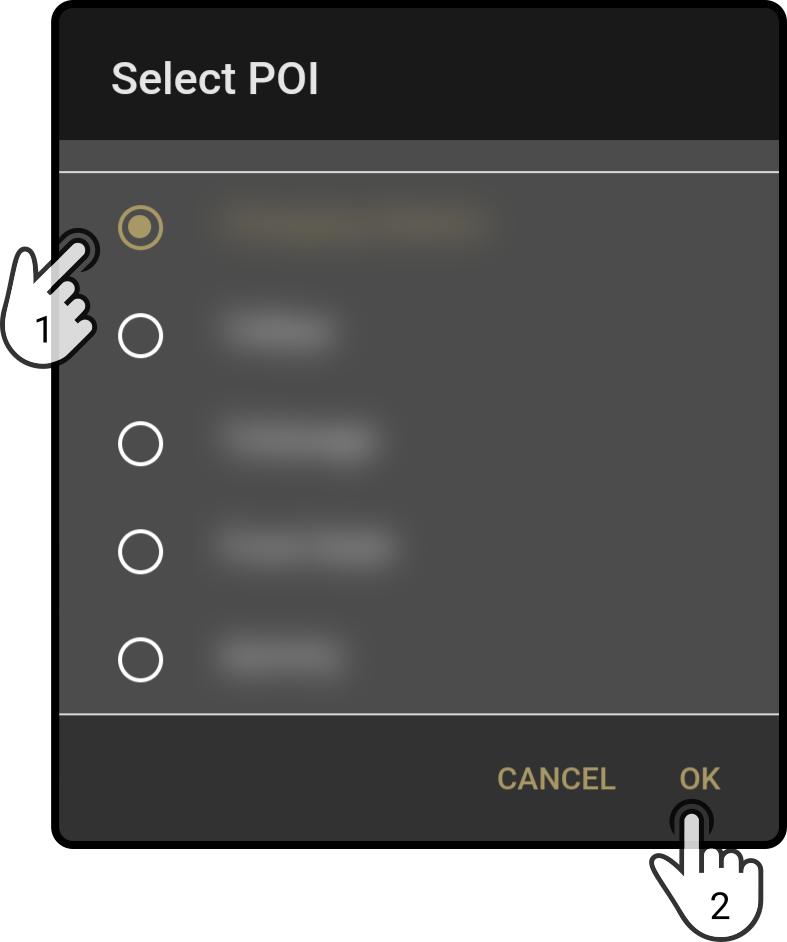
Select the POI contained in the selected map
-
Tap the POI for the device to move to
-
Tap the option 'OK' to set the POI
-
-
Slide the bar to set how fast the device should move to the POI
-
Enter a text for the device to say if the POI can’t be reached after 5 tries
-
Set the language for the device to state the 'retry text' in.
|
 Head-motion block
Function
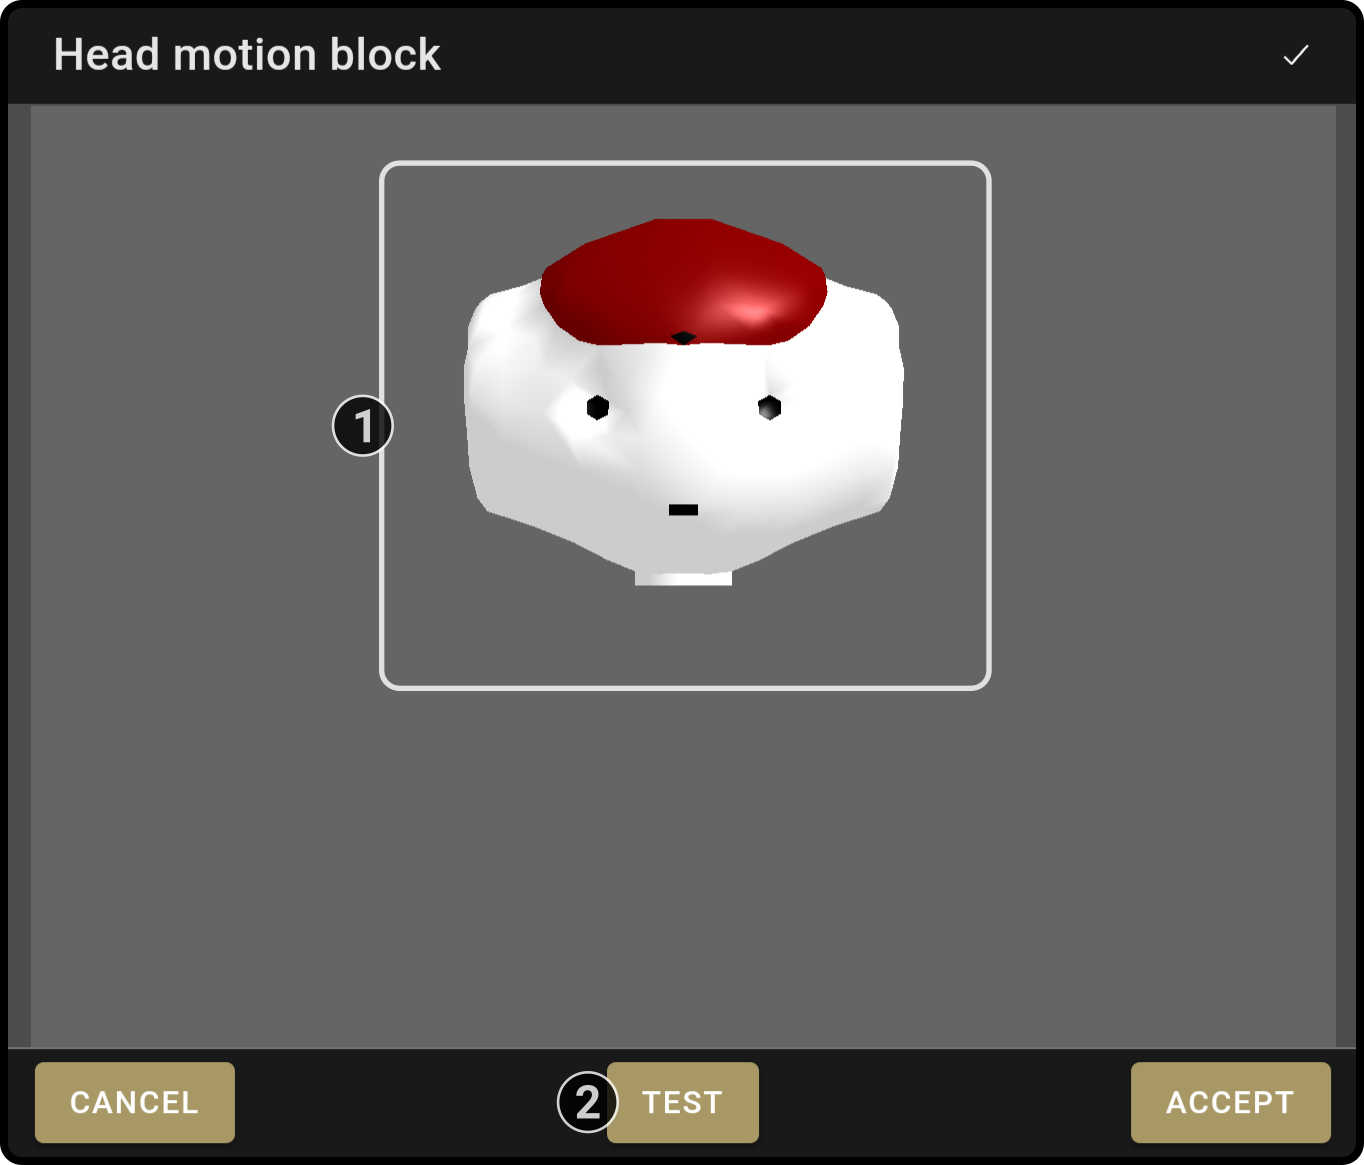
This block is used to move the head of the device to a custom position.
Settings
-
Move the head in the allowed direction(s) to the new position (1)
-
Tap the button 'Test' to test the new position and allow for corrections if needed
| (1): Device specific properties. For example, robots like James and Cruzr can only move their head up or down, while robots like Zora/Nao can move their head in all directions. |
 Gym block
Function
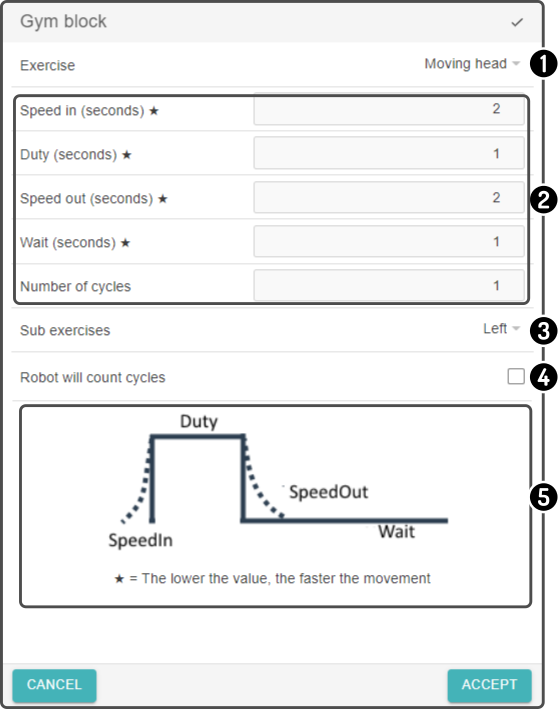
This block will make the device perform an exercise.
Settings
-
Tap the exercise to display a list of exercises available on the device. Select an exercise in the list for the device to execute.
-
Enter the additional parameters for the exercise (e.g. slow the exercise down, set the distance to walk, …).
-
Select the sub-exercise to execute (e.g. 'move the left arm only')
-
Tap the option 'device will count cycles' to have the device count the number of times the exercise has been completed.
-
A figure is shown with information on the parameters of the exercise.
|
 Speech block
Function
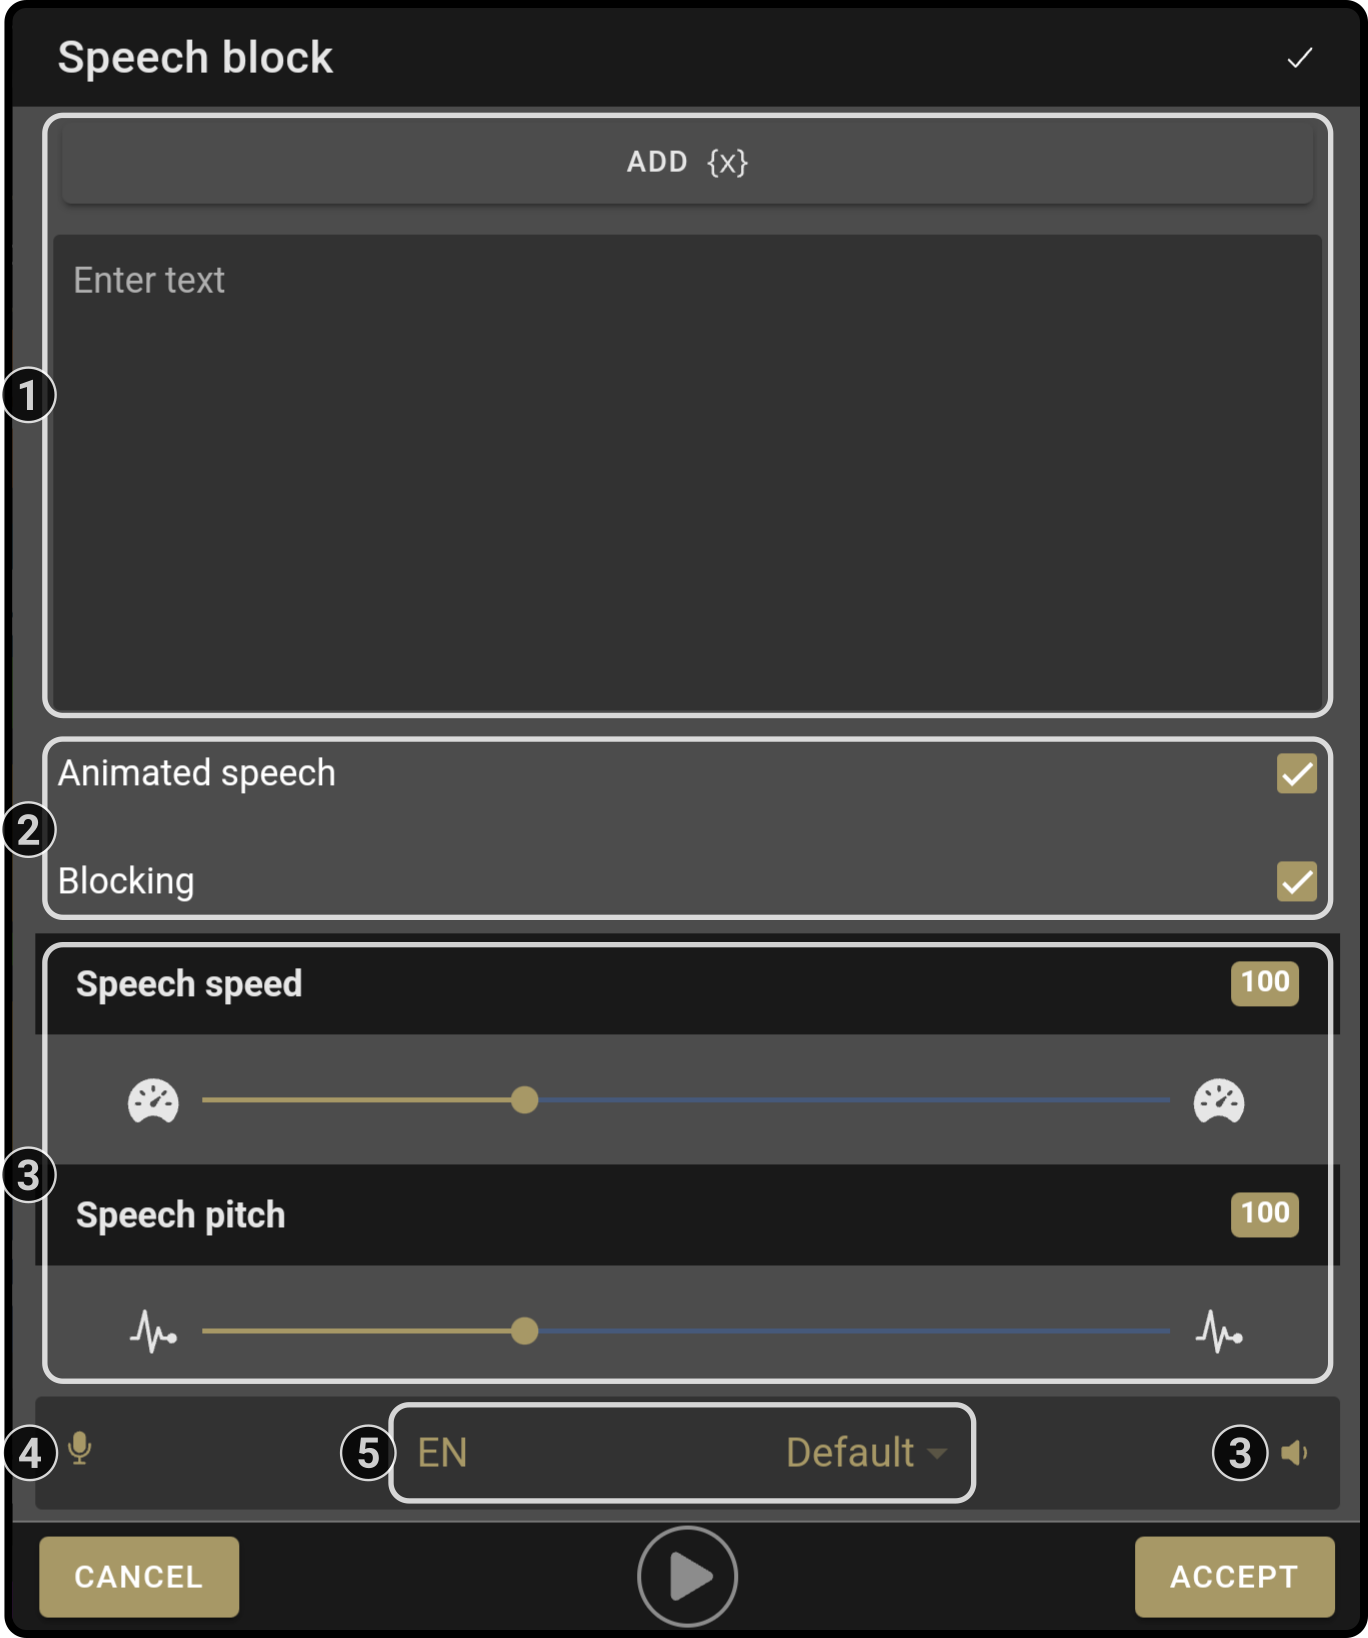
This block will make the device say something (with some customizable properties). For example, the volume and language to be used by the device can be changed.
| The available options for the speech are determined by the connected device. |
Settings
-
Enter a text in the main text box.
Tap the button 'Add (x)' to insert a variable in the message at the location of the cursor. -
Toggle the options 'animated speech' and/or 'blocking' as needed.
-
Tap the icon
 to view or hide advanced speech options. (1)
Change the 'speech speed', 'voice pitch' and/or the 'volume' for the speech. -
Tap the icon
 to use voice input to enter the message. (2)
 -
Set the language (3) and voice (4) for the speech.
|
(1): Changing the volume in a speech-block will change the general volume on the device. |
 Wait for voice command block
Function
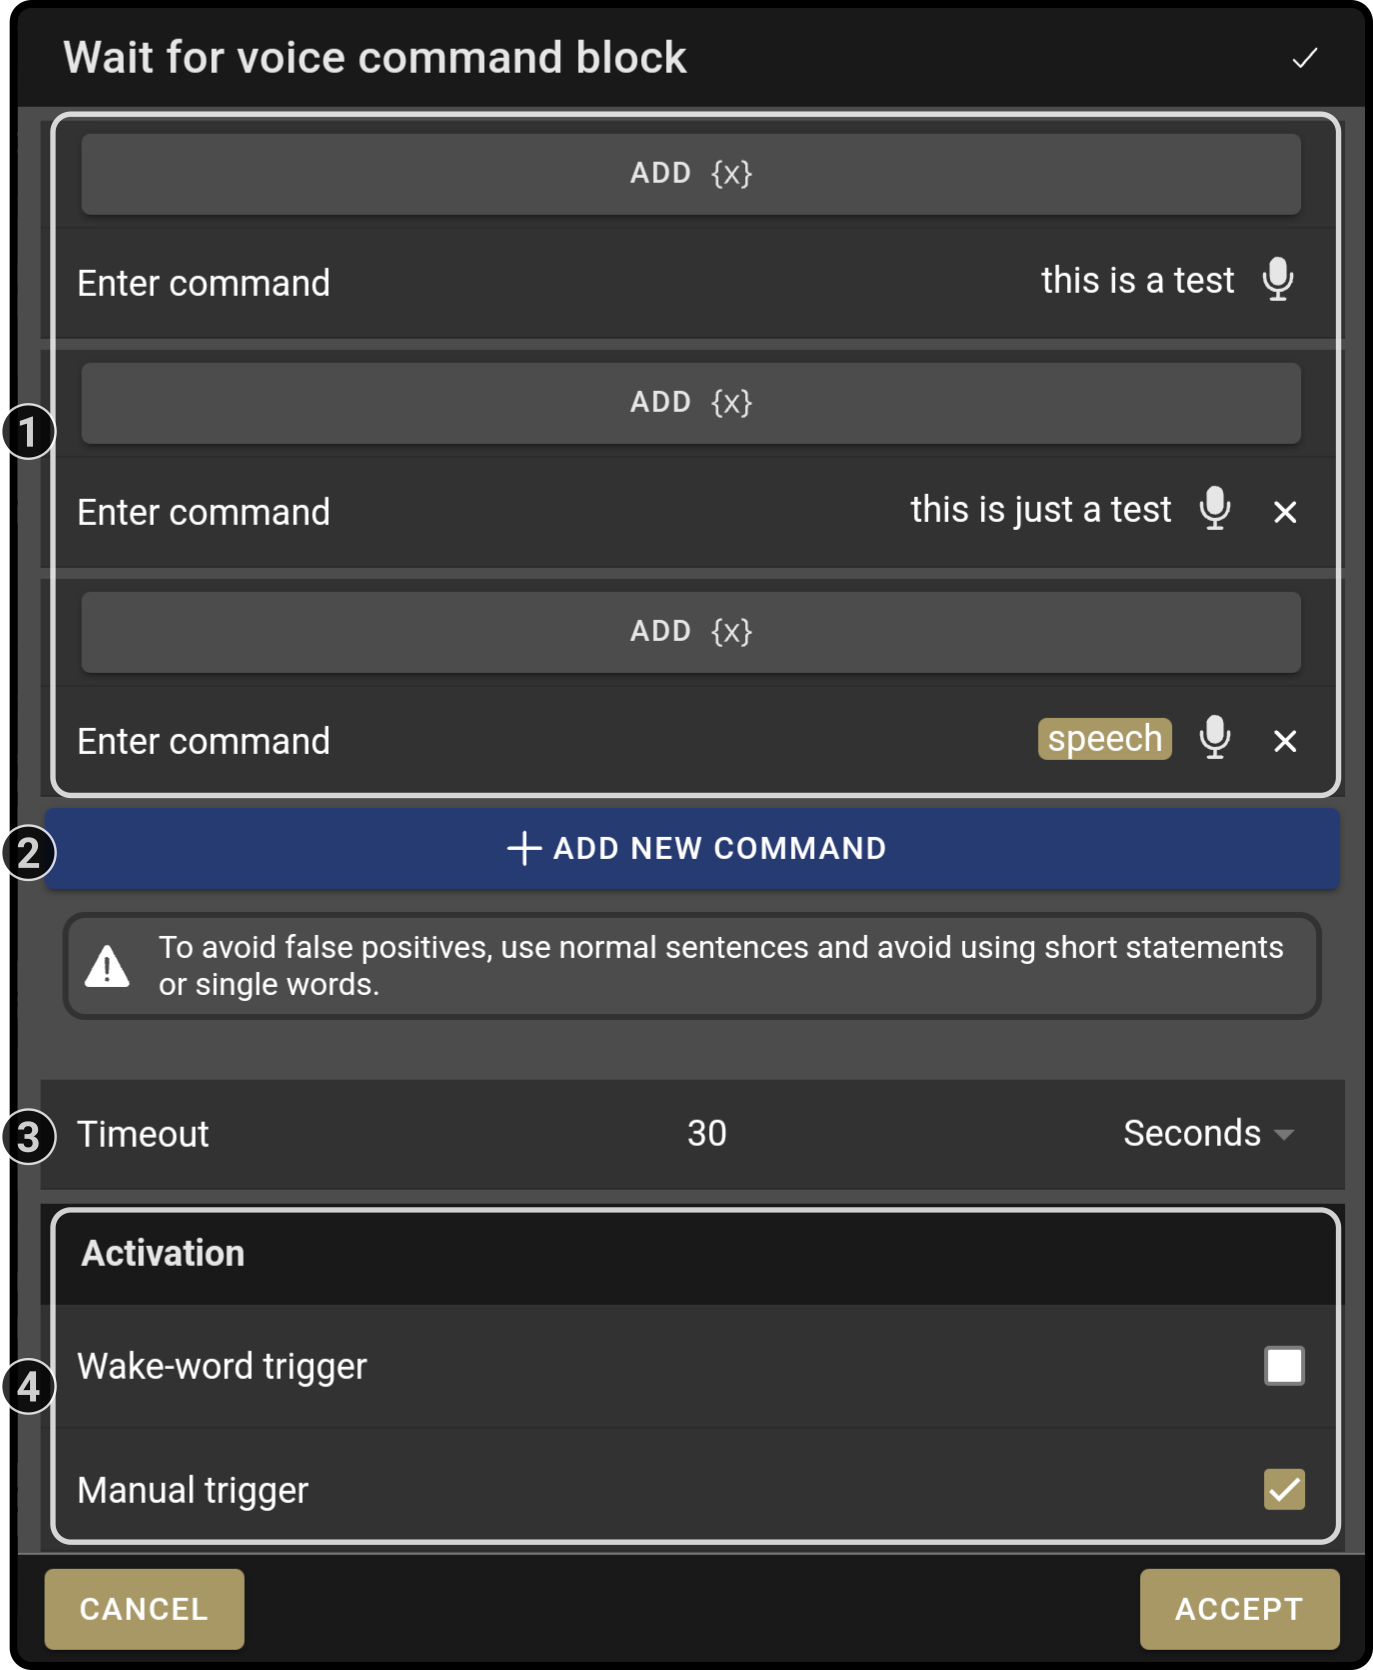
This block will pause the composition until the device understands (one of) the entered command(s).
| To avoid false positives, use normal sentences and avoid using short statements or single words. |
Settings
-
Enter the command for the device to listen to.
Tap the button 'Add (x)' to enter a variable at the location of the cursor.
Tap the icon to use voice input to enter the command. -
Tap the button '+ Add new command' to create a new entry to the list.
-
Optionally, enter a timeout after which the composition will continue.
Set the option to '0' to have the device listen indefinitely. -
Set the options for how the device will start to listen to the voice commands.
Check the option 'Require wake-word' if the user needs to state the wake-word (e.g. 'OK James') before stating the voice-command.
Check the option 'Manual trigger' to display the microphone on the Kiosk screen.
| The device will listen for the term in the currently set (speech-)language of the device. |
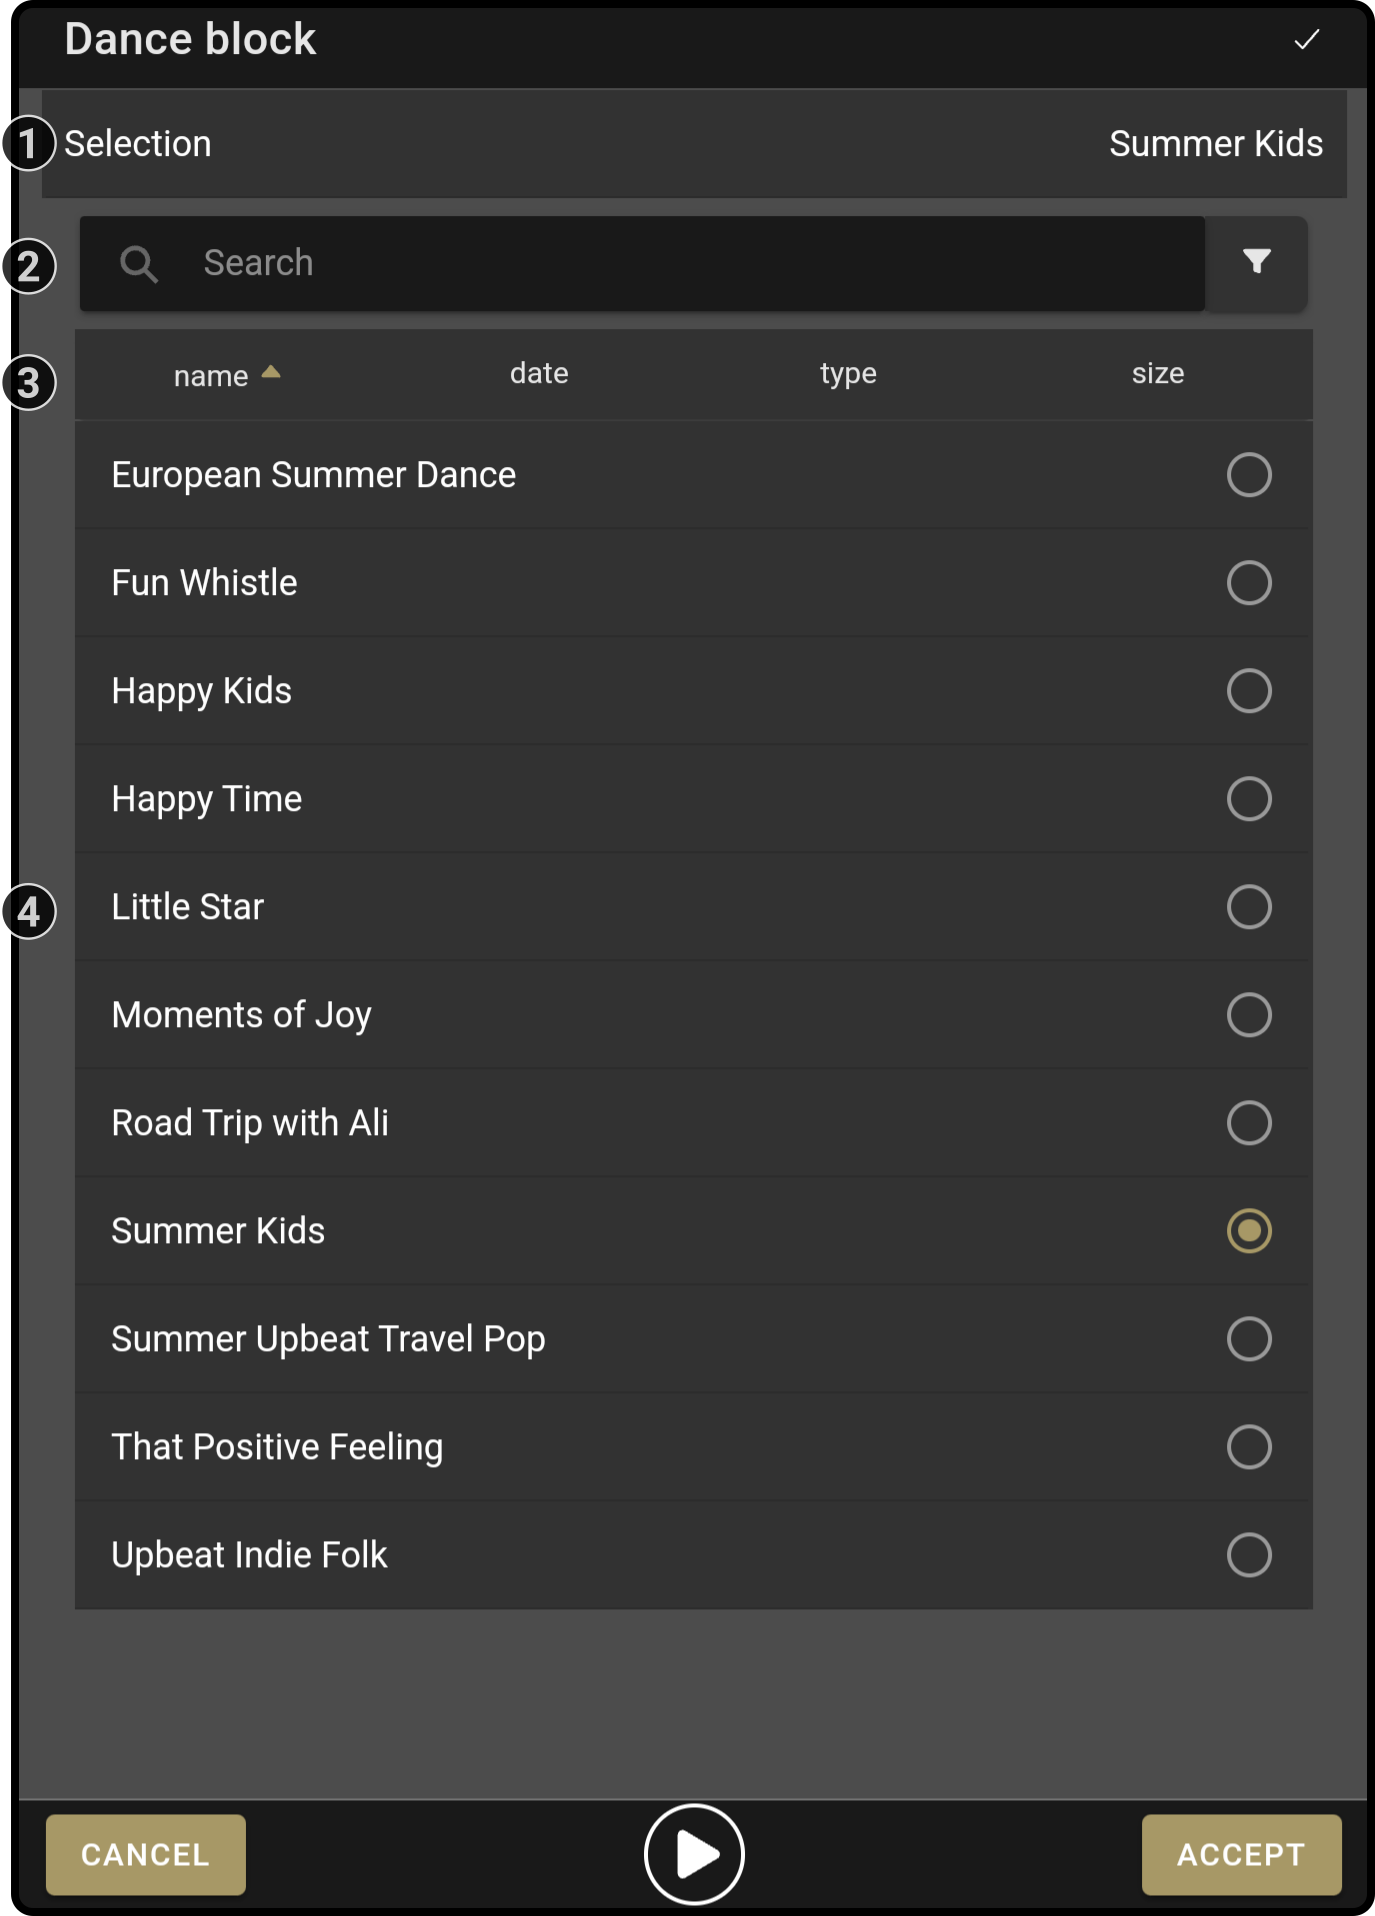
 Dance block
Function
This block will make the device perform a dance routine.
Settings
-
The currently selected dance is shown at the top of the modal
-
Enter a search-term or apply a filter to narrow the list of dances down
-
Sort the list of available dances on their properties
-
Select the dance routine to be executed from the list
| Make sure the device has plenty of room before starting this composer-block. |
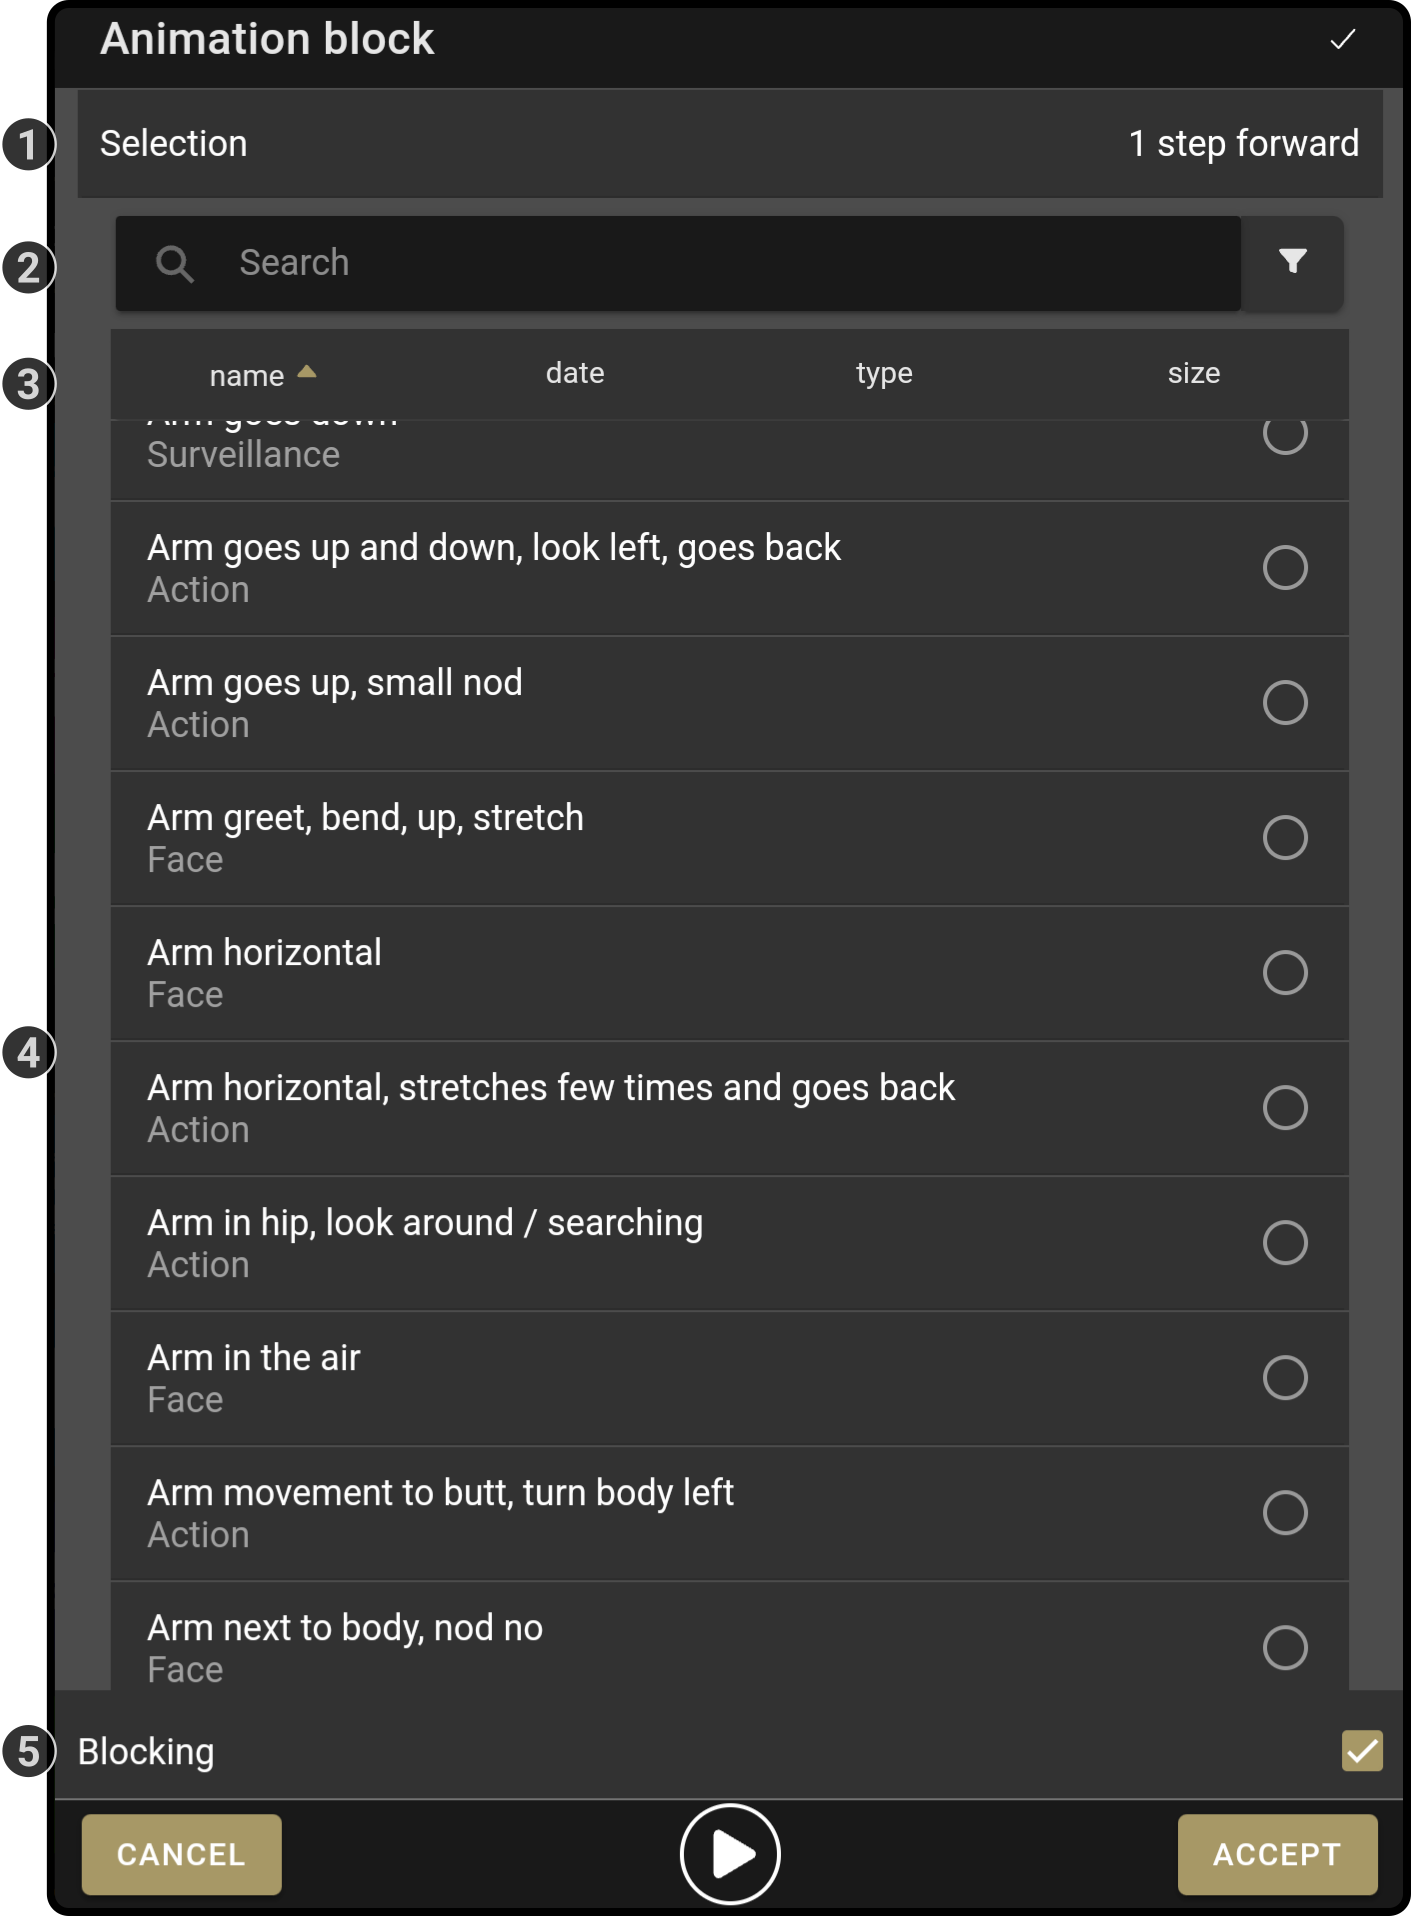
 Animation block
Function
This block will make the device perform an animation (e.g. 'Wave hello').
| On Zora, the 'Postures' are included in this category. |
Settings
-
The currently selected animation is shown at the top of the modal
-
Enter a search-term or apply a filter to narrow the list of animations down
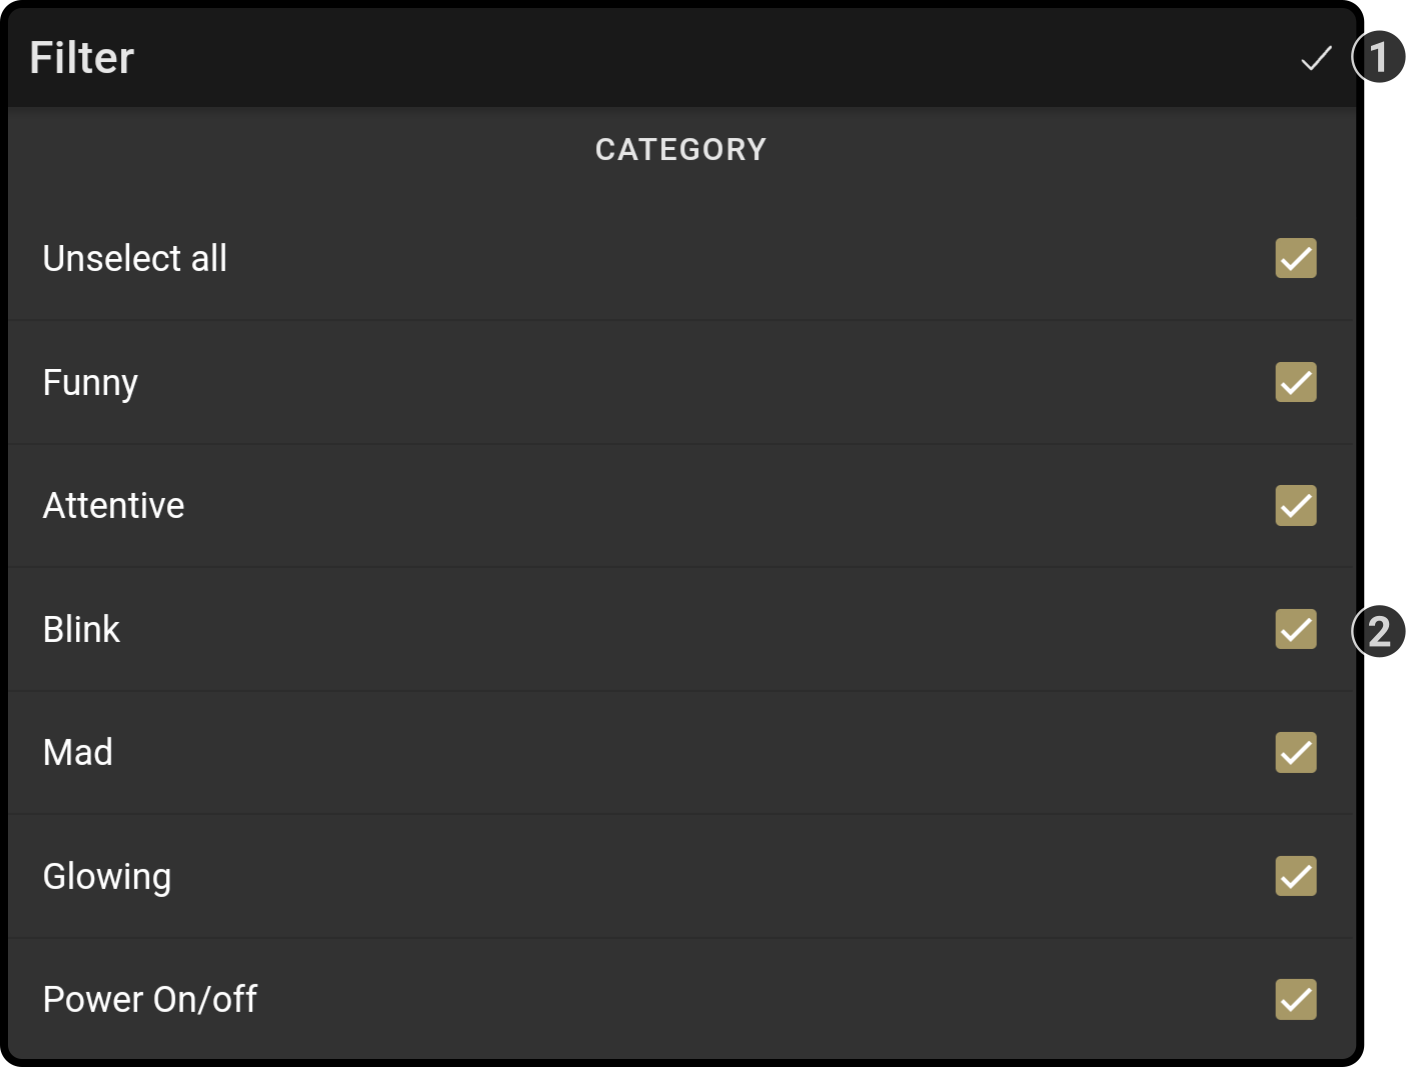
Tap the icon to display the list of available filters:

-
Tap the icon to apply the filter
-
Toggle the checkboxes next to a category to show or hide the animations
-
-
Sort the list of available dances on their properties
-
Select the animation for the device to execute
-
Toggle whether the block should play concurrent with the following blocks in the composition
|
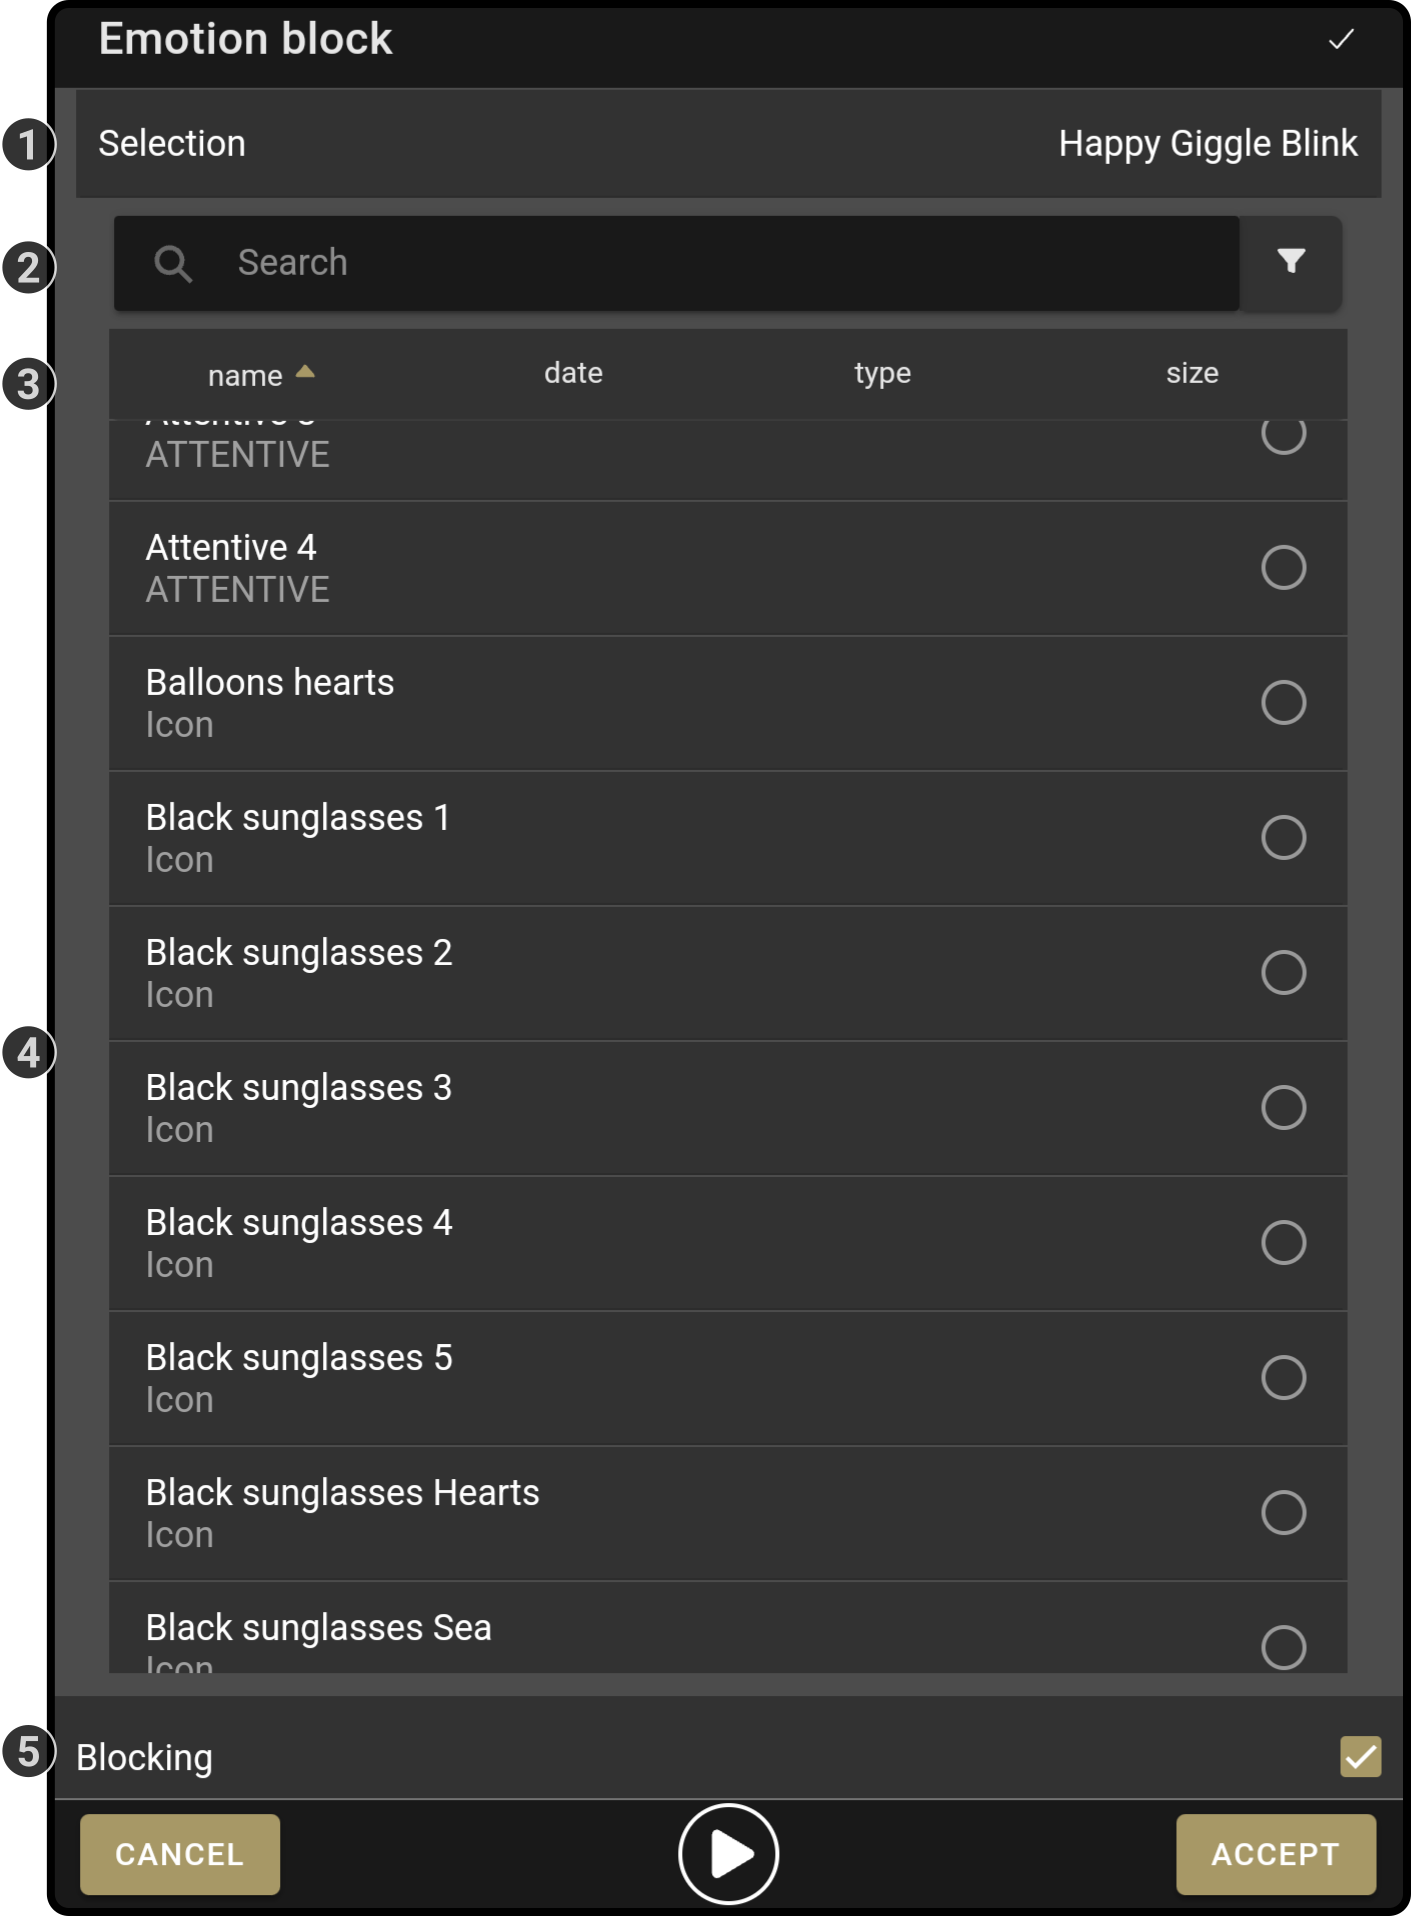
 Emotion block
Function
This block will make the device perform an emotional animation (e.g. 'Angry' or 'Determined').
Settings
-
The currently selected emotion is shown at the top of the modal
-
Enter a search-term or apply a filter to narrow the list of emotions down
Tap the icon to display the list of available filters:
-
Tap the icon to apply the filter
-
Toggle the checkboxes next to a category to show or hide the emotions
-
-
Select the emotion for the device to emulate
-
Toggle whether the block should play concurrent with the following blocks in the composition
| The device will assume the correct posture before executing the animation. For example, the device will stand up before starting the animation 'Confused 1'. |
 Wait block
Function
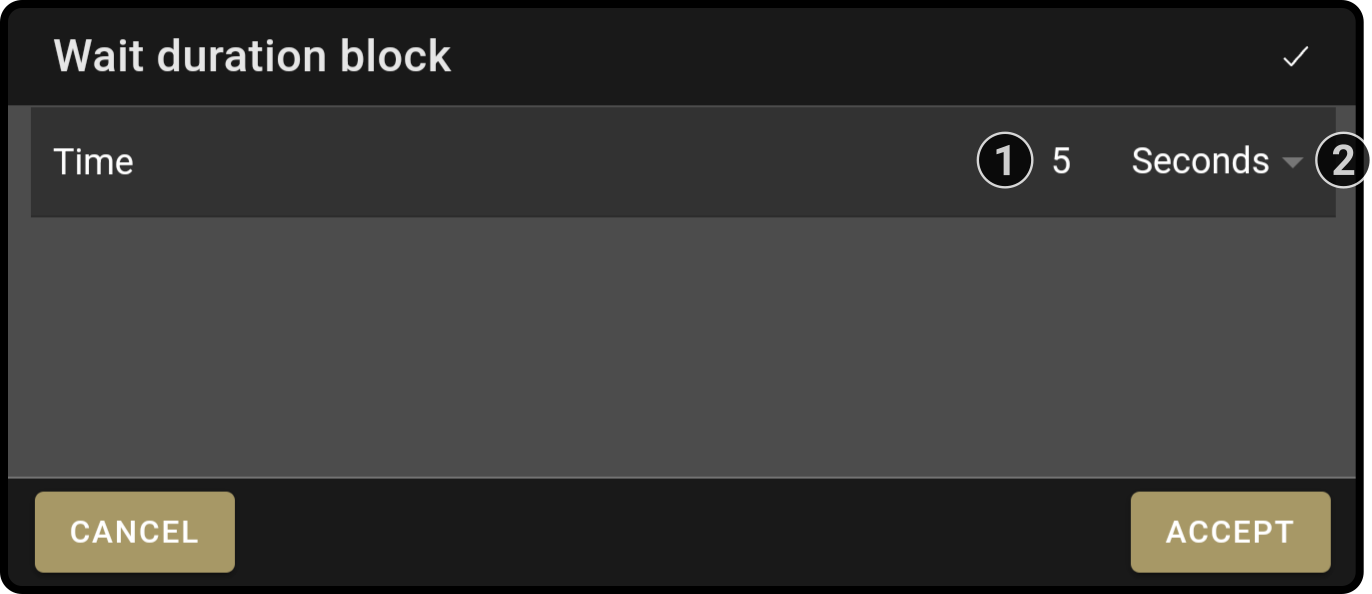
This block will pause the composition for the specified time. For example, the device will wait for 2 seconds while an image is being shown.
Settings
-
Enter the amount of time to wait (e.g. '5' out of '5 minutes')
-
Select the unit of time (i.e. Seconds, Minutes or Hours) for the composition to wait before continuing
 Wait on sensor
Function
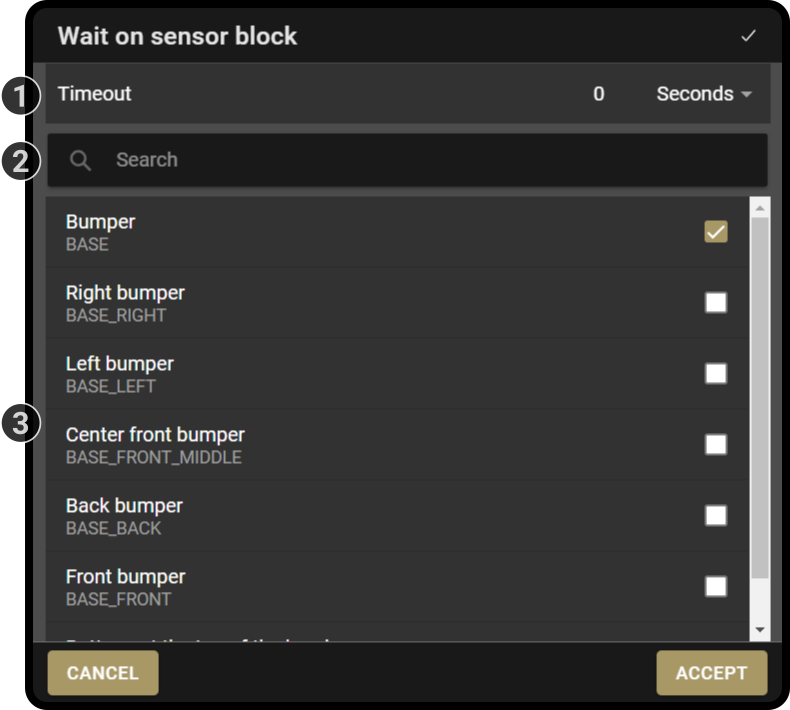
This block will pause the composition until a specific (collection of) sensor(s) is triggered. For example, a James can be configured to continue if 'any bumper' or if 'only the front bumper' is triggered.
Settings
-
Enter an optional timeout for the block
Enter a number and select a unit (e.g. '5' 'seconds' or '2' 'minutes').
Set the time to '0' to have the composition wait indefinitely. -
Enter a search term in the field to narrow down the list.
-
Tap any input (or collection of input devices) in the list to enable them to continue the composition.
The value for the wait_sensor is shown below the name of the input device (e.g. 'wait_sensor' will contain the value 'BASE_LEFT' if the left bumper was triggered).
| The list of available sensors will only be shown if ZBOS Control is connected to a device. |
 Mqtt block
Function
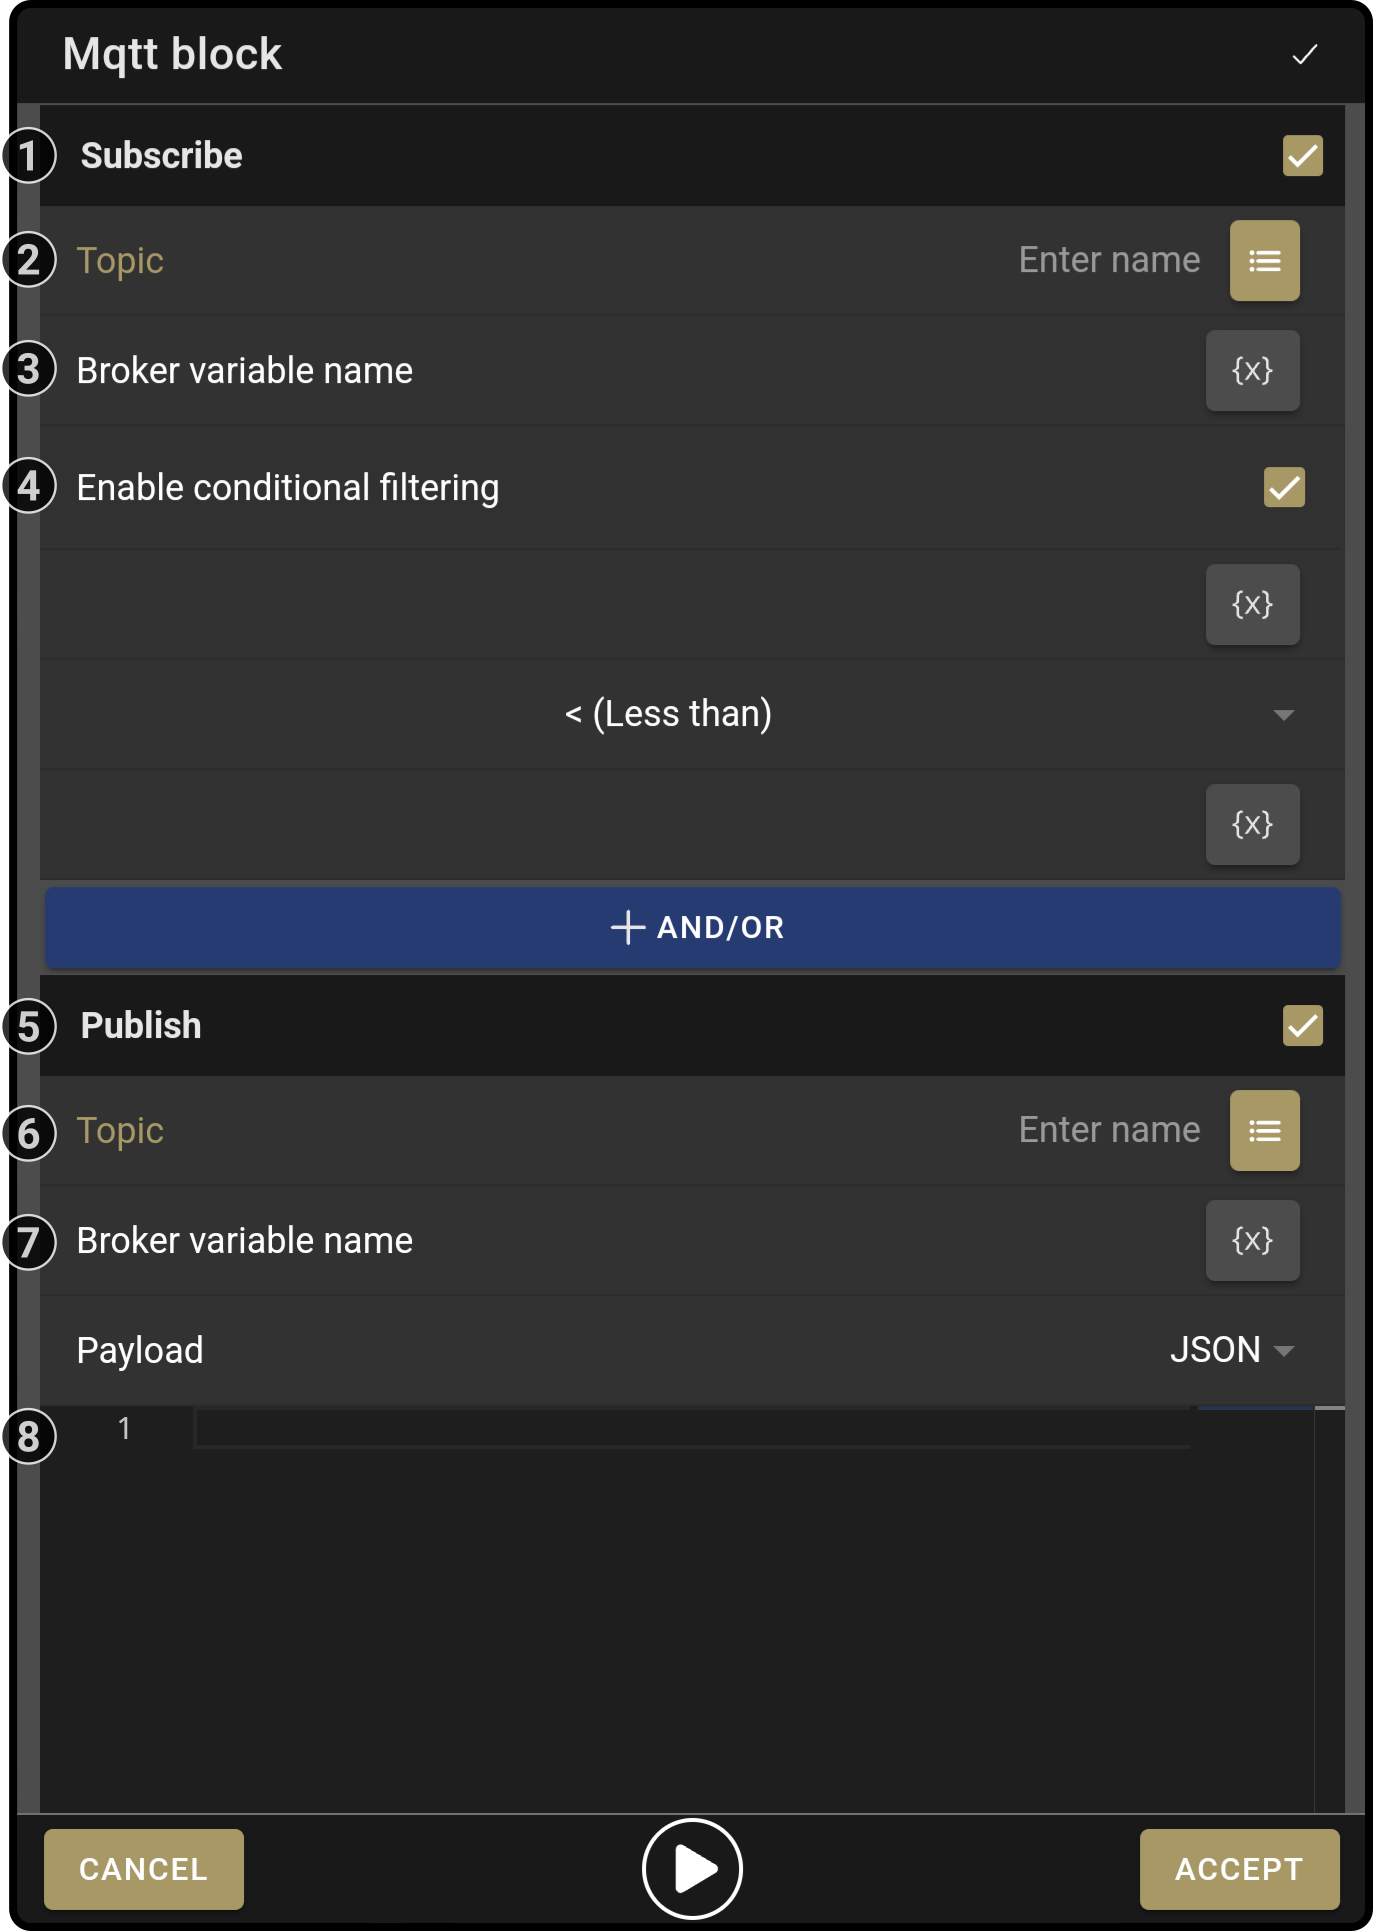
This block allows publishing and subscribing to MQTT topics, either on the internal device broker or external MQTT brokers (see: mqtt connection block). Any data received is stored in a variable named mqtt. To use the variable in subsequent blocks (e.g. speech), the content can be accessed by using the term {mqtt.payload}.
Settings
-
Toggle whether the composition should wait for a message from the broker before continuing with the composition
Tap the icon
 to view the list of available topics to interact with the ZBOS platform.
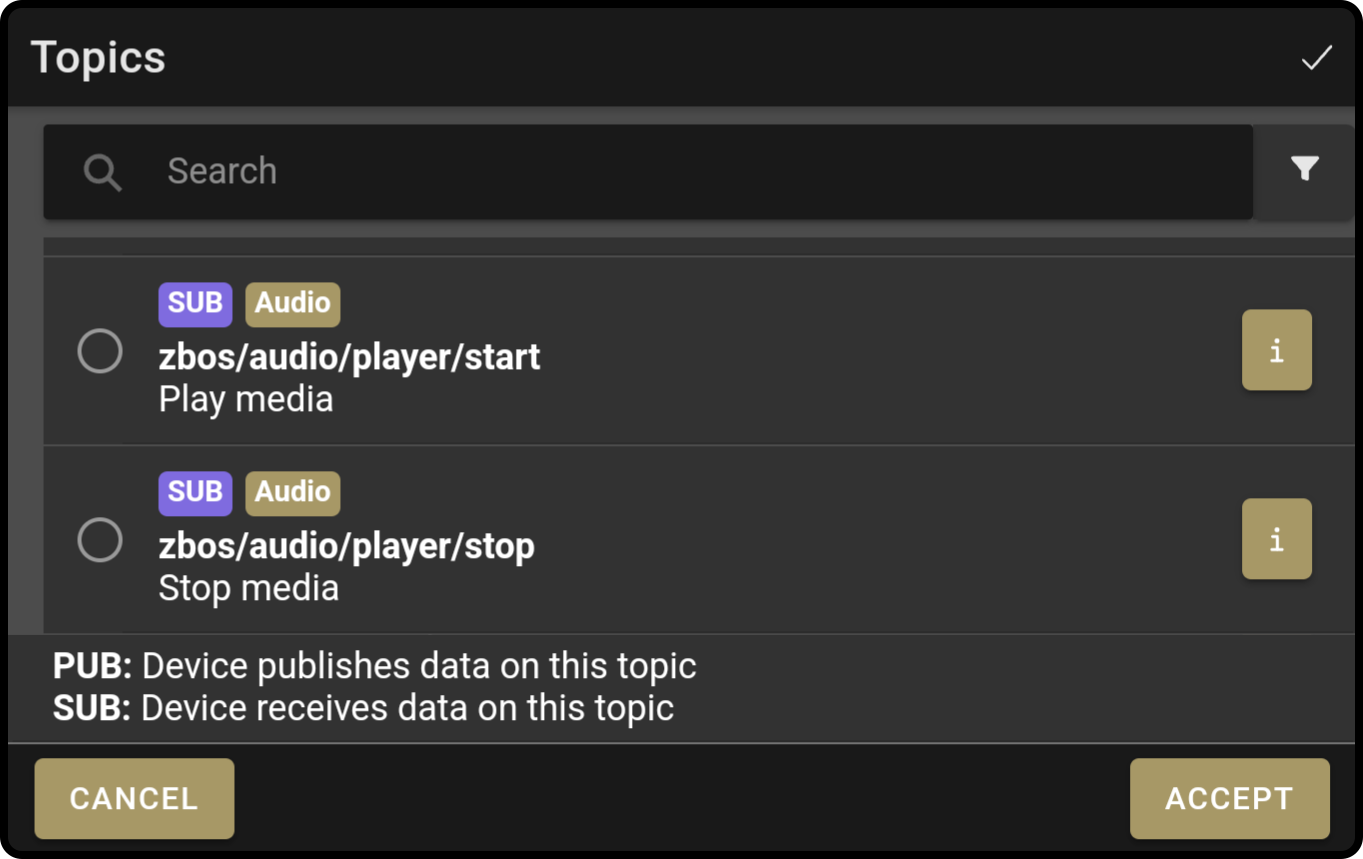
-
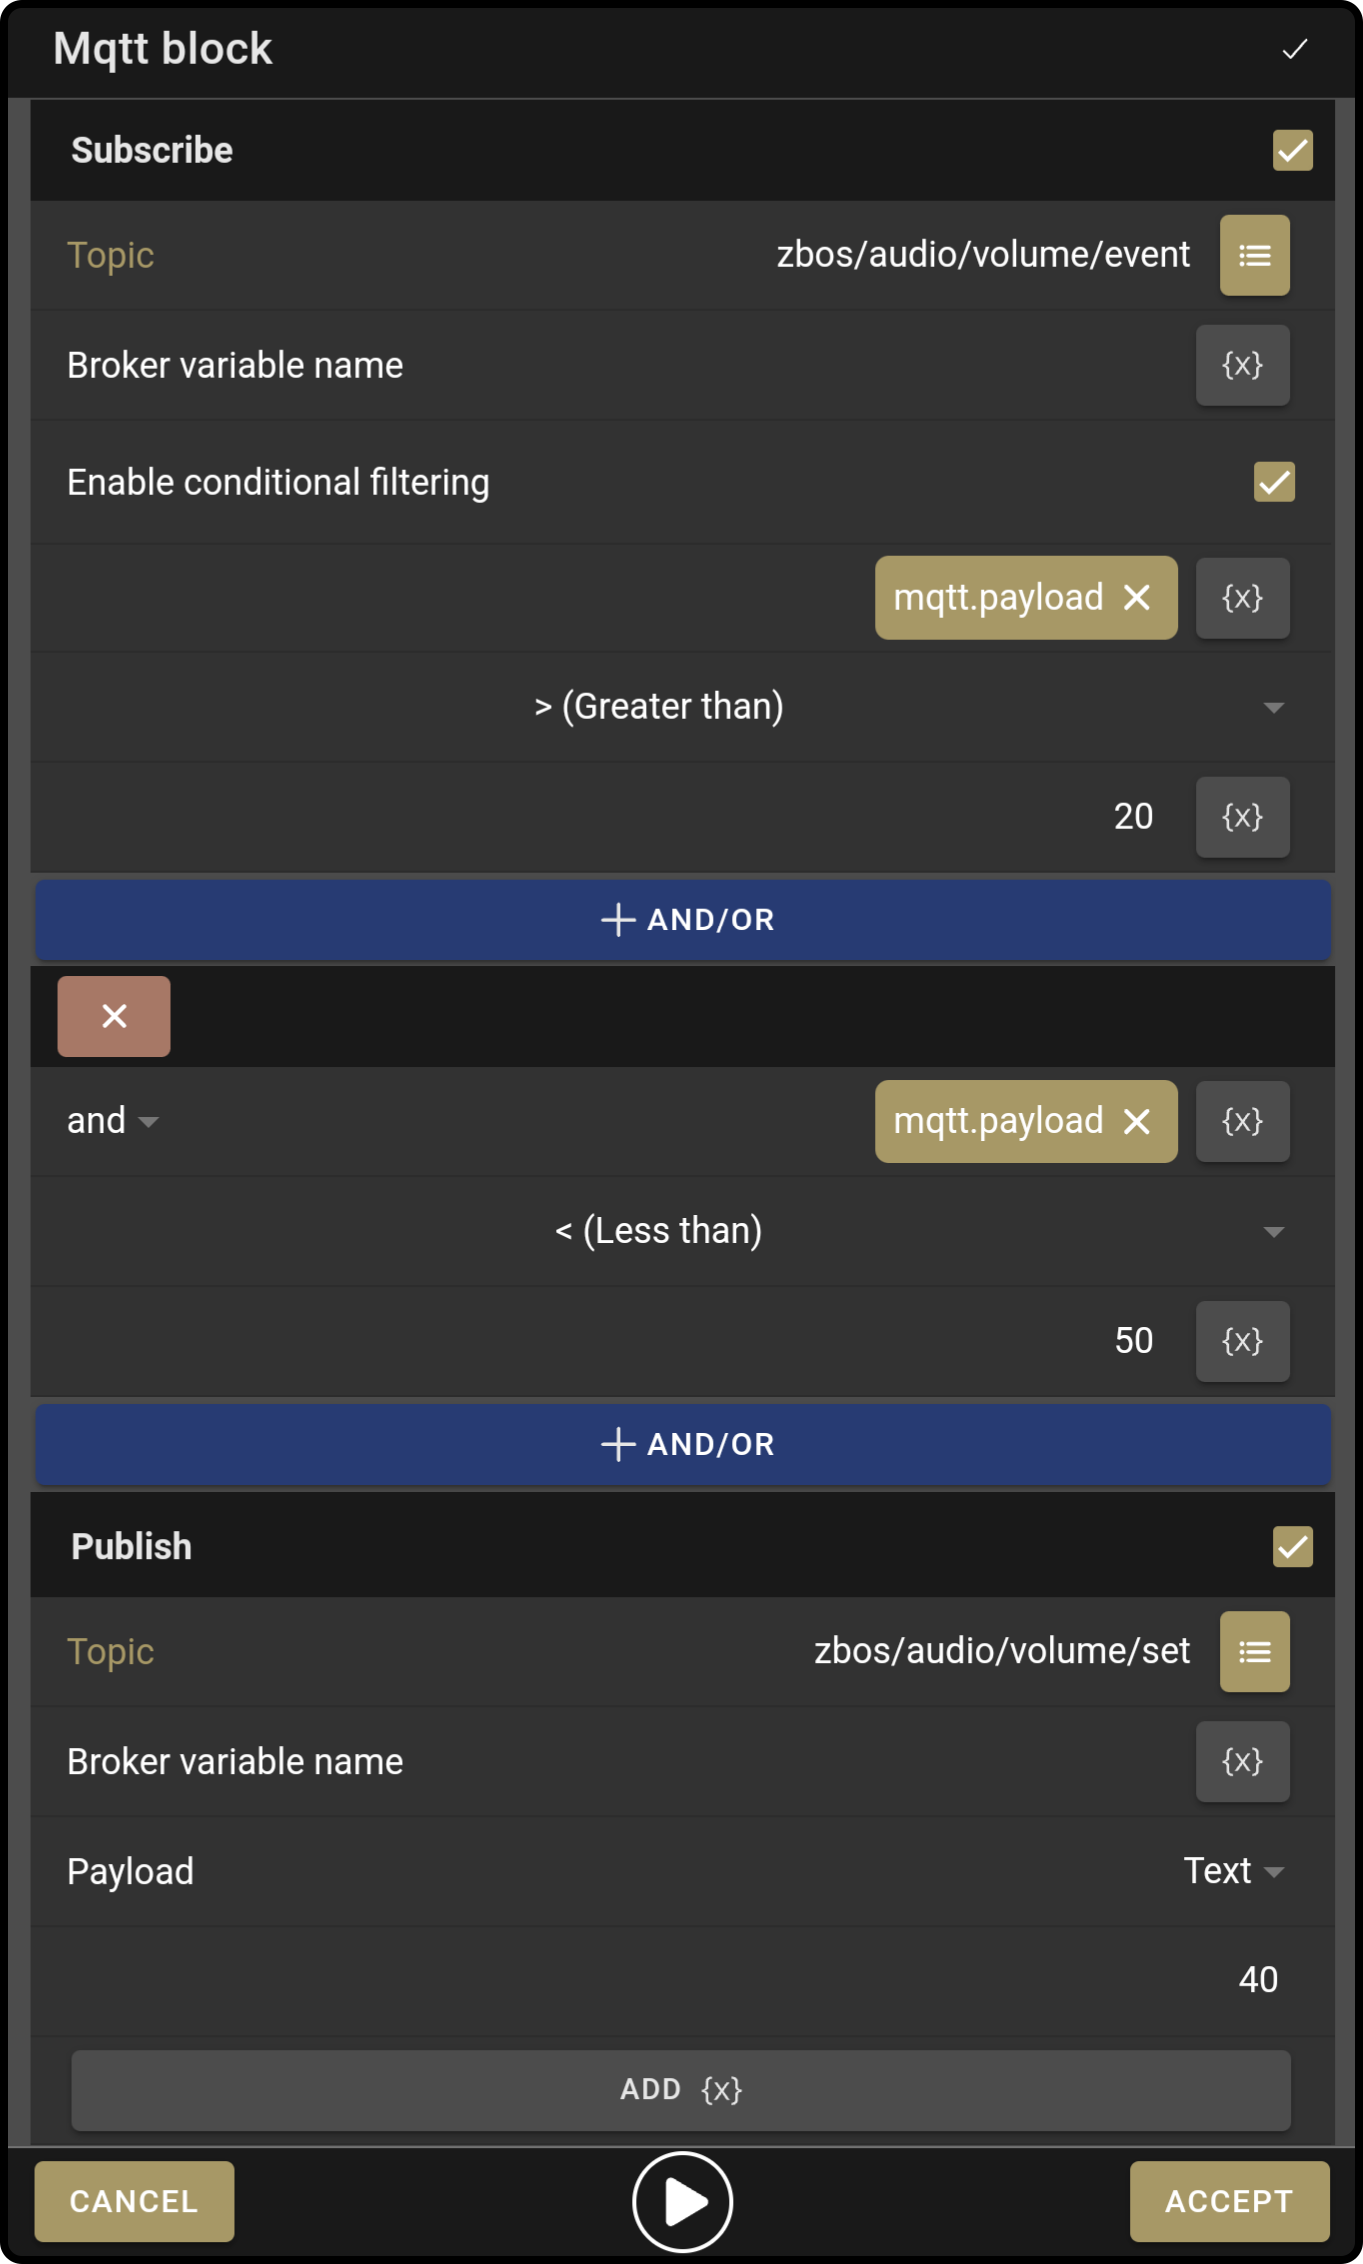
Enter the topic for the message for the composition to listen to (e.g. zbos/audio/volume/event)
Tap the icon
to view the list of available topics to interact with the ZBOS platform.
-
Enter the name of the mqtt connection to use (leave blank to use the broker on the device)
-
Toggle whether some conditions should be met before continuing with the composition after the event has been received
The options for the conditions for the block to proceed can be set using if-statement(s). For example:
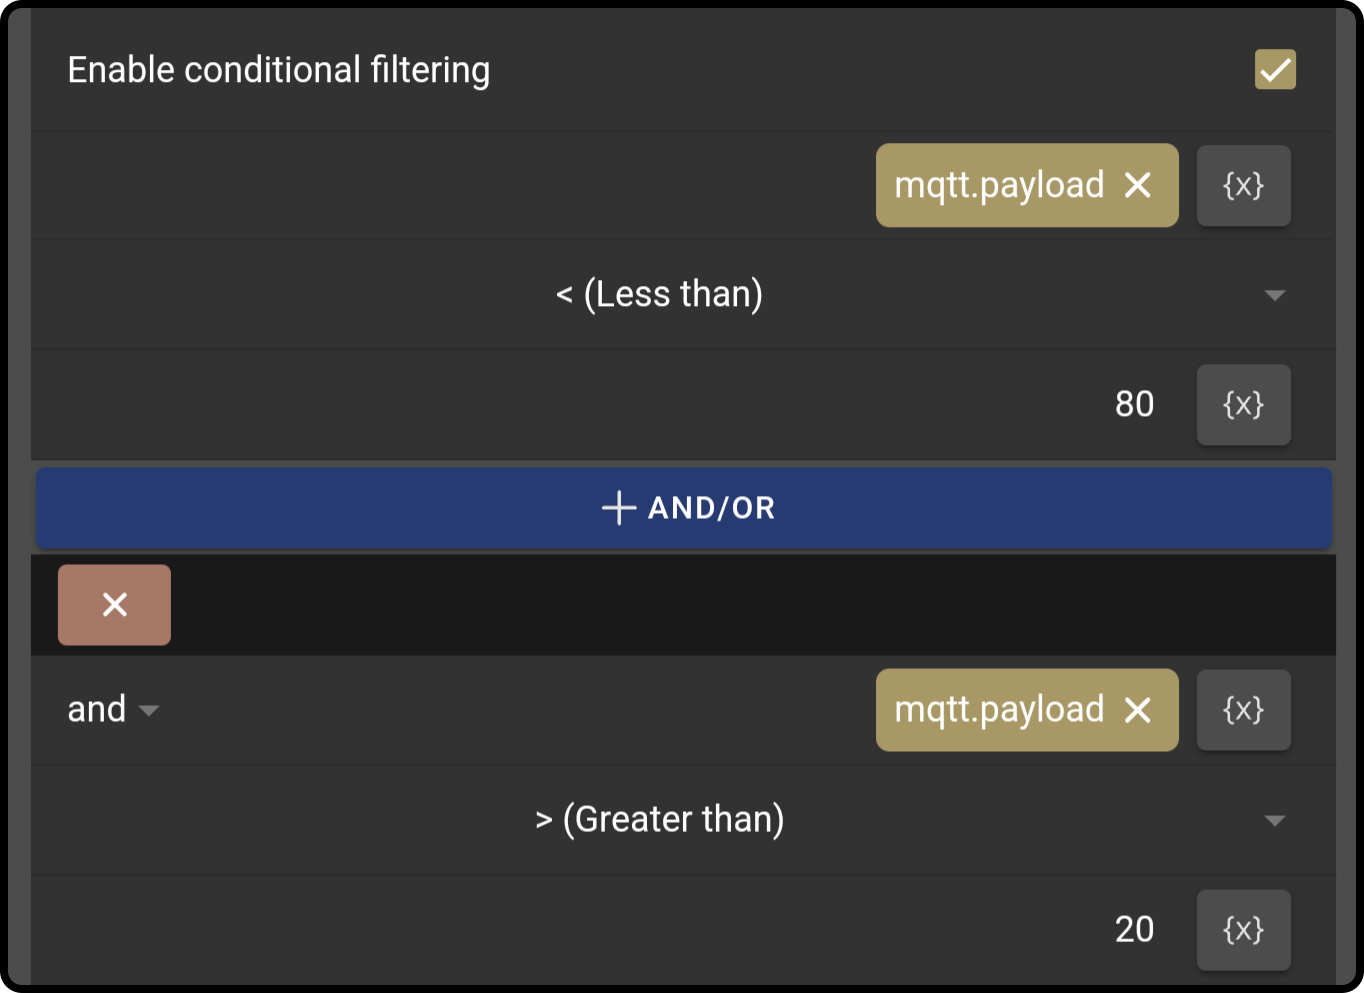
The condition of the response for the humidity is higher than 80 and lower than 20 could continue a composition stating a plant needs the water level checked.
-
Toggle whether a message should be published on the broker
-
Enter the topic for the message to be sent to the broker (e.g. zbos/audio/volume/set)
Tap the icon
to view the list of available topics to interact with the ZBOS platform.
-
Enter the name of the mqtt connection to use (leave blank to use the broker on the device)
-
Select the type of message to be sent to the broker (Text or JSON).
-
Enter the payload for the message (e.g. 60)
-
Tap the button 'Add (X)' to add a variable to the payload (Text only)
| Take care not to confuse the PUB/SUB tags of the message list. For example, the device will publish a message on topic zbos/audio/volume/event (PUB) where the block will SUBscribe to the topic. |
Usage
| The composition will listen for a message before sending the message. |
-
Listening to a topic
-
Tap the icon
to view a list of all available topics for the ZBOS platform.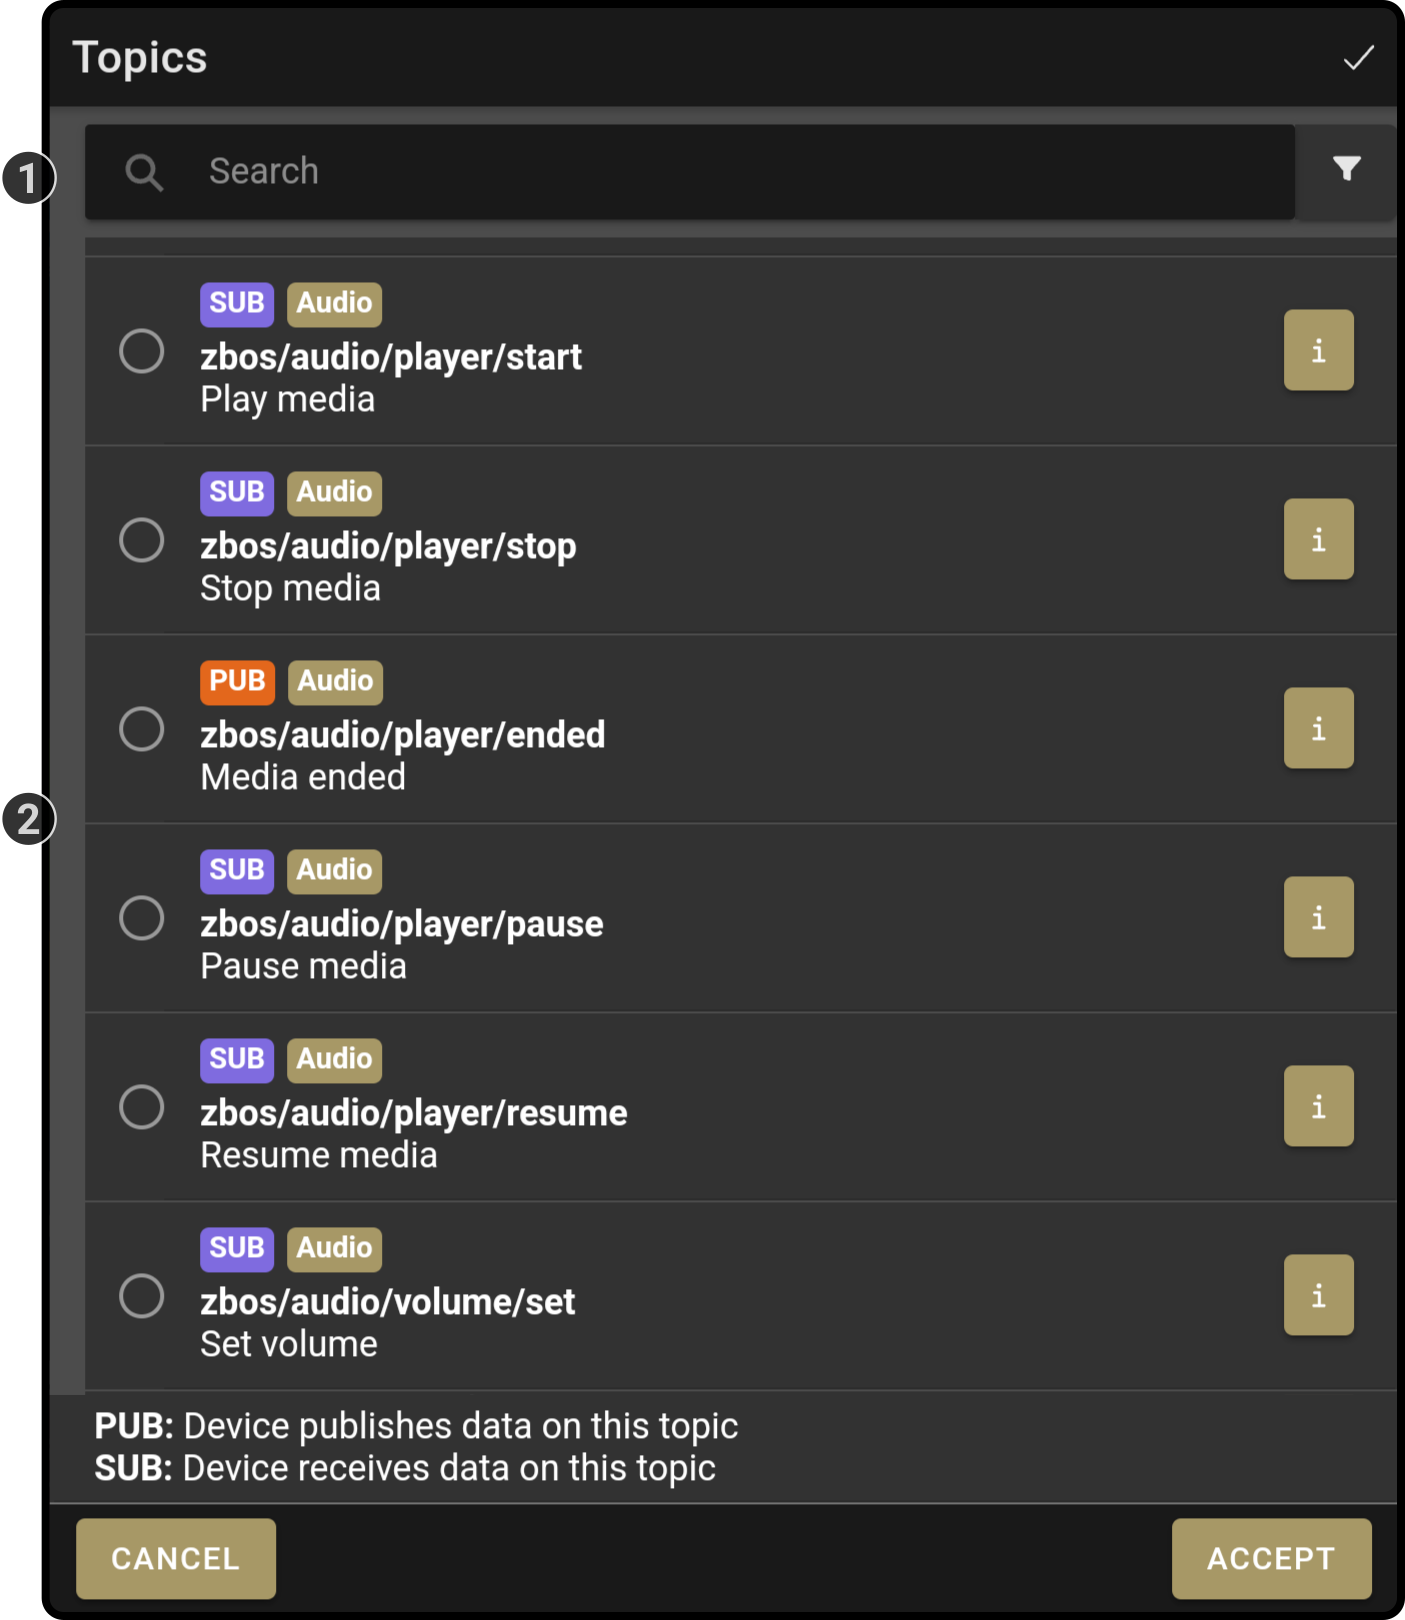
-
Enter an optional search term to filter the list.
-
Select the topic for the composition to listen to.
-
-
Set the payload for the message (See ZBOS RAIL MQTT API Reference for more information and examples of existing topics and payloads)
-
(Optional) Set the conditional requirements for the response
-
Sending a message on a topic
-
-
Tap the icon
to view a list of all available topics for the ZBOS platform.
-
Enter an optional search term to filter the list.
-
Select the topic for the composition to publish on.
-
-
Set the payload for the message (if required) (See ZBOS RAIL MQTT API Reference for more information and examples of existing topics and payloads)
Example
The following configuration could be used to set the volume to 60 using the mqtt block:
 Wait for QR code block
Function
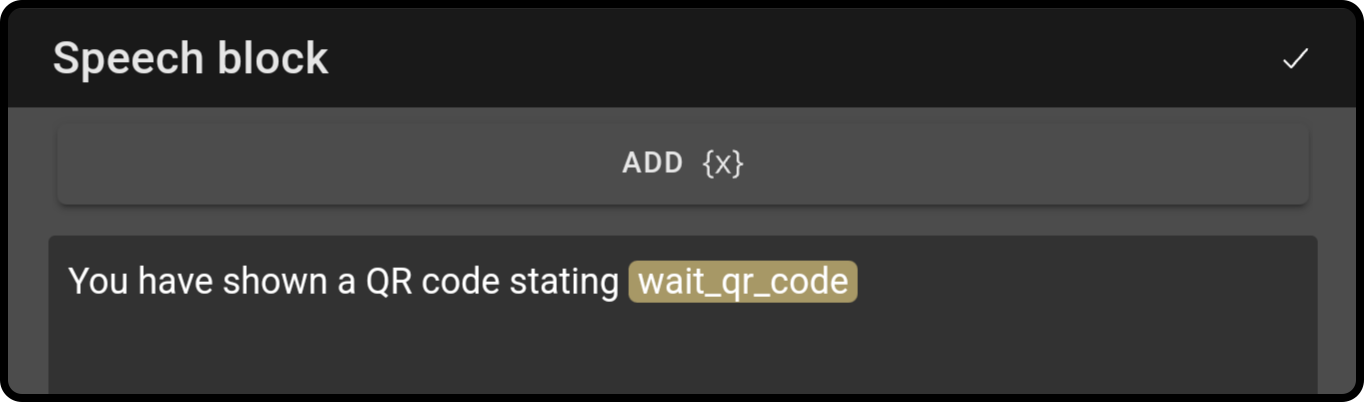
This block will make the device wait for a QR code before continuing with the composition. The scanned code can be used in the subsequent block using the "wait_qr_code" variable
Settings
-
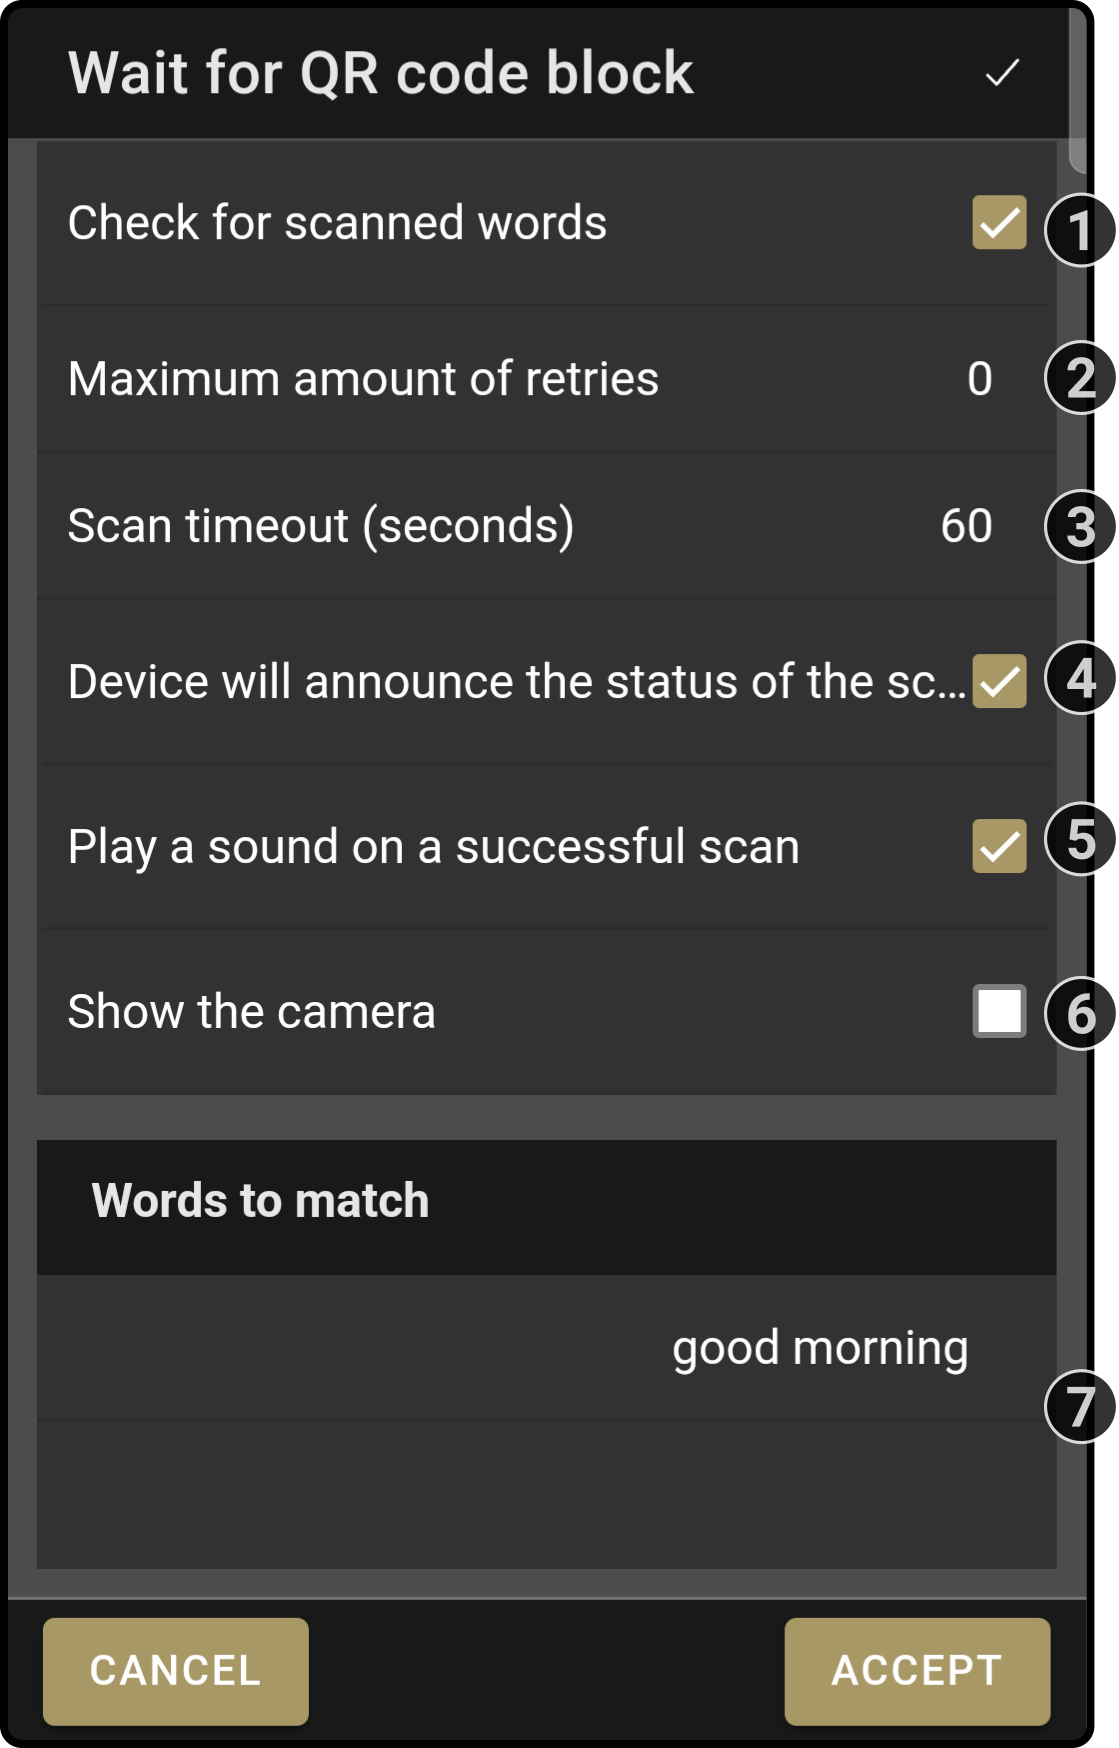
Check the option 'Check for scanned words' to restrict which values will be permitted to be used to continue the composition
-
Enter how many times the device should retry to scan the code (1)
For example, setting the amount of retries to '0' will only scan the code once. -
Enter how long the scan should wait for a code to continue if no qr code is shown
Enter a value of '0' for the device to keep waiting indefinitely -
Check the option 'announce the status' to have the device use the built-in speech options for announcements (i.e. 'I will now start a qr scan' and/or 'The scanned QR code is invalid, please try again')
-
Check the option 'Play a sound' to have the device play a 'beep' when a QR code has been scanned
-
Check the option 'Show the camera' to select have the device display the current camera while the QR scan is in progress
An additional or will be displayed after the scan to display if the QR code was valid. -
Enter the terms that must be matched for a 'valid' qr code (1)
(1): These options are only available if the option 'Check for scanned words' is checked.
| Not all options may be available on devices. For example, the option 'Show camera' will not be available devices without an external display. |
Usage
-
Using the block
Simply drag the block into the timeline and enter the proper configuration:

-
Retrieving the data
Enter the variable "wait_qr_block" to retrieve the information. For example, using the variable in a speech-block:
 Wait for monitoring event
Function
This block will make the device wait for a monitoring event to occur before continuing with the composition.
| The options for the specific sensor must be enabled in the Apps and config page. Only the option 'Enabled' needs to be checked, the setting cloud-sync is optional. |
Settings
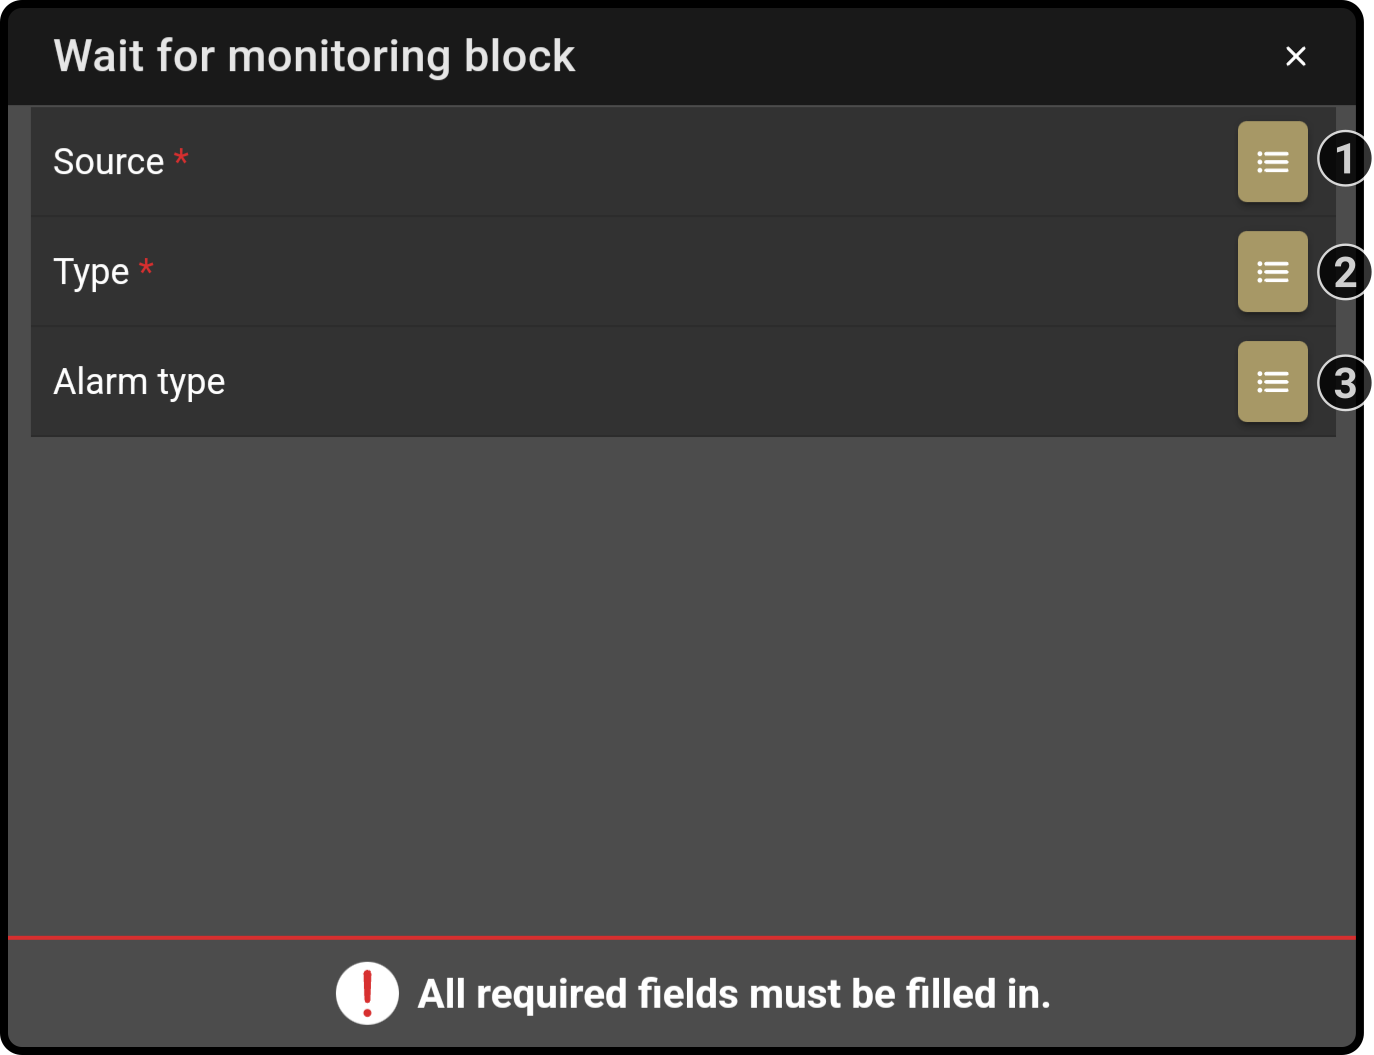
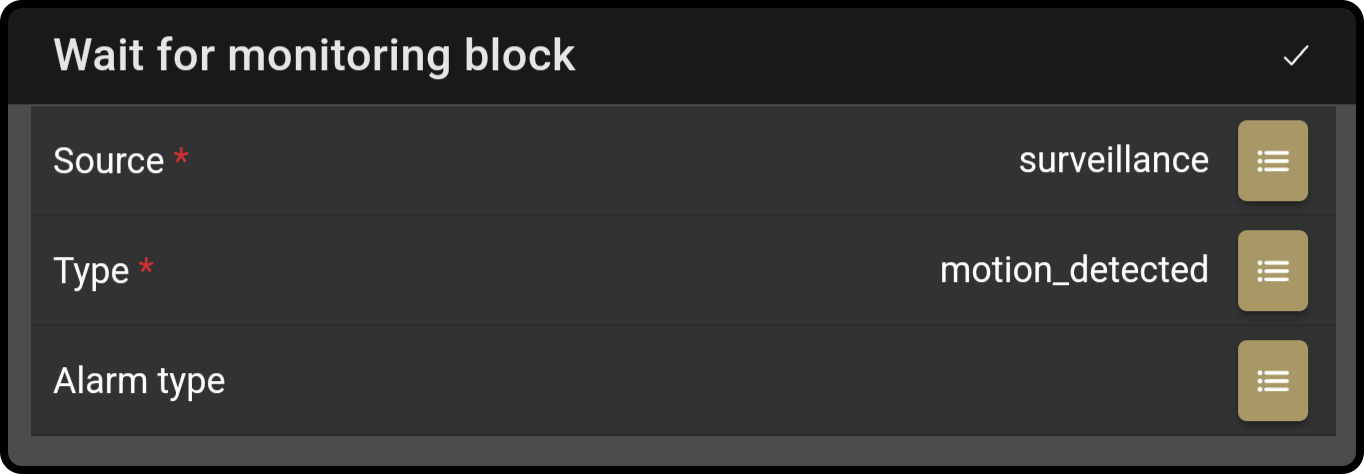
The following options are available for the block:
-
Enter the source of the monitoring event (i.e. the sensor/button pushed)
Alternatively, tap the icon to view the available sources registered for events in the cloud. -
Enter the type of event
Alternatively, tap the icon to view the available types of events registered for events in the cloud. -
Enter the type of alarm for the event (optional)
Tap the icon to view the available types of alarms registered to events.
|
The Monitoring page can be used to review the available options for a sensor or button. 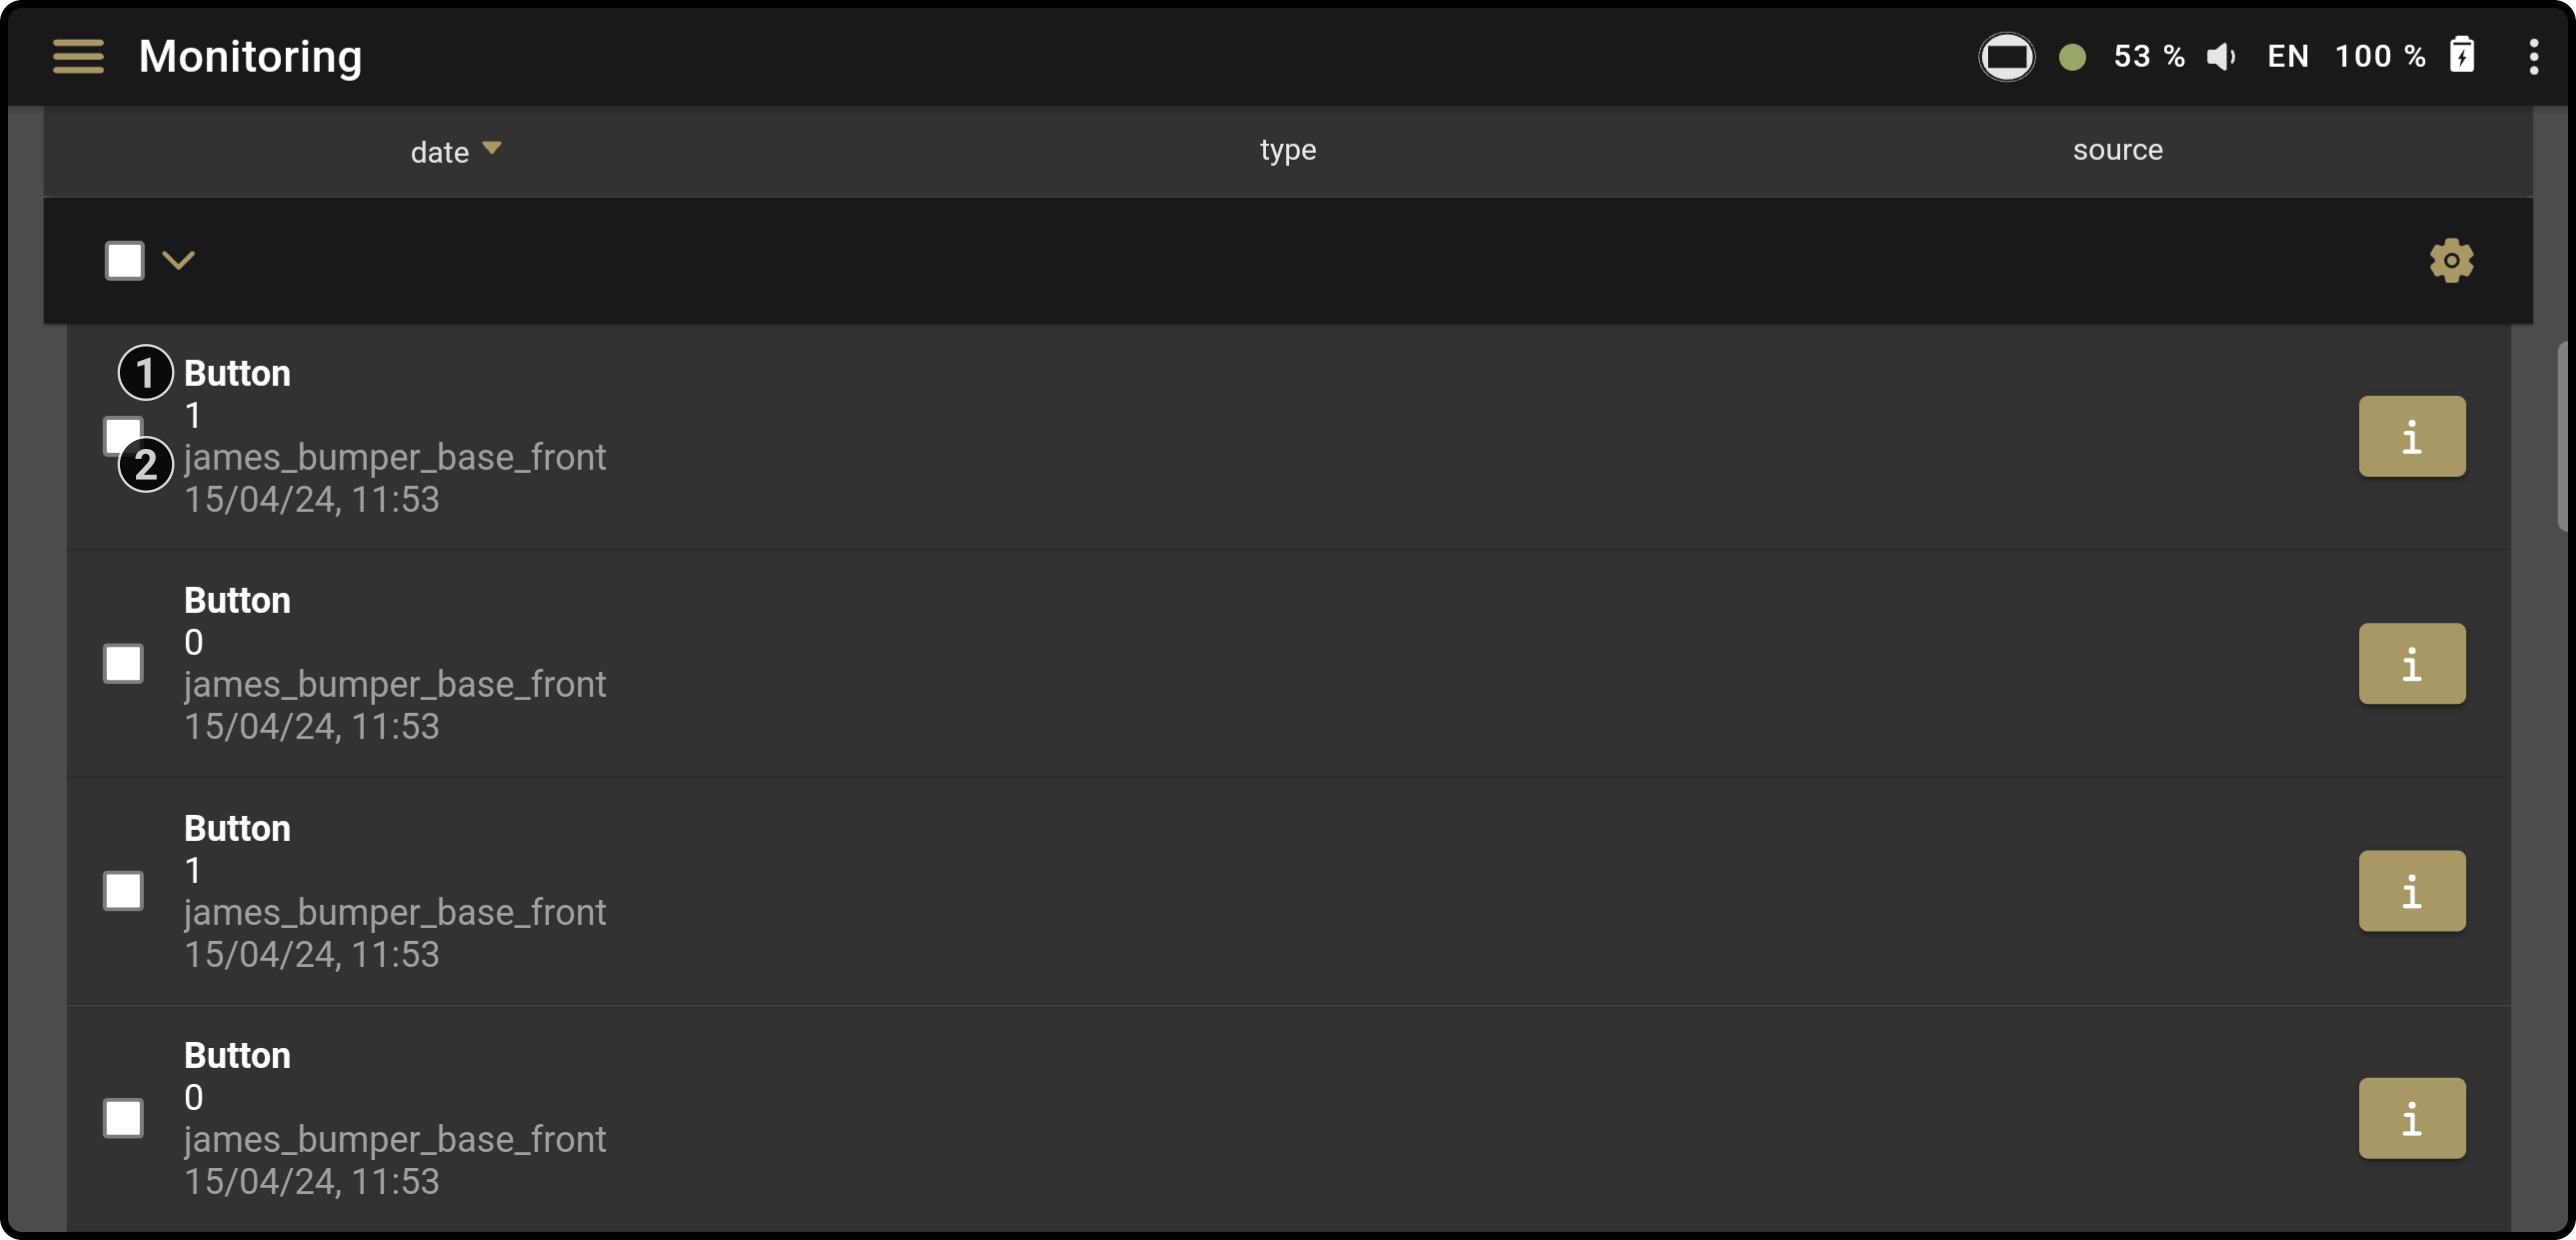
|
Usage
-
Using the block
Simply drag the block into the timeline and enter the configuration for a monitoring event. For example:
-
Retrieving the data
Enter the variable "wait_monitoring" to retrieve the information. For example, retrieving the source of a monitoring event:
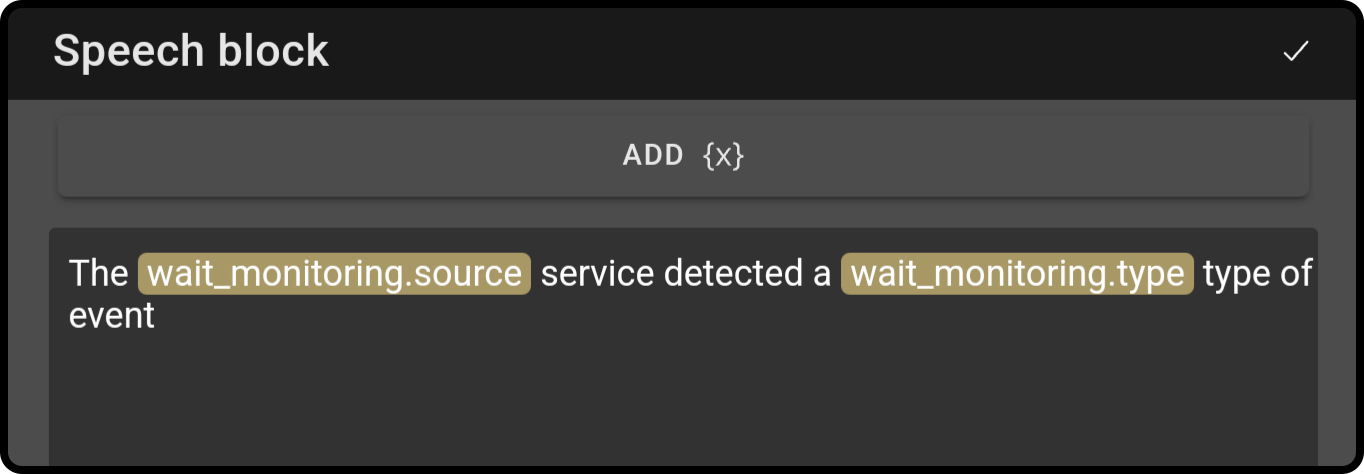
For additional information on the detected event, see the Monitoring page for more information.
 Mqtt connection block
Function
This block allows for the configuration of an external mqtt broker.
Settings
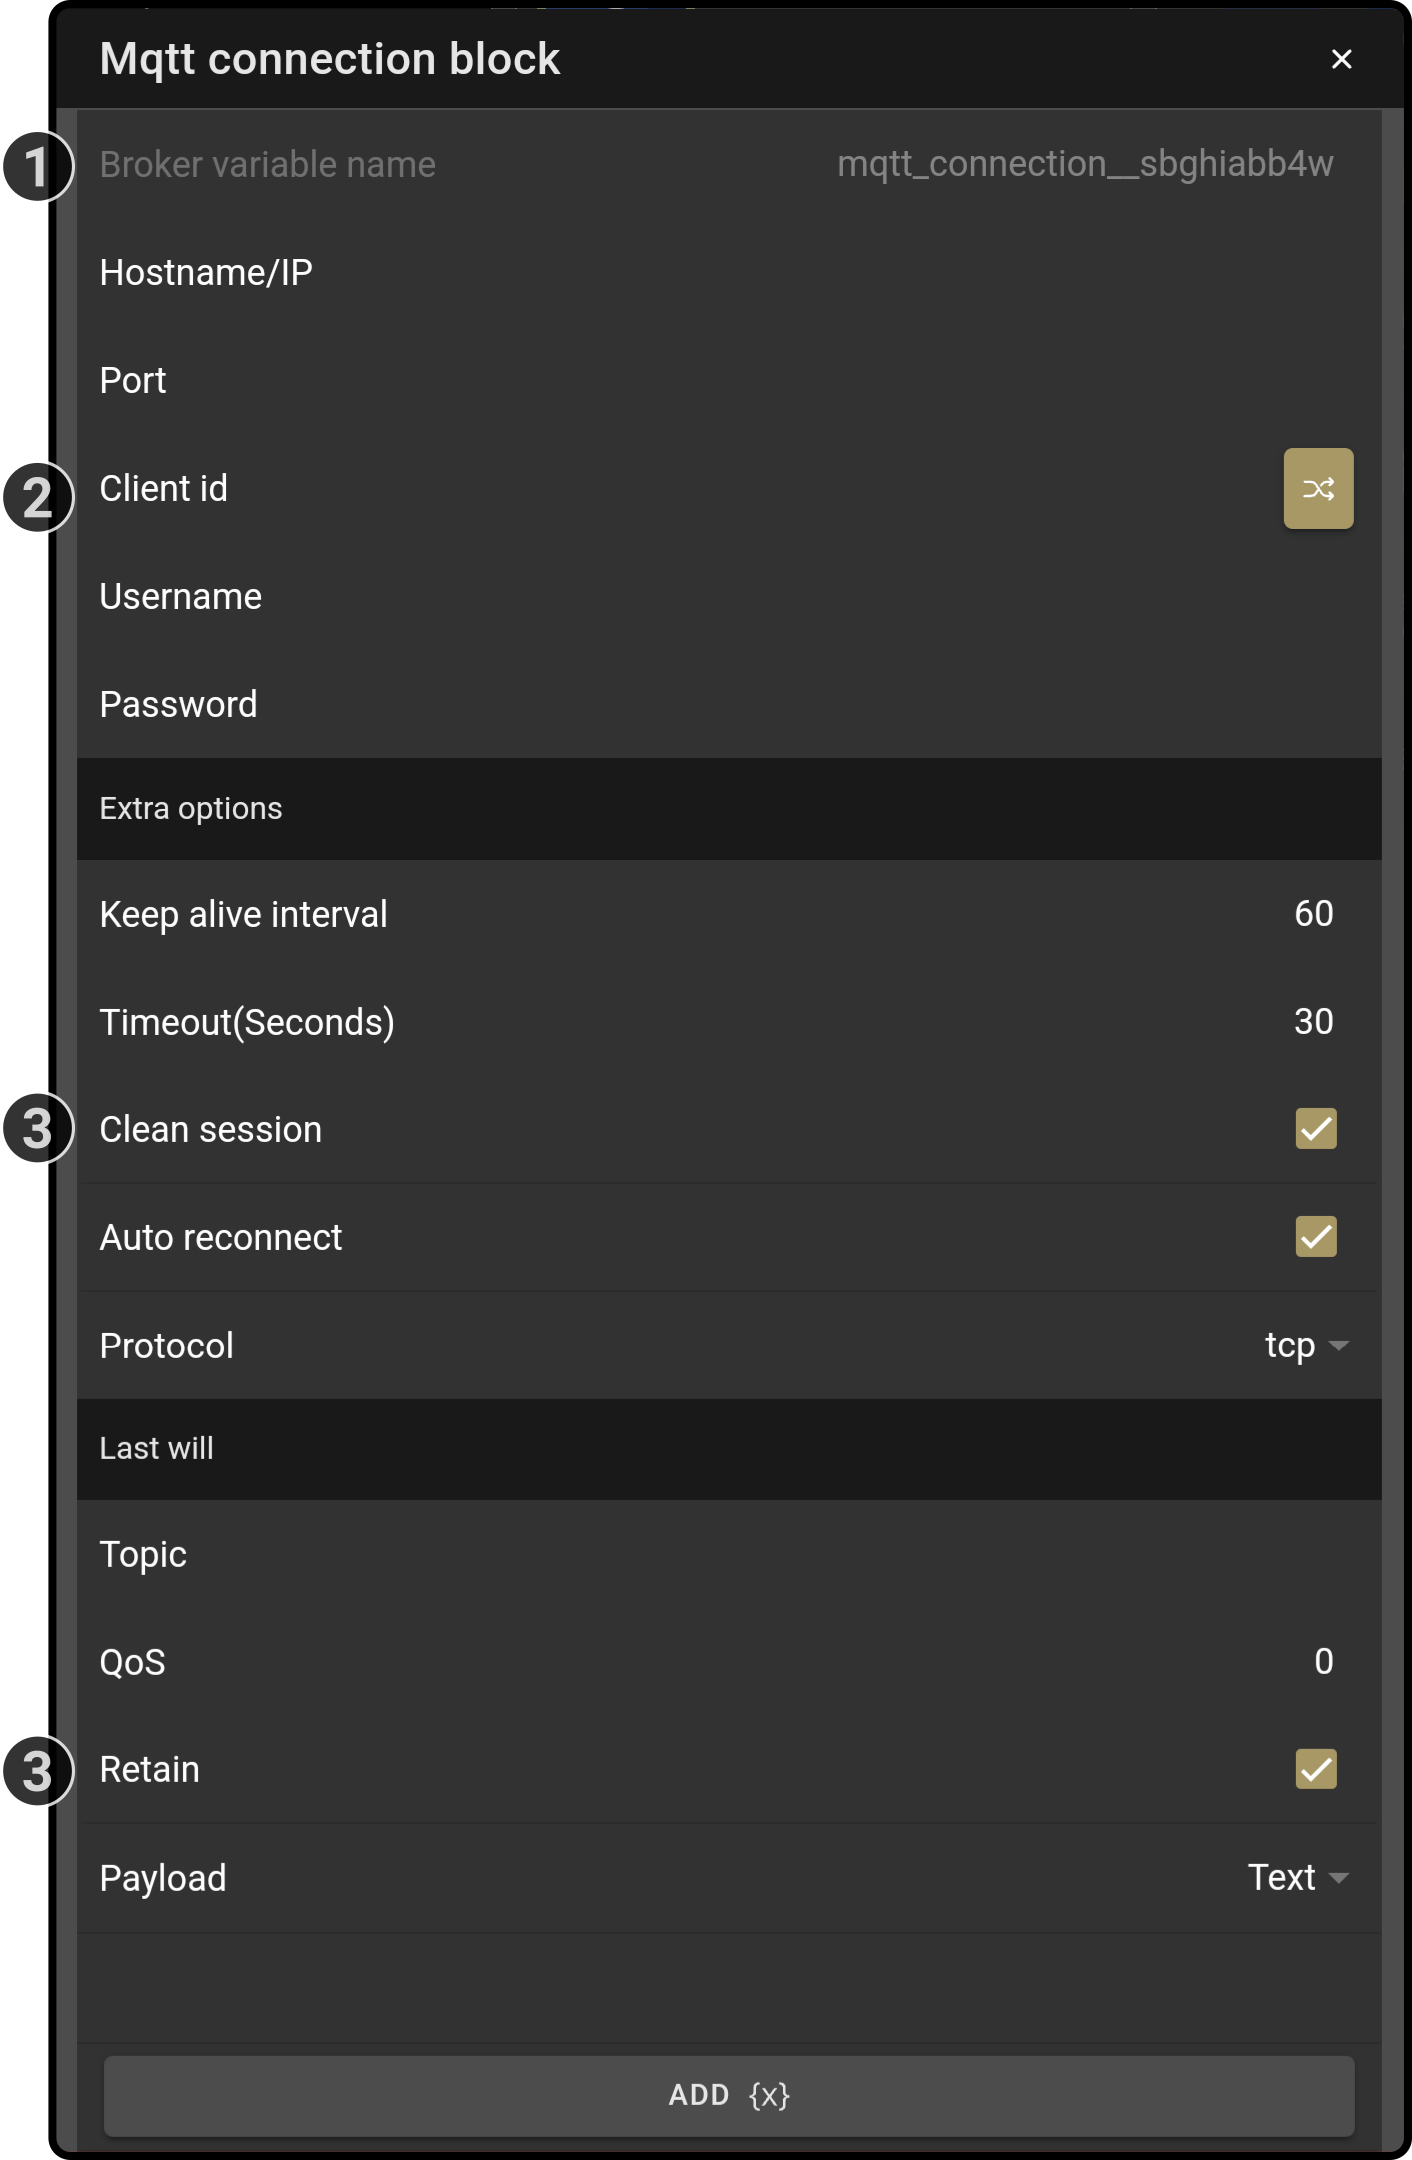
-
The name of the connection to be used in the mqtt block (1)
-
Enter the required connection information for the external mqtt broker
-
Optionally, enter the required extra options information for the external mqtt broker
-
Optionally, enter the message to be sent on the broker once the connection has completed.
(1): The name of the connection is auto-generated and cannot be changed manually.
Usage
-
Enter the information for the external mqtt broker
-
Enter the name of the broker in the field 'broker connection' in the mqtt block.
 Settings block
Function
This block allows getting, updating or resetting settings of the device.
Settings
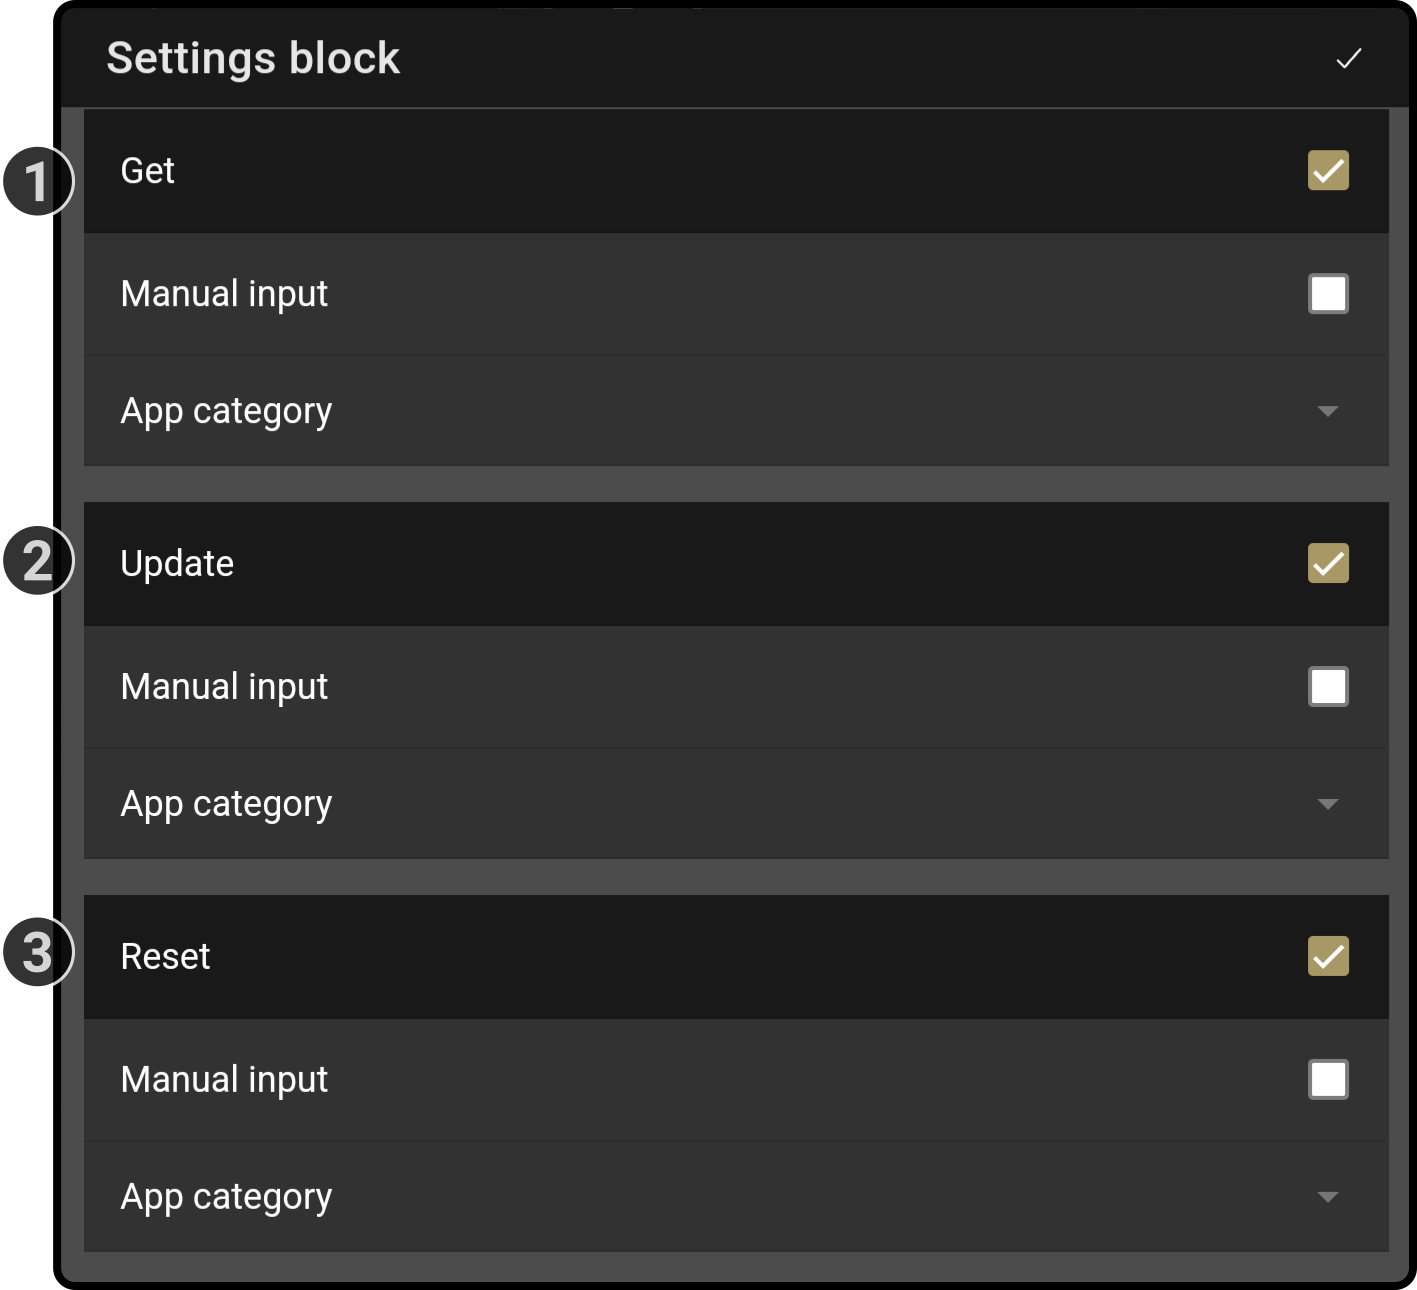
-
Toggle whether to get the current settings from the device.
-
Toggle whether the settings of the device should be updated.
-
Toggle whether settings should be reset.
The response from this block will be stored in the 'settings' variable.
Get device settings
The following settings are available for the settings:
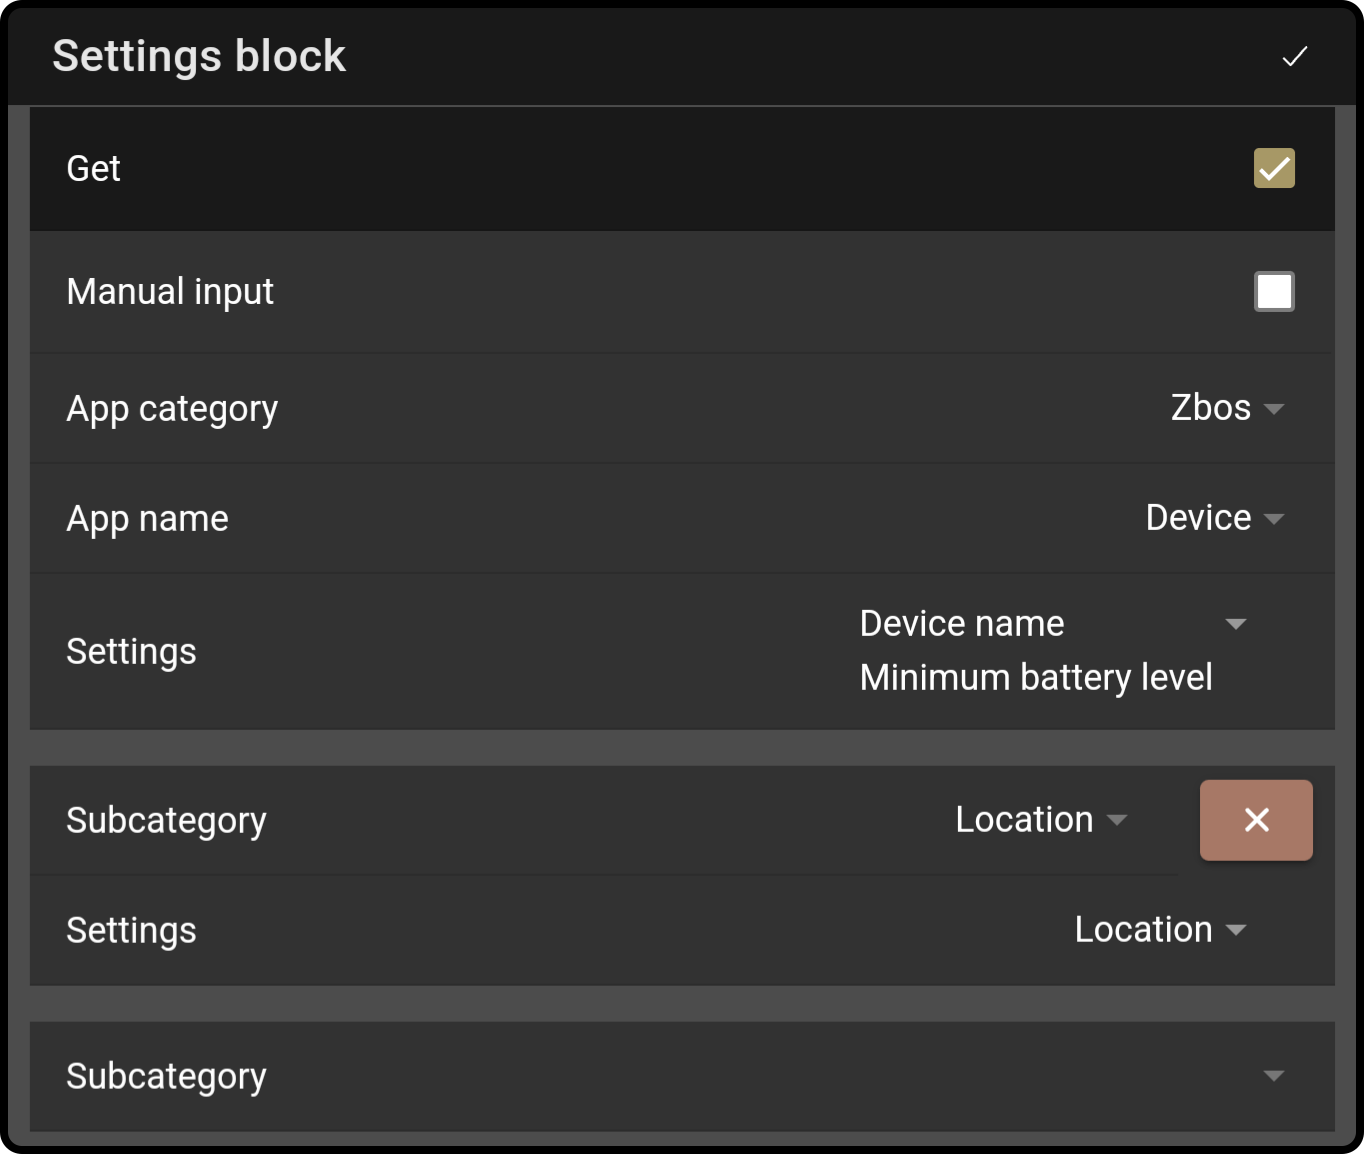
-
Select the app category and the app name(1) to get the current settings of the ZBOS device (see the Apps & Config page for more information).
-
Select which settings from the category should be included in the response.
-
Optionally, select which settings of the subcategories should be included in the response.
(1): Alternatively, the settings category can be entered manually.
|
A quick way to remember how to retrieve the data is to view the titles of the settings block: 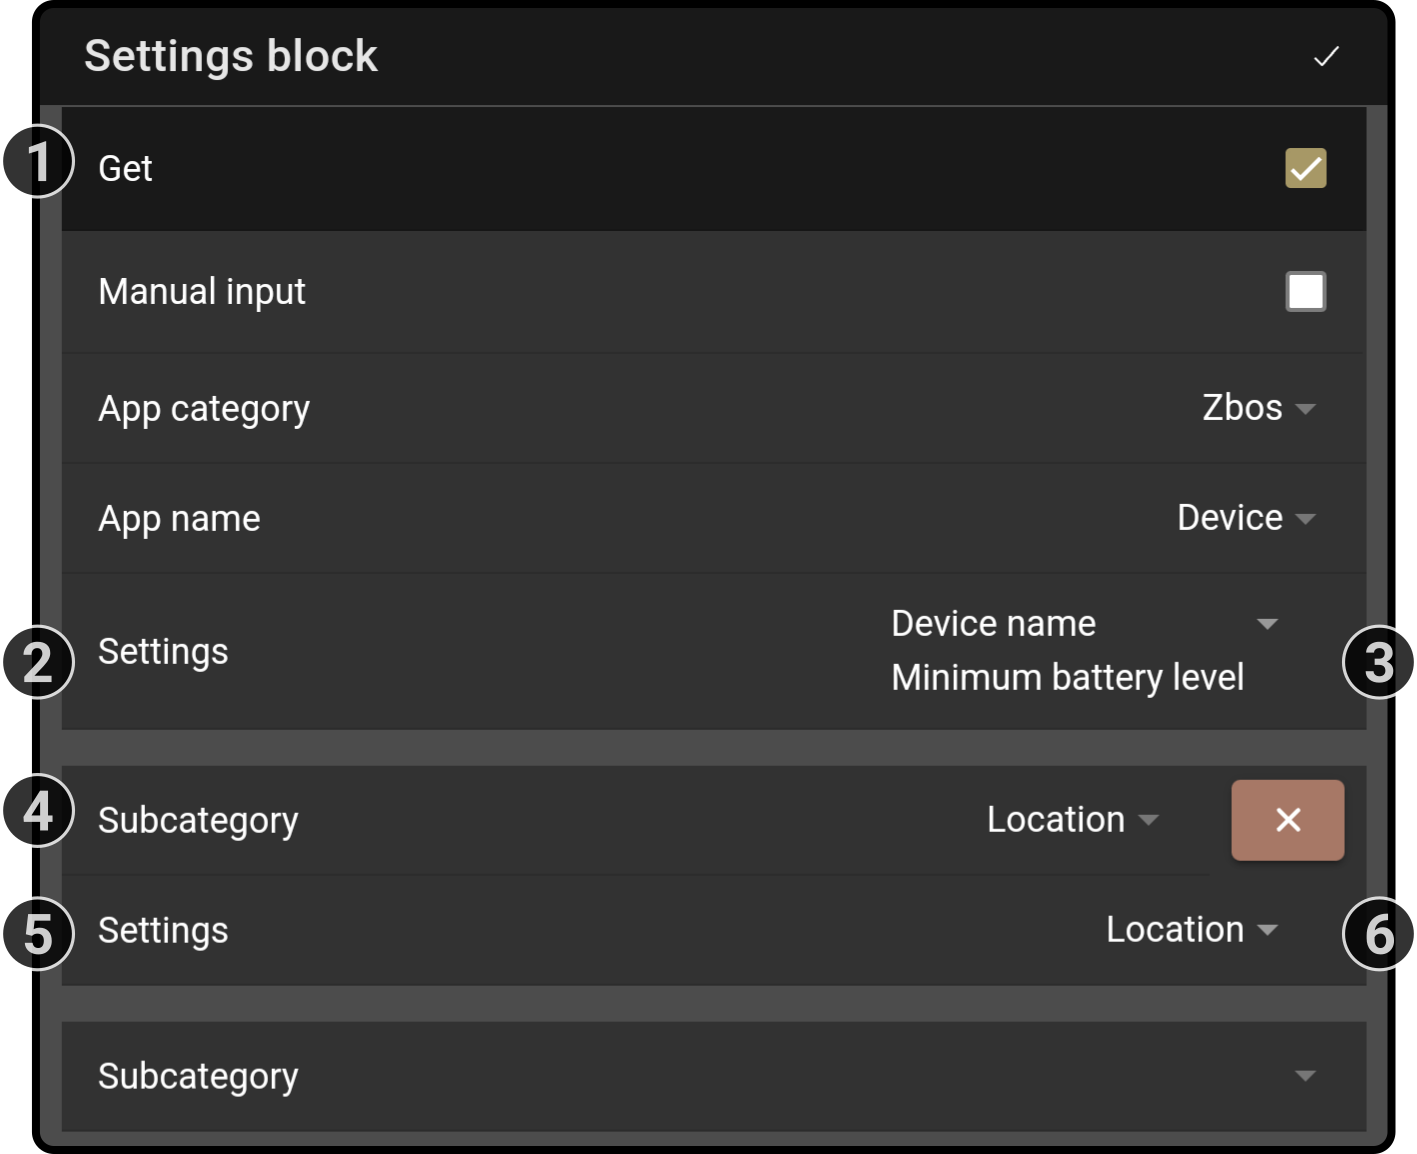
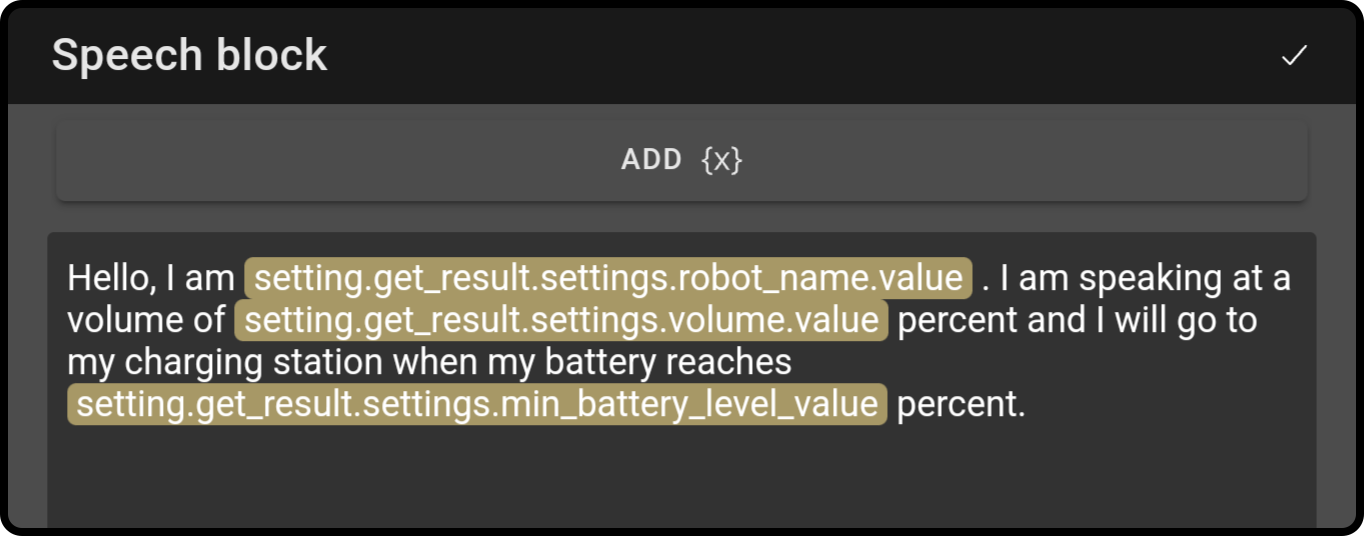
Use the variable {settings.1.2.3.value} to retrieve the value of the specified setting. For example:
{settings. Use the variable {settings.1.subcategories.4.5.6.value} to retrieve the value of the specified setting in a subcategory. For example: {settings. |
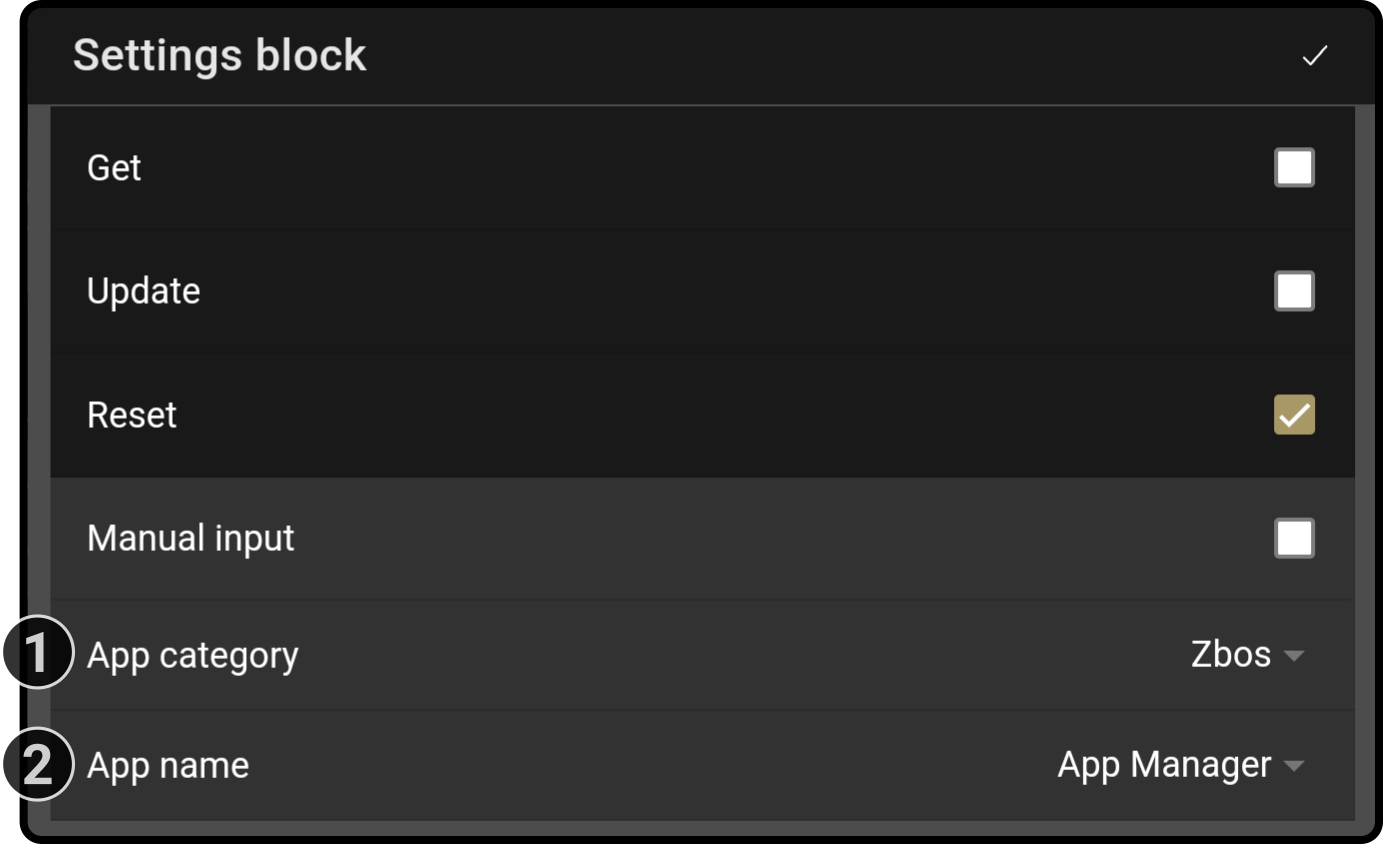
Update device settings
Check the option to 'Update' to view the following settings:
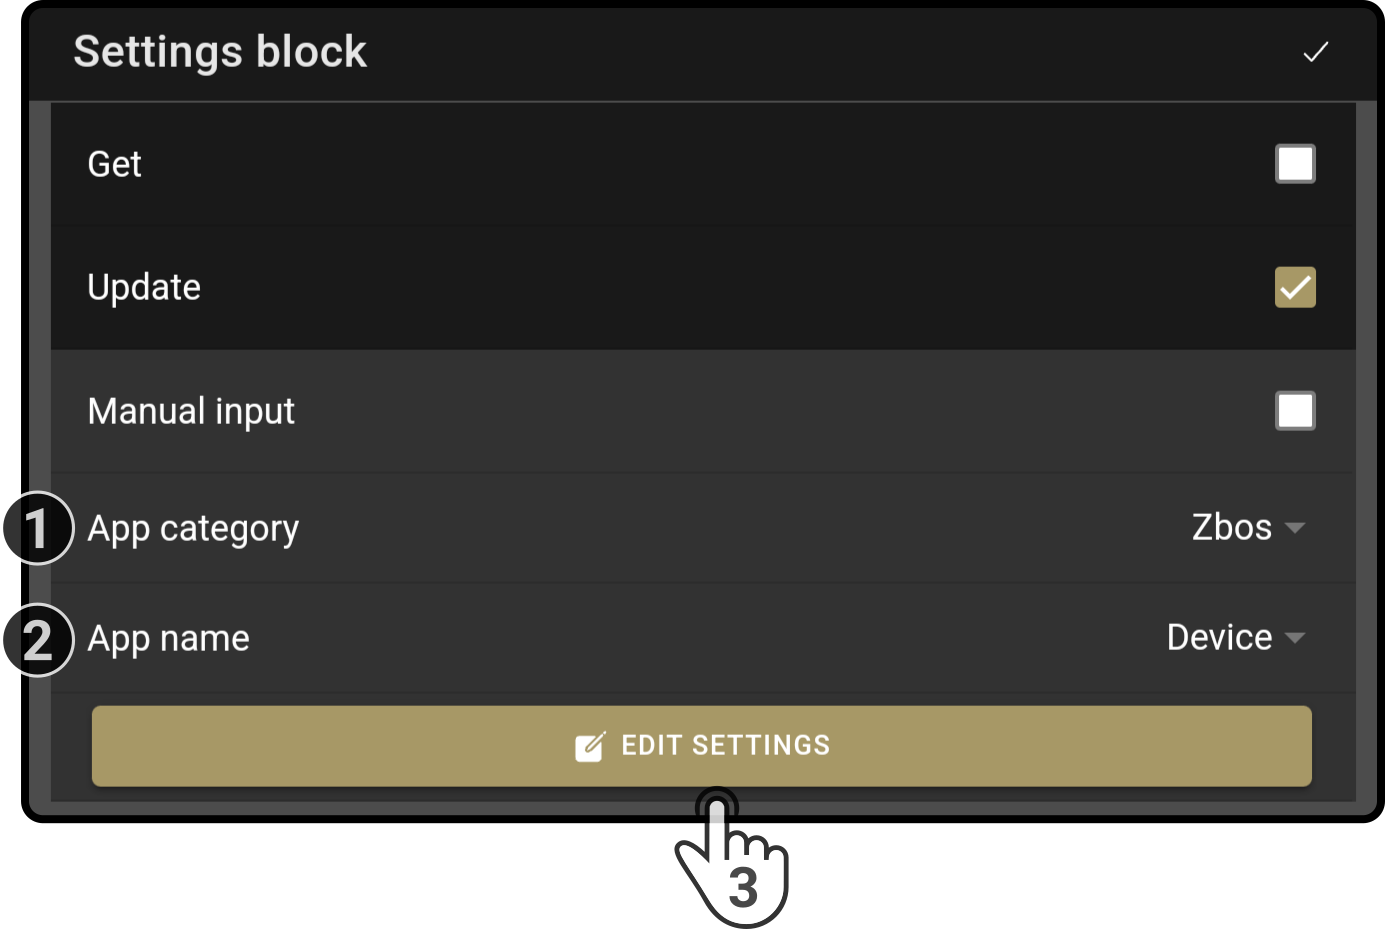
-
Select the app category(1) to display the app selection (e.g. 'zbos' category)
-
Select the app name(1)(2) in the selected category (e.g. 'device')
See the Apps & Config page for more information. -
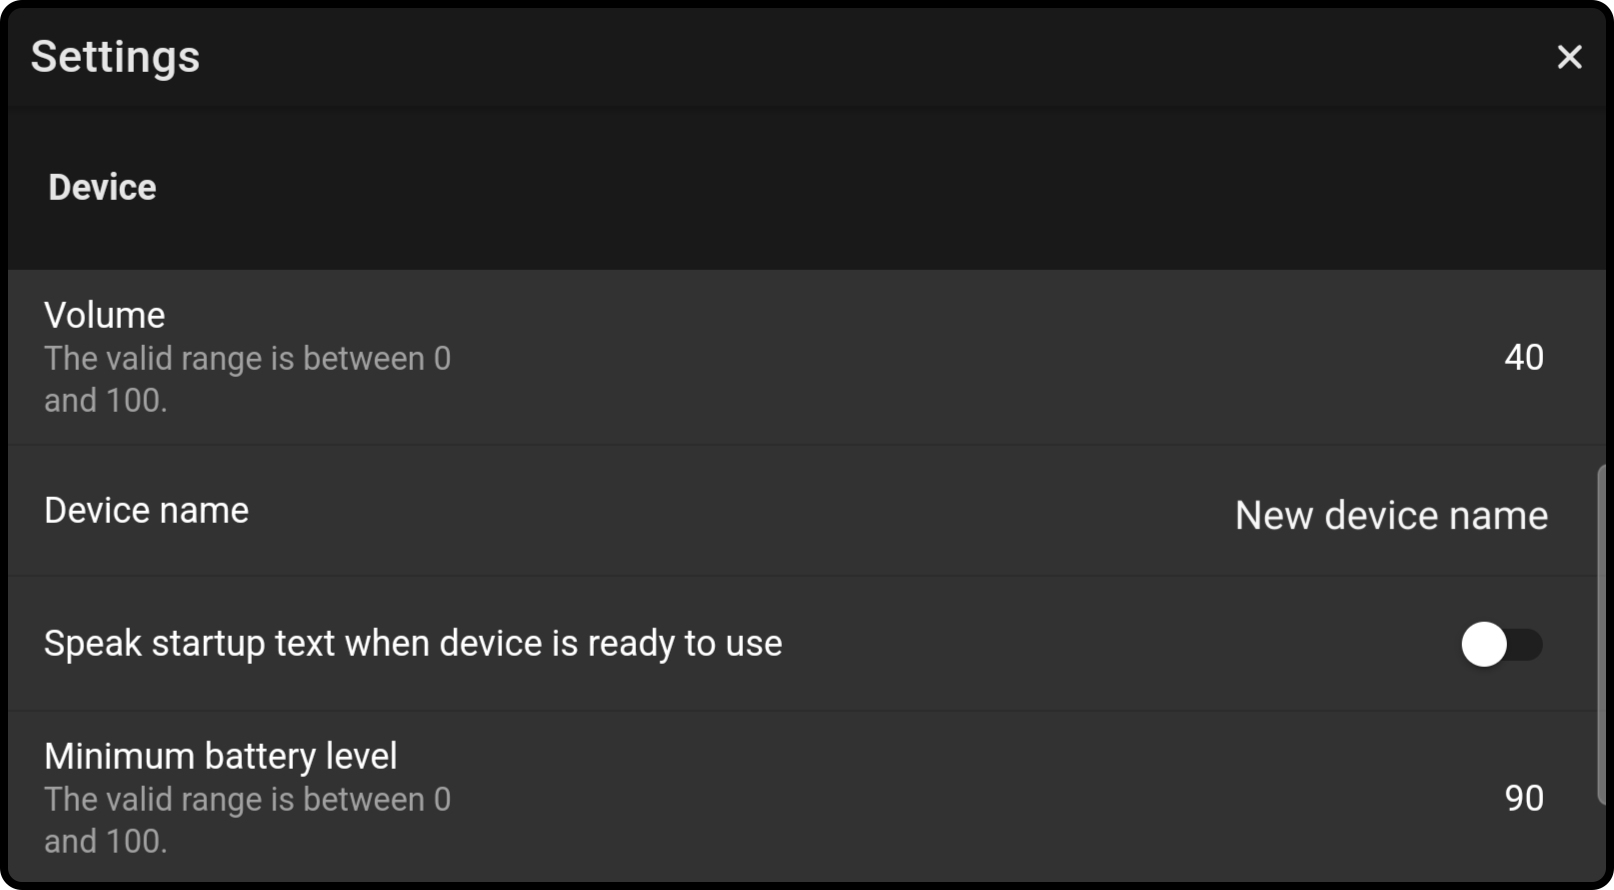
Tap the option 'Edit settings' to edit the settings.
For example, to edit the name of the device, edit the following setting:
(1): Alternatively, the settings category and category can be entered manually.
(2): The settings will be opened as soon as the app name has been selected.
The response from the update request can be retrieved using the variable {settings.update_result} ('true' or 'false').
Reset device settings
-
Select the app category and the app name(1)(2) to get the current settings of the ZBOS device (see the Apps & Config page for more information).
The response from the update request can be retrieved using the variable {settings.update_result} ('true' or 'false').
Examples
Example settings block
The following example will retrieve the 'low battery setting', 'volume' and 'robot name' setting from the device:
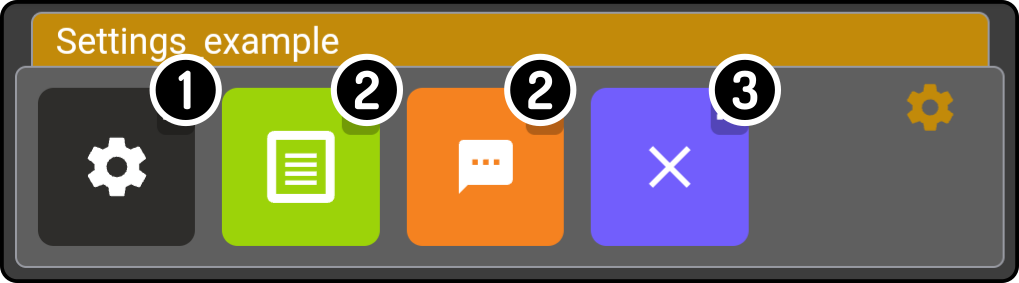
-
The settings block will retrieve the information (as a json) and store the retrieved data as the variable 'settings'.
The json contains the following information:
{ "get_result": { "label_key": "robot.robot_settings_name", "description_key": "Additional options for the tester", "settings": { "volume": { "value": "53", "default_value": "50", "type": "integer", "label_key": "robot.pref_title_volume", "range": { "min": 0, "max": 100 } }, "robot_name": { "value": "James", "default_value": "", "type": "string", "label_key": "robot.pref_title_robot_name" }, "min_battery_level": { "value": "40", "default_value": "30", "type": "integer", "label_key": "robot.pref_title_min_battery_level", "range": { "min": 0, "max": 100 } } }, "subcategories": {}, "orphaned": false } }
-
The text overlay and speech block will display the formatted information.
-
At the end of the composition, the information should no longer be shown.
This composition can be imported in the simple composer as reference.
-
Settings block configuration
The following configuration can be used to retrieve the settings from the device settings:
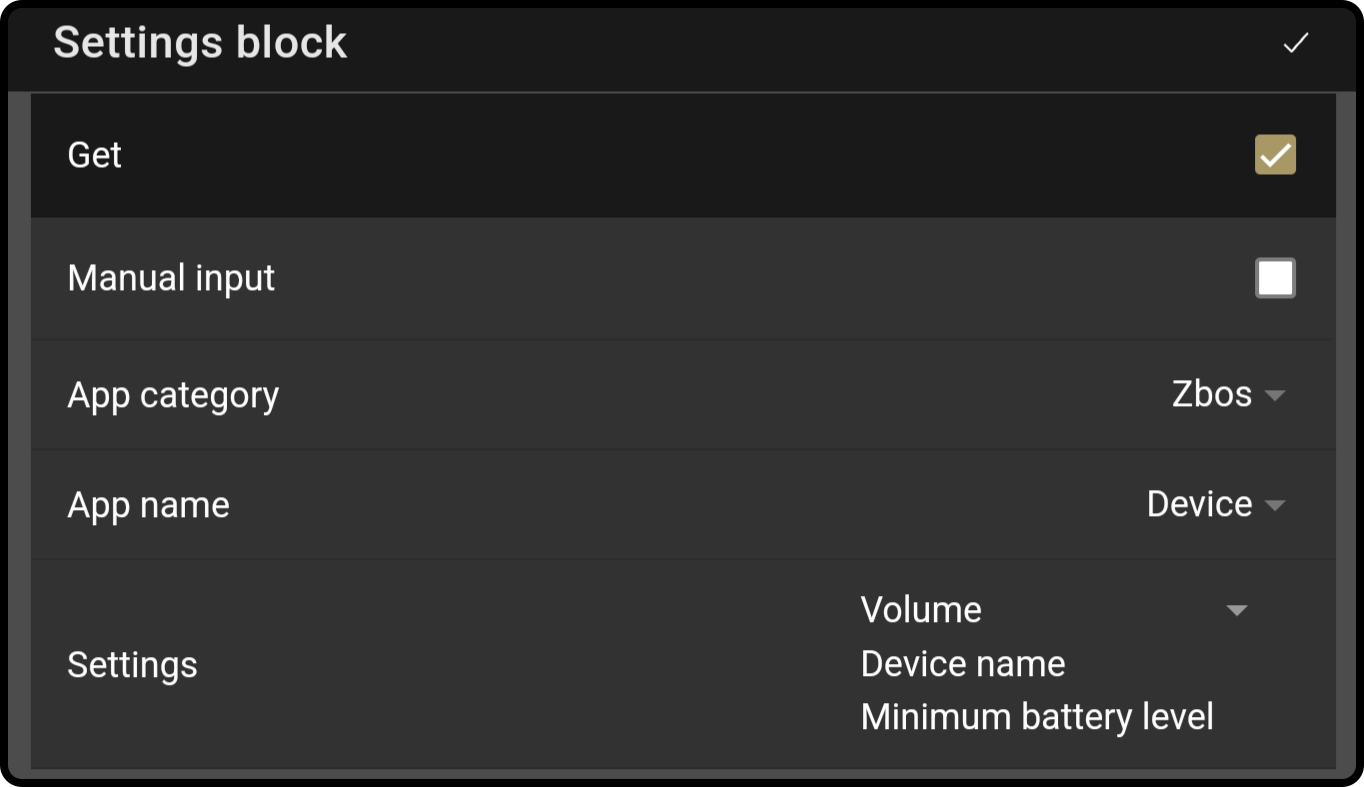
-
Select the app retrieve the general settings of the category.
-
Select which settings to be retrieved.
-
Speech / Text Overlay configuration
-
The following settings can be used to retrieve the specific information:
 Monitoring block
Function
The monitoring block can be used to generate a monitoring event using a composition.
Settings
The following settings are available for the monitoring block:
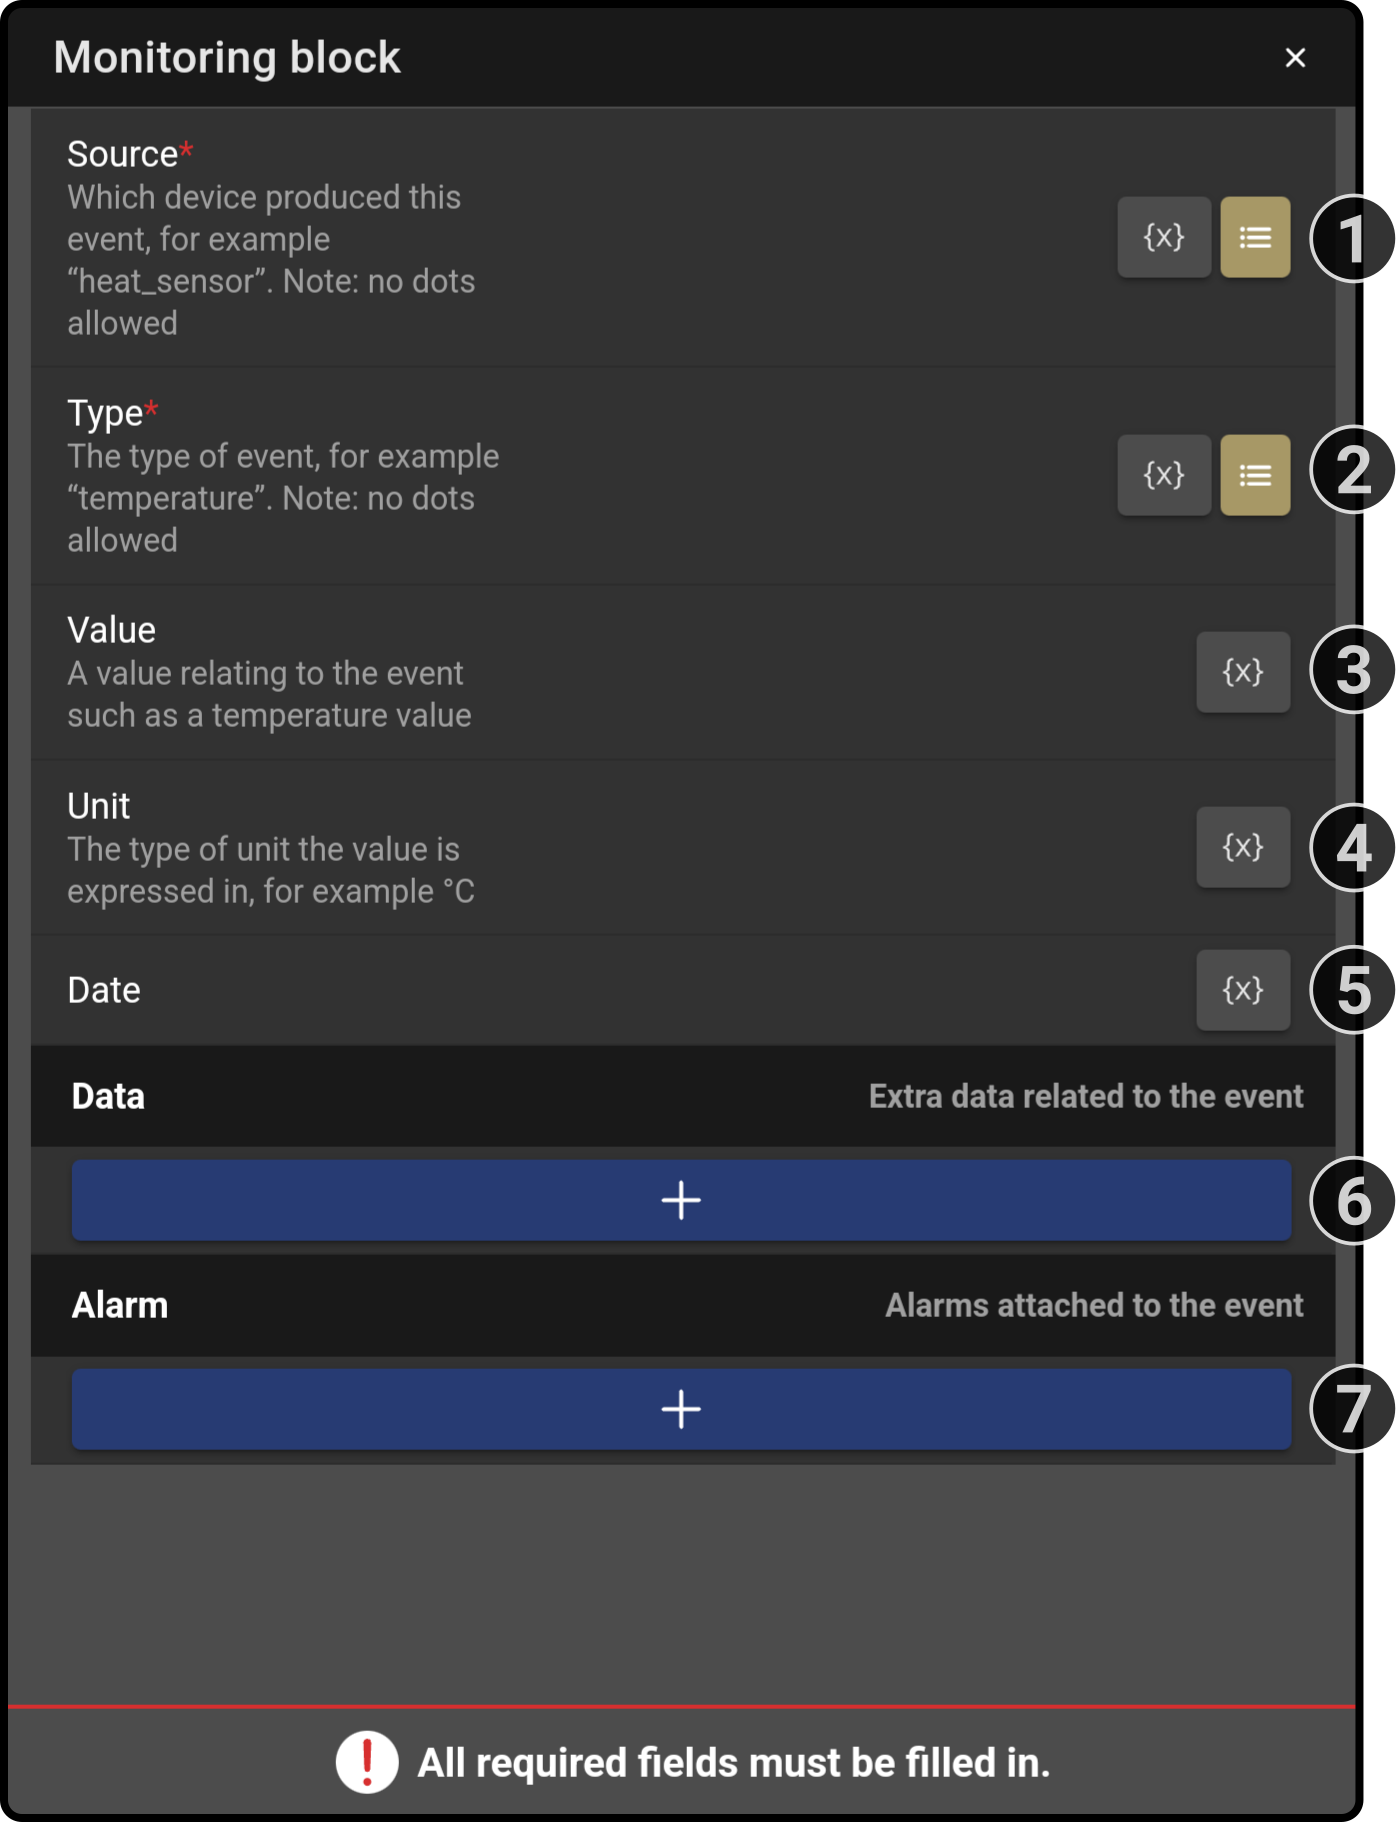
-
Enter a source for the event (e.g. a type of sensor or device) Tap the icon to view a list of sources of events already existing on the Cloud.
Tap the '{x}' button to add a variable to the source list. -
Enter a type of event (e.g. 'temperature' or 'button') Tap the icon to view a list of sources of events already existing on the Cloud.
Tap the '{x}' button to add a variable to the source list. -
Enter a value for the event (e.g. '20' in '20 °C' or '1' for a button press) Tap the '{x}' button to add a variable to the source list.
-
Optionally, enter a unit for the event (e.g. '°C' in '20°C') Tap the '{x}' button to add a variable to the source list.
-
Optionally, enter a date for when the event should be registered Tap the '{x}' button to add a variable to the source list.
-
Optionally, enter additional data the monitoring event
Tap the button to add an additional variable to the event:

-
Enter a key and value for the additional data.
-
Tap the '{x}' button to add a variable to the source list
-
Tap the button to remove the entry from the list
-
-
Optionally, select an alarm type to use
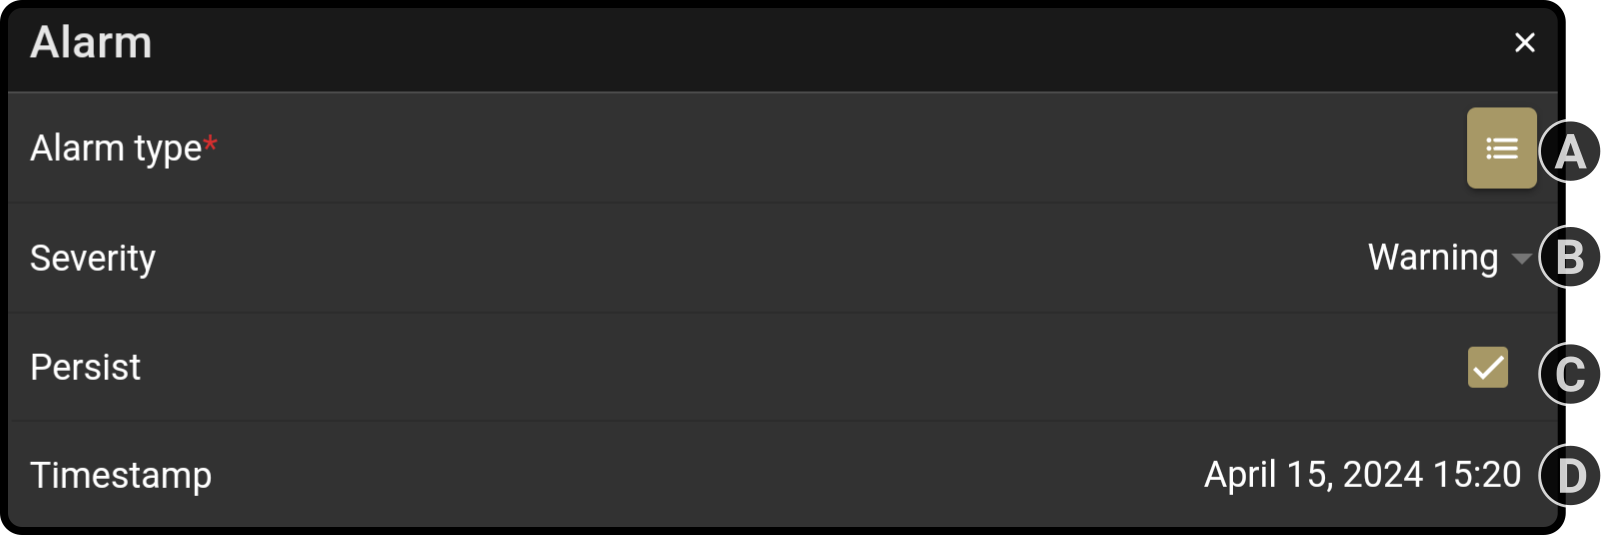
-
Enter an alarm type (by using the icon to view all available alarm types, typing a value or selecting a variablue using the '{x}' button)
-
Select the severity for the alarm (Emergency, Alert, Critical, Error, Warning, Notice, Information or Debug)
-
Optionally, toggle whether the alarm should persist
-
Optionally, select the date for the alarm
-
 Wait for webhook block
| This block can be used when the device if connected to internet. |
Function
The block will wait for an external event on the Cloud to continue the composition. For example, the webhook can be entered on any webbrowser and the device will continue with the composition.
| The webhook needs to be registered for use for the device. See the section Webhooks for more information. |
Settings
The following settings are available for the webhook block:

-
Enter the webhook manually or tap the button to view the webhooks registered to the user.
Tapping the button will display the following options:

-
If necessary, enter a search term to filter the list of available webhooks
-
Tap the webhook to be used in the name and ID field
-
Tap the button 'Accept' to apply the webhook
-
-
Enter the ID for the webhook manually or use the in the name setting to enter the value Leave this entry blank to have the device respond to any valid webhook registered to the device.
-
Optionally, enter a timeout for the block (i.e. the composition will continue after the timeout, even if no webhook event was received).
| The user needs to be logged in to view the list of webhooks registered to the user. |
 Open web page block
Function: Display a web page on the tablet of the device
Available settings:
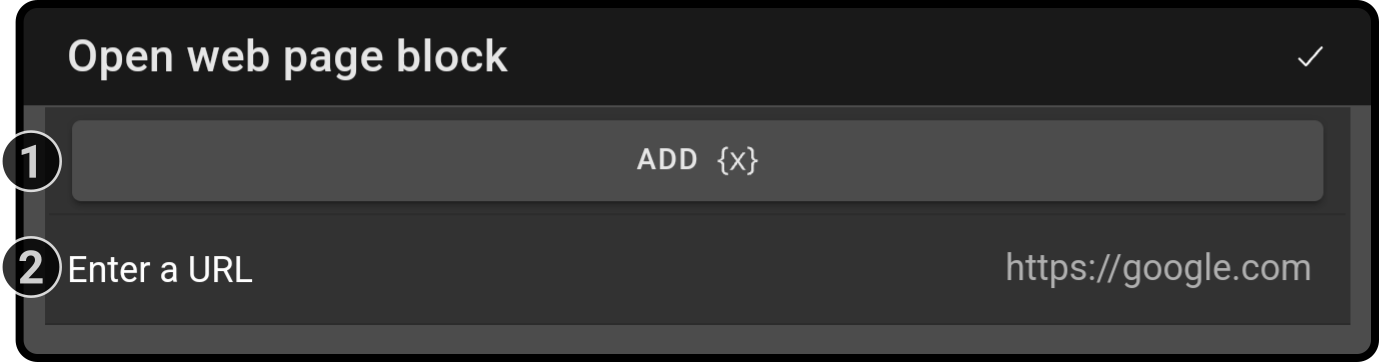
-
Enter the URL for the website to be shown on the device Tap the button 'Add {x}'' to add a variable to the text field.
-
Toggle the option 'Duration' to have the image be shown for a set period of time.
-
Set the time for the overlay to remain on screen.
-
Toggle the option 'Blocking' to prevent the composition from continuing until the set time has elapsed.
| This block is by default set to be non-blocking, meaning the composition will continue while the website is being shown. |
 Wait for face block
| This block requires the app ZBOS Face Recognition to be installed on the device. |
Function
This block will pause the composition until a human face is (not) detected by the main camera.
Settings
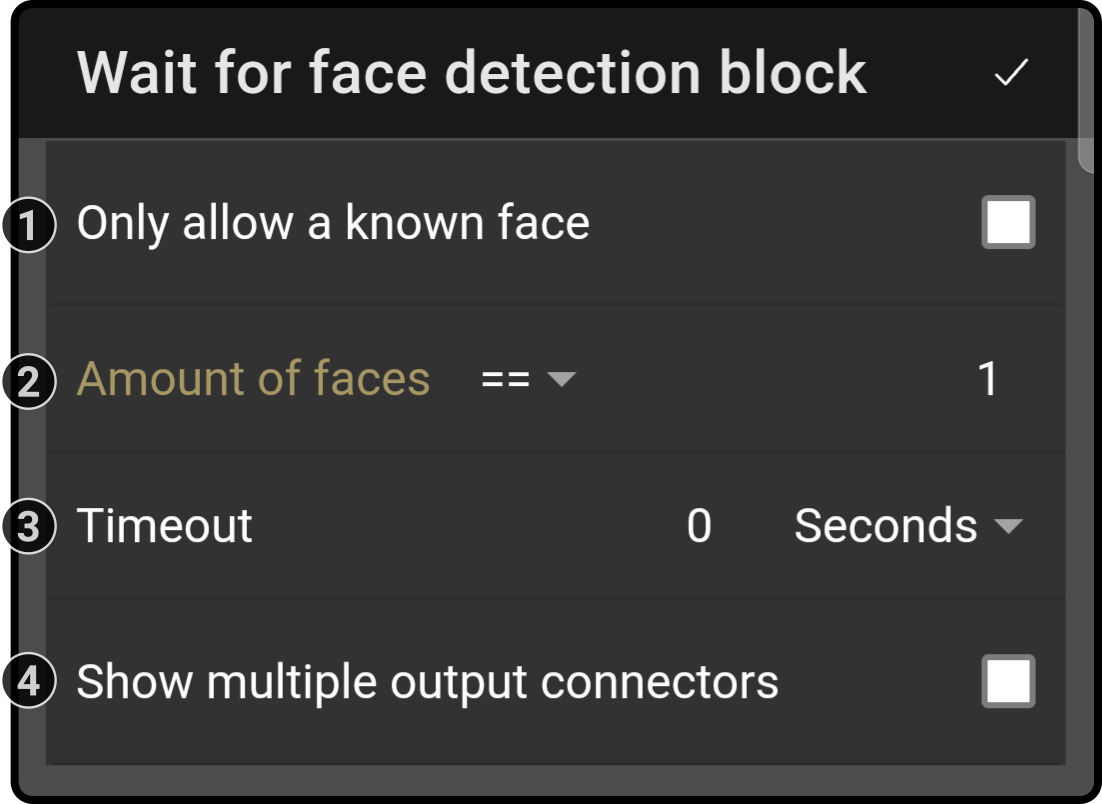
-
Check the option 'Only allow a known face' to continue the composition only after a registered face has been detected. If this option is checked, the 'amount of faces' option will be disabled.
-
Select how many faces should be detected before the composition should continue (e.g. 'equal to one' or 'at least two').
-
Set the timeout for the composition to continue if no face has been detected (value '0' equals no timeout).
-
Toggle the option 'Show multiple output connectors' to show an additional output connector for the timeout if it is set. (1)
(1): Advanced composer only.
Output
The data retrieved from the block can be used in the rest of the composition using the following variables:
{face_detect} has the following properties:
{
"uuid":"uniqueidentifier",
"name":"<name of the known user>",
"role":"<description of the user>"
}
{face_detect_length} is a different variable containing the number of recognized faces.
For example, the following input can be used to state the response: "Hello, {face_detect.name}. You are registered as {face_detect.role} in the system.".
|
 Motion detection block
Function
This block will make the device take images and warn the user if changes have been detected since the previously taken image.
Settings
-
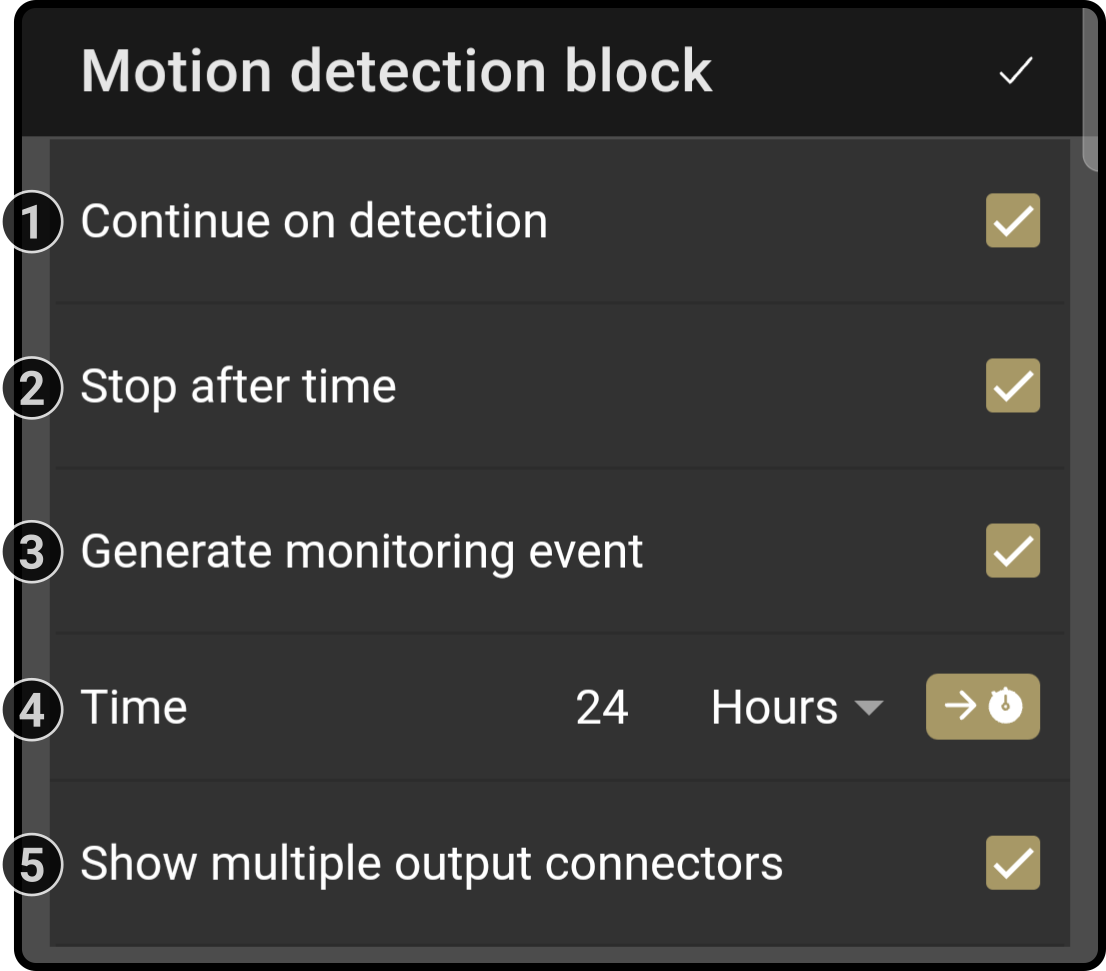
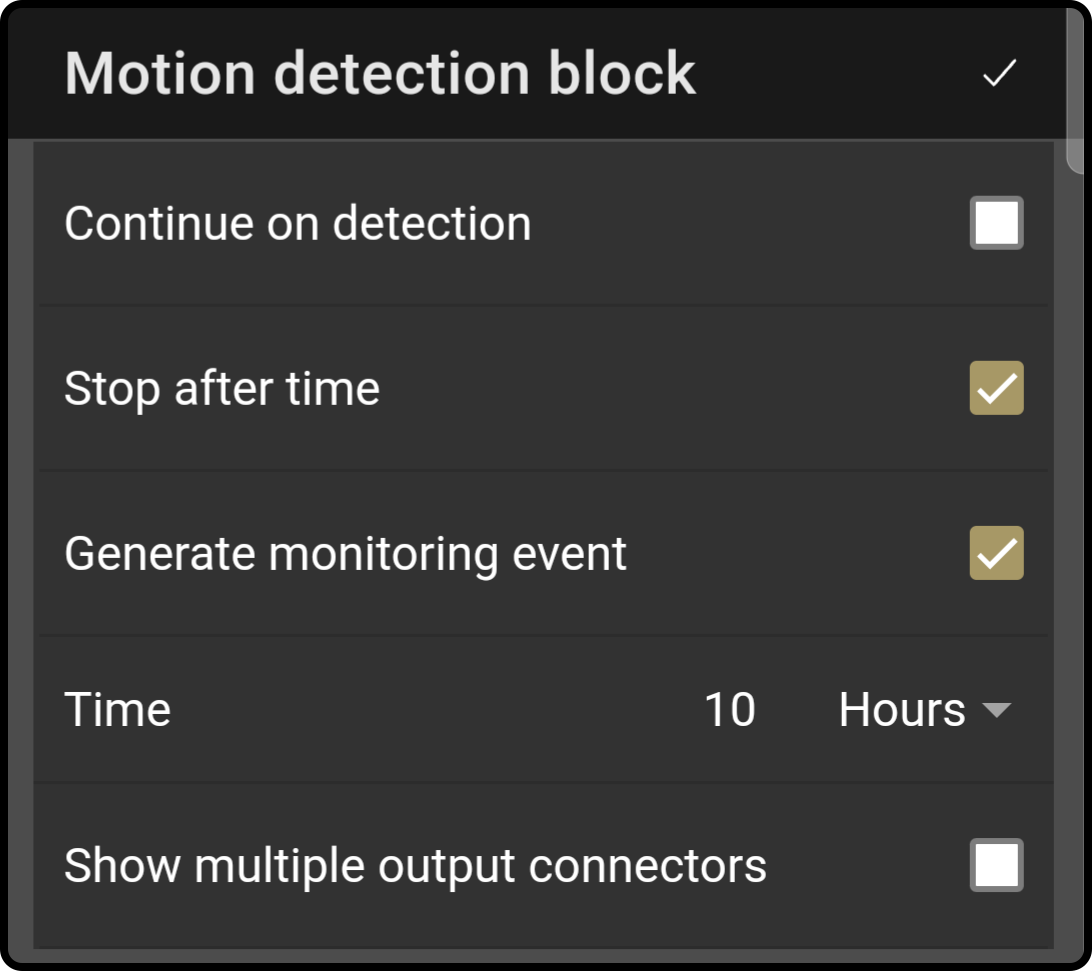
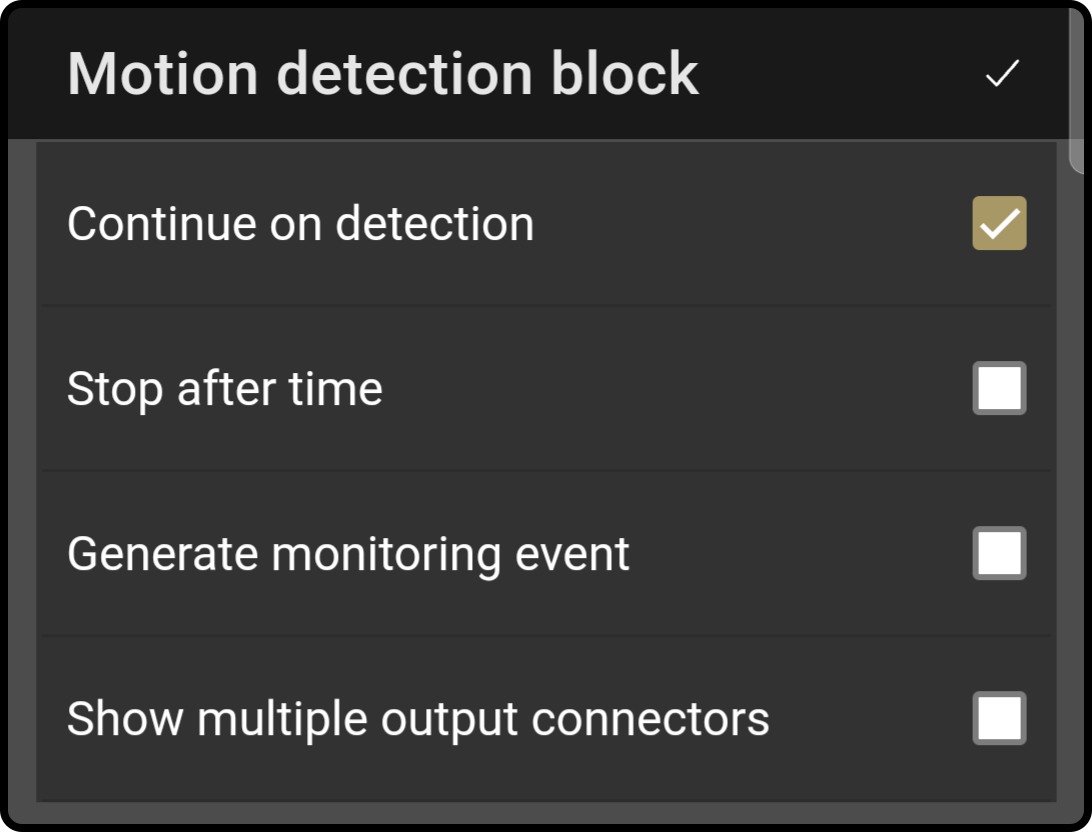
Check the option 'Continue on detection' to toggle whether the composition should continue once any motion has been detected
-
Check the option 'Stop after time' to toggle whether the device should stop recording after the set period of time (see (4))
-
Check the option 'Generate monitoring event' to toggle whether a monitoring event will be triggered when the block continues The settings for the monitoring event can be modified here
-
Set the maximum duration for the device to take image(s) The option 'Stop after time' needs to be checked
-
Toggle the option 'Show multiple output connectors' to show an additional output connector for the timeout (1)
(1): Advanced composer only.
Examples
-
Security-camera
-
Doorman
 Text input block
Function
This block will ask the user to enter some input on the kiosk-screen.
Settings
-
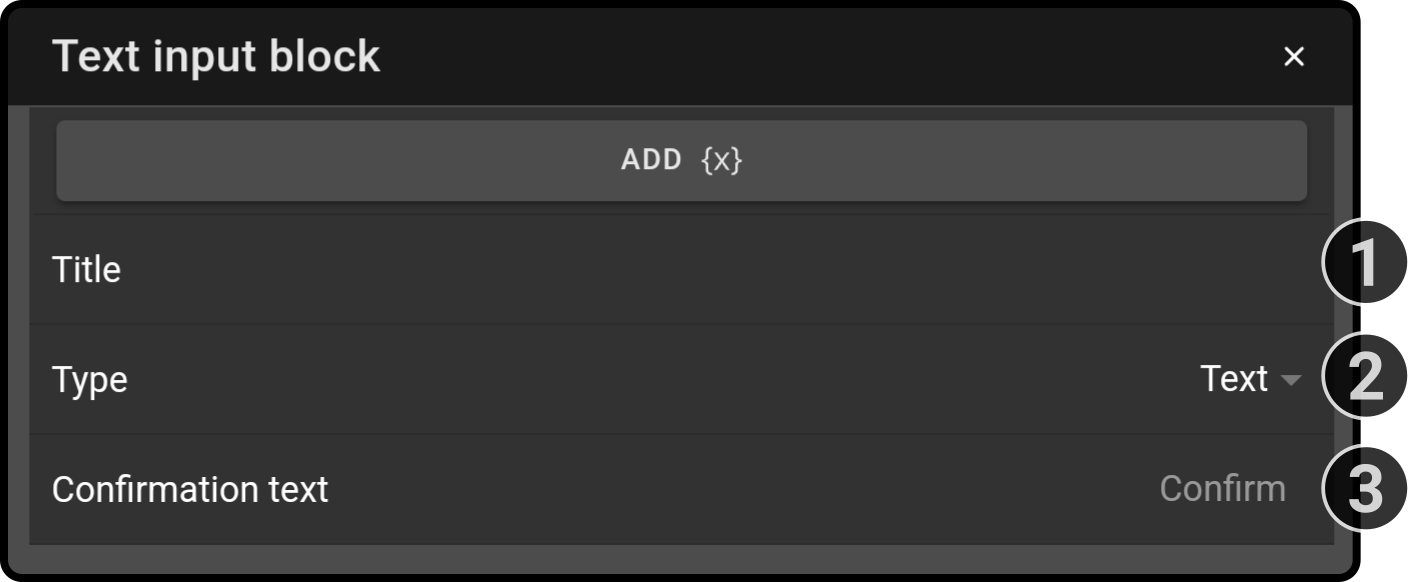
Enter the title that will be shown on the kiosk (e.g. 'What is your e-mail address')
-
Select the type of entry the user needs to enter (e.g. 'E-mail') The available options are 'Date', 'Date & Time', 'Email', 'Number', 'Password', 'Phone', 'Text', 'Textarea', 'Time' and 'URL'.
-
Enter the text to be shown in the 'confirmation' button (e.g. 'Continue')
The input from the block can be used in other blocks by using the variable {input}.
| The type of entry needs to be entered correctly before the composition will continue. |
 Variables
Function
This block is used to declare and define variables to be used in the composition.
Settings
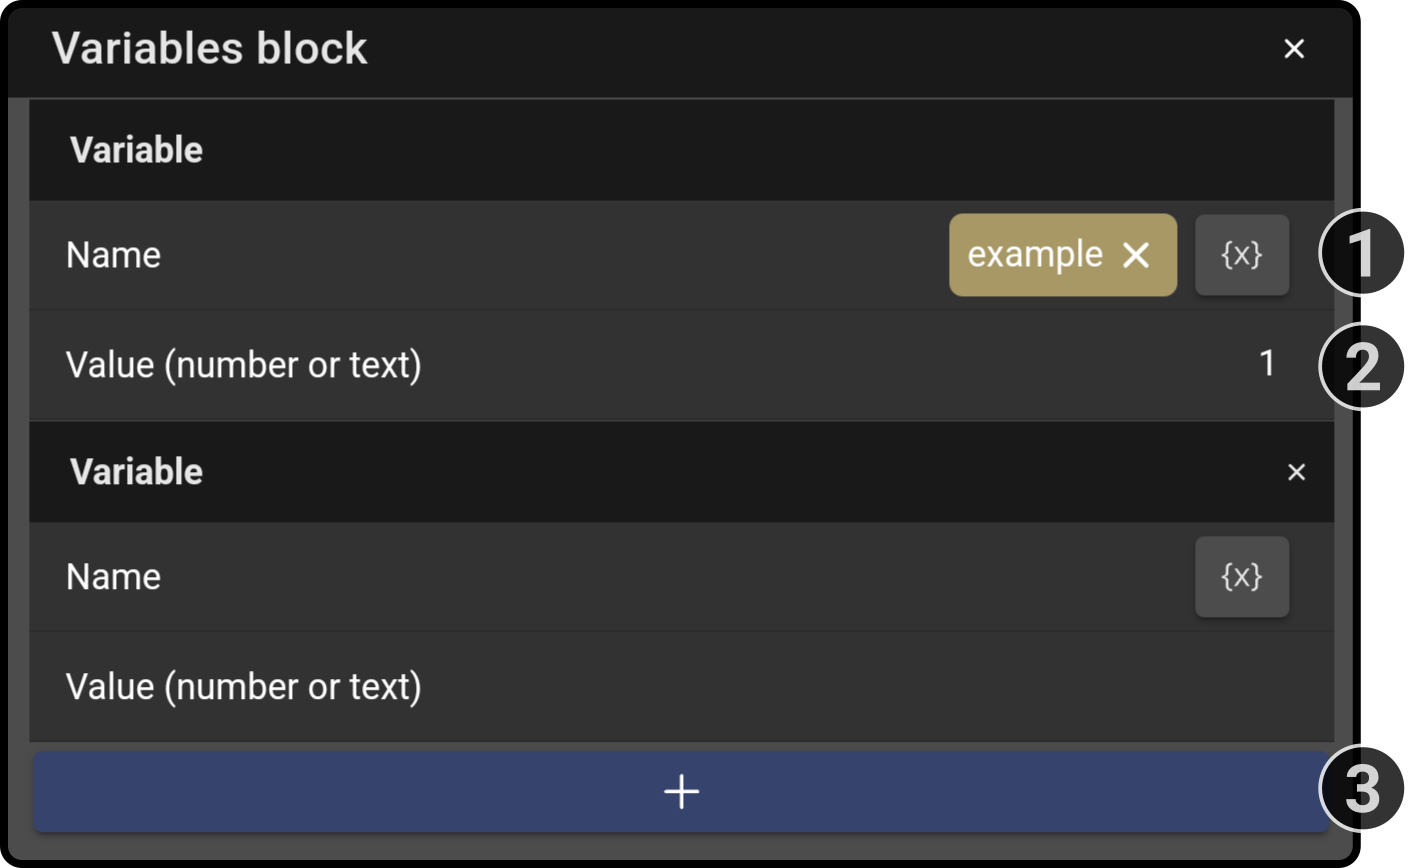
-
Enter the name of the variable to use Alternatively, tap the button {x} to view the list of already available variables to assign a new value
-
Enter the (new) value for the variable
-
Tap the button to add a new variable to the list
Once a valid variable/value pair has been entered, a new blank field will be shown below the currently existing list.
| Tap the button {x} next to a field to display a list of known variables. Select a variable to enter it in the adjacent field. |
Usage
The defined variable can be used in other blocks (speech-block for example):
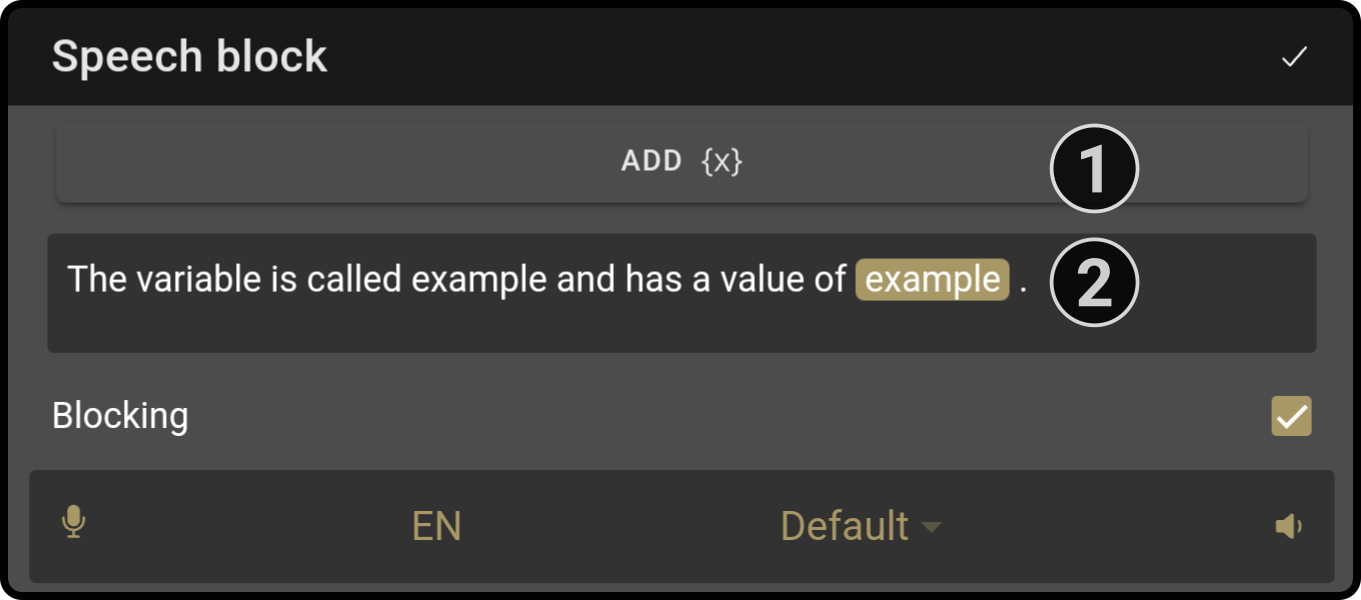
-
Add the earlier defined variable by tapping the 'Add {x}' button and selecting the variable in the list to insert it at the location of the cursor in the text field.
-
Enter the name of the variable between brackets to enter the variable in the text-field.
| The variable will only be styled once the text-field has been un-selected. |
 Text overlay block
Function
This block has been designed to display some text on the tablet of the device. The text will be shown on top of the background image, video or default background of the running composition.
Settings
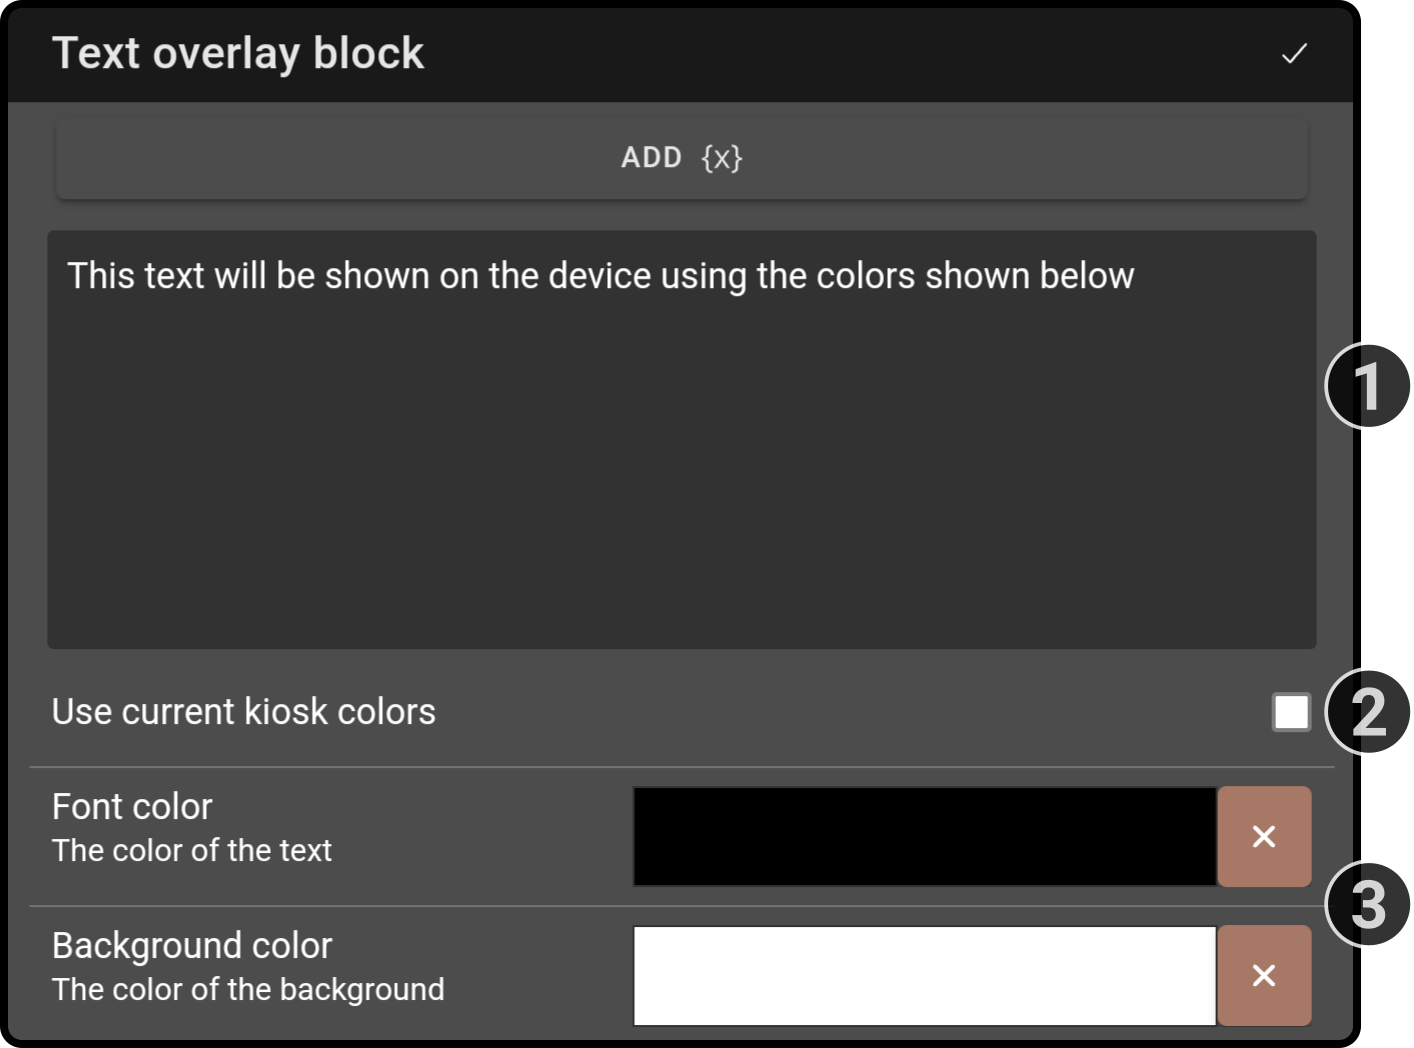
-
Enter the text to be shown (in multiple lines if necessary). Tap the button 'Add {x}'' to add a variable to the text field.
-
Check whether the current kiosk color scheme should be used as an overlay(1) Set the font color for the text and the background color for the overlay.
-
Toggle the option 'Duration' to have the image be shown for a set period of time.
-
Set the time for the overlay to remain on screen.
-
Toggle the option 'Blocking' to prevent the composition from continuing until the set time has elapsed.
(1): If the background is set to an image, the image will be used as background.
 String operations
Function
This block is used to perform operations on variables.
Settings

Tap the button to view the available operations:
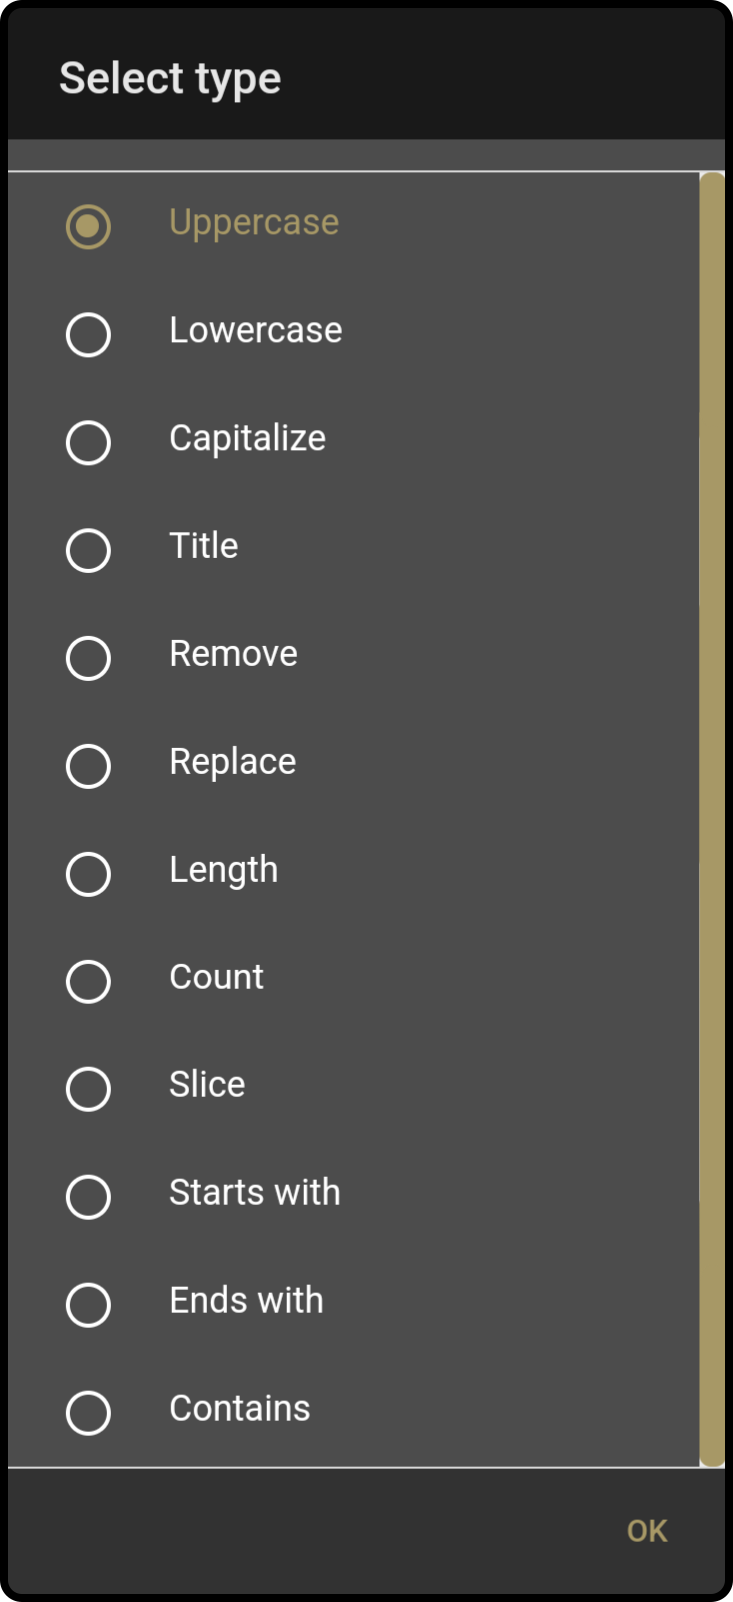
Select an operation from the list and tap the option 'OK' to add the operation to the block. Additional options will be shown in the list based on the available operation. For example, the following options will be shown for a 'replace' operation:
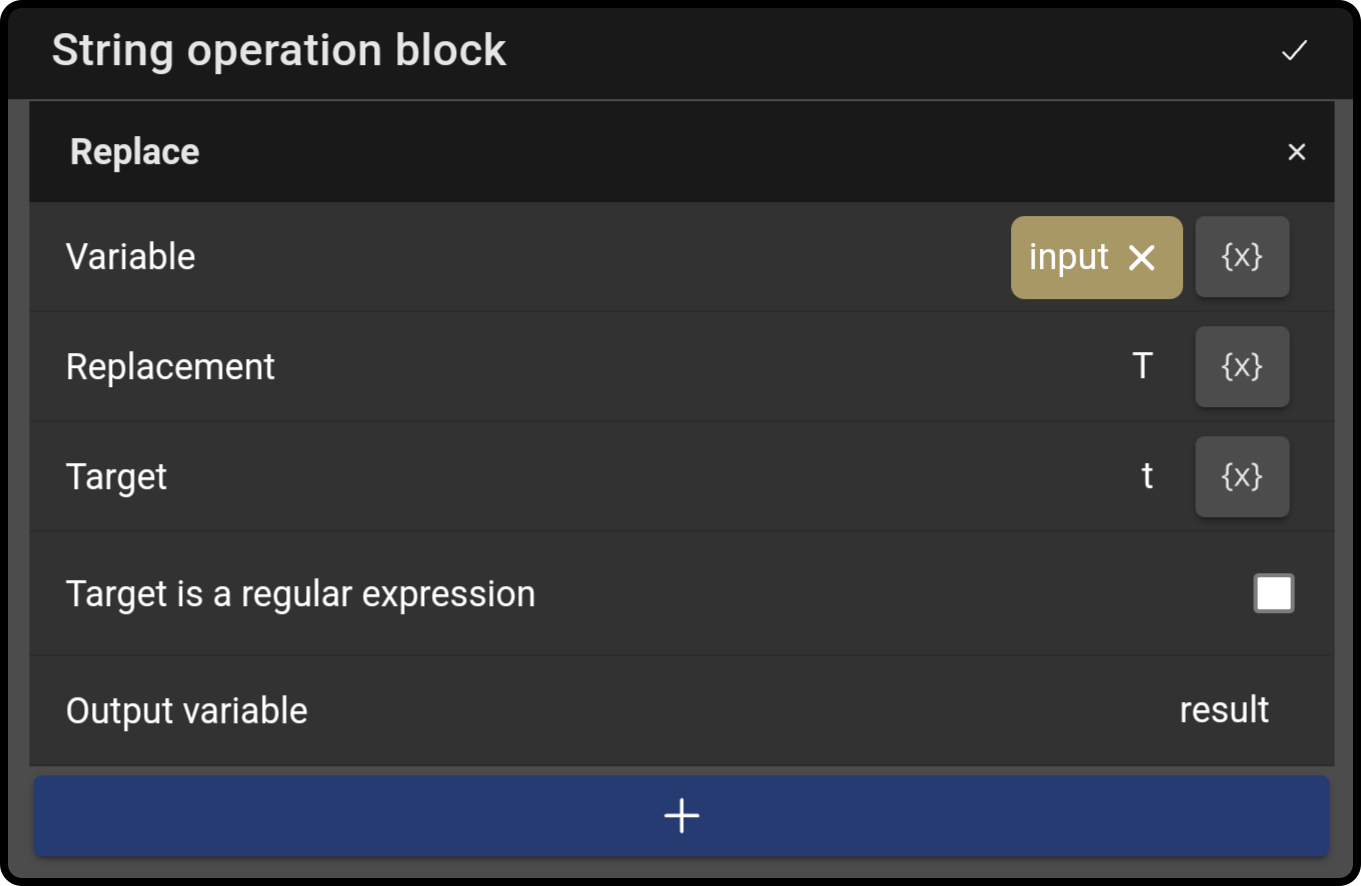
The variable 'input' will have every character 't' replaced by 'T' and the result of the operation will be stored in the variable input_replaced.
| Operation | Arguments | Result |
|---|---|---|
Uppercase |
|
String |
Lowercase |
|
String |
Capitalize |
|
String |
Title |
|
String |
Remove |
|
String |
Replace |
|
String |
Length |
|
Number |
Count |
|
Number |
Slice |
|
Number |
Starts with |
|
Boolean |
Ends with |
|
Boolean |
Contains |
|
Boolean |
 Video call
Function
This block is used to have the device start a video call with a connected user.
Settings
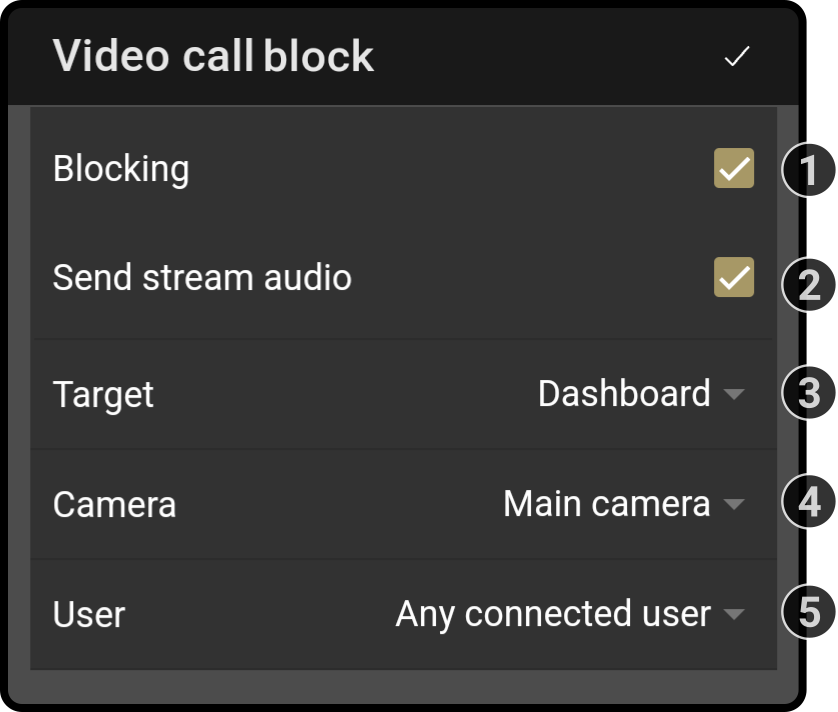
-
Toggle whether the composition should only continue after the call has ended
-
Toggle whether the audio from the device to the connected user should be streamed immediately
-
Select where the call should be shown for the connected user (i.e. in the dashboard widget, in a floating window in the dashboard or in the steering page)
-
Select which video stream should be shown (i.e. which available camera or the device screen)
-
Specify which registered user should be able to connect with a video call(1)
(1): You need to be logged in to view the available options. If the user is logged out, only the option 'Any connected user' will be shown.
| The composition will continue if any connected user refuses the call. |
 Date/time block
Function
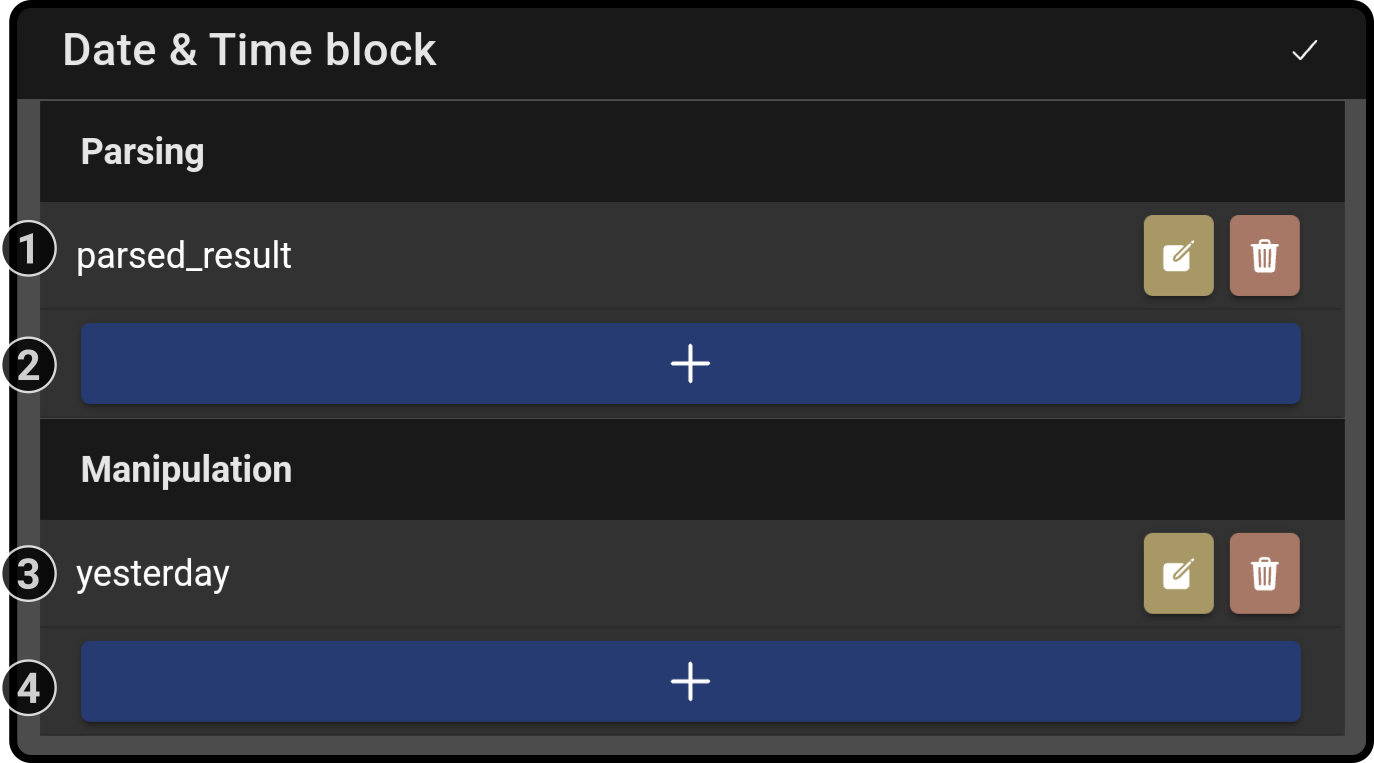
This block can be used to modify existing date/time events. This block contains 2 main sections, specifically:
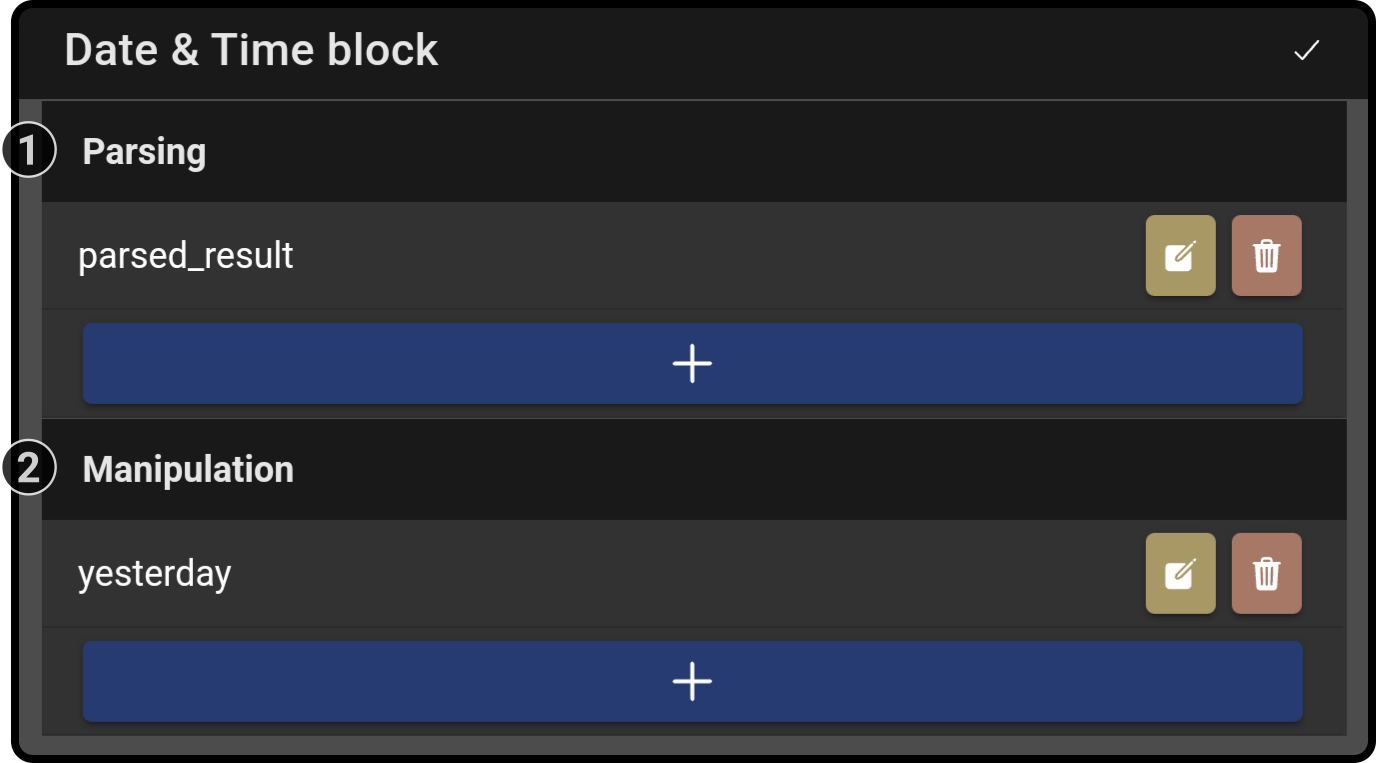
-
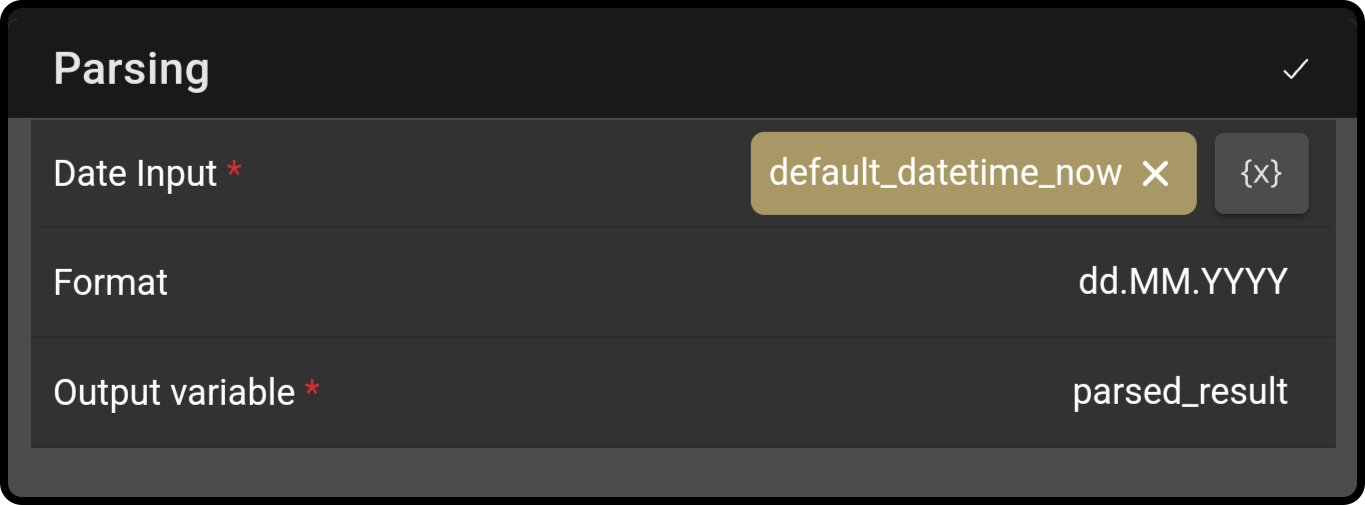
Parsing datetime events will result in a string that can be used for output (e.g. speech block)
For example, the following operation can be used to read out the current date:
-
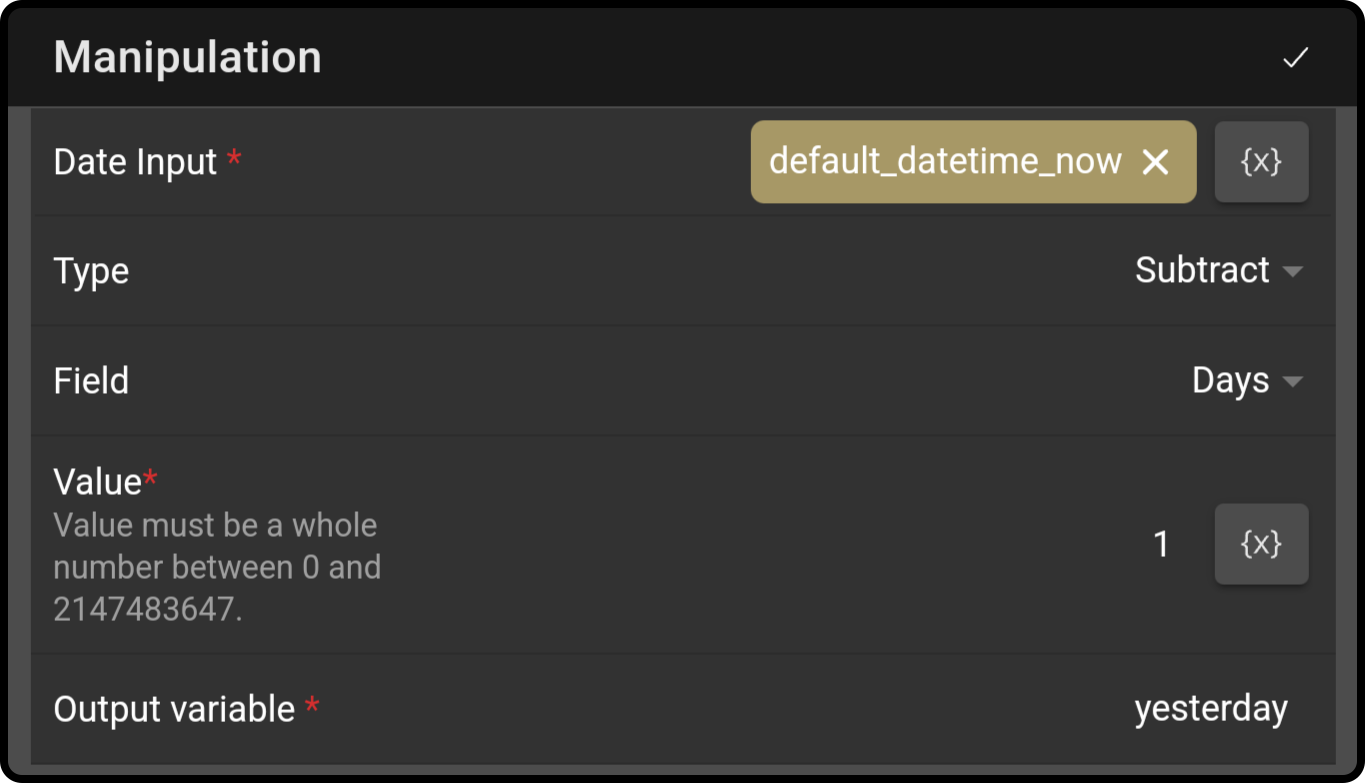
Manipulated datetime events will result in modified datetime outputs which can be used in other block (e.g. for generating a monitoring event)
For example, the following operation can be used to generate a variable dated to a year from the current date:
Settings
-
The list of parsed datetime operations is shown
Tap the icon to modify the operation.
Tap the icon to remove the operation. -
Tap the button to add a new operation to parse a datetime operation
-
The list of manipulated datetime operations is shown
Tap the icon to modify the operation.
Tap the icon to remove the operation. -
Tap the button to add a new operation to modify a datetime event.
| The variables defined in this block can’t be used in other operations in this block. For example, to set the date to a year and a day back, 2 datetime block need to be used. |
 OpenAI
| A valid openAI API Key is required for this block. |
Function
This block will request a response to a question from the openAI server(s).
General settings
-
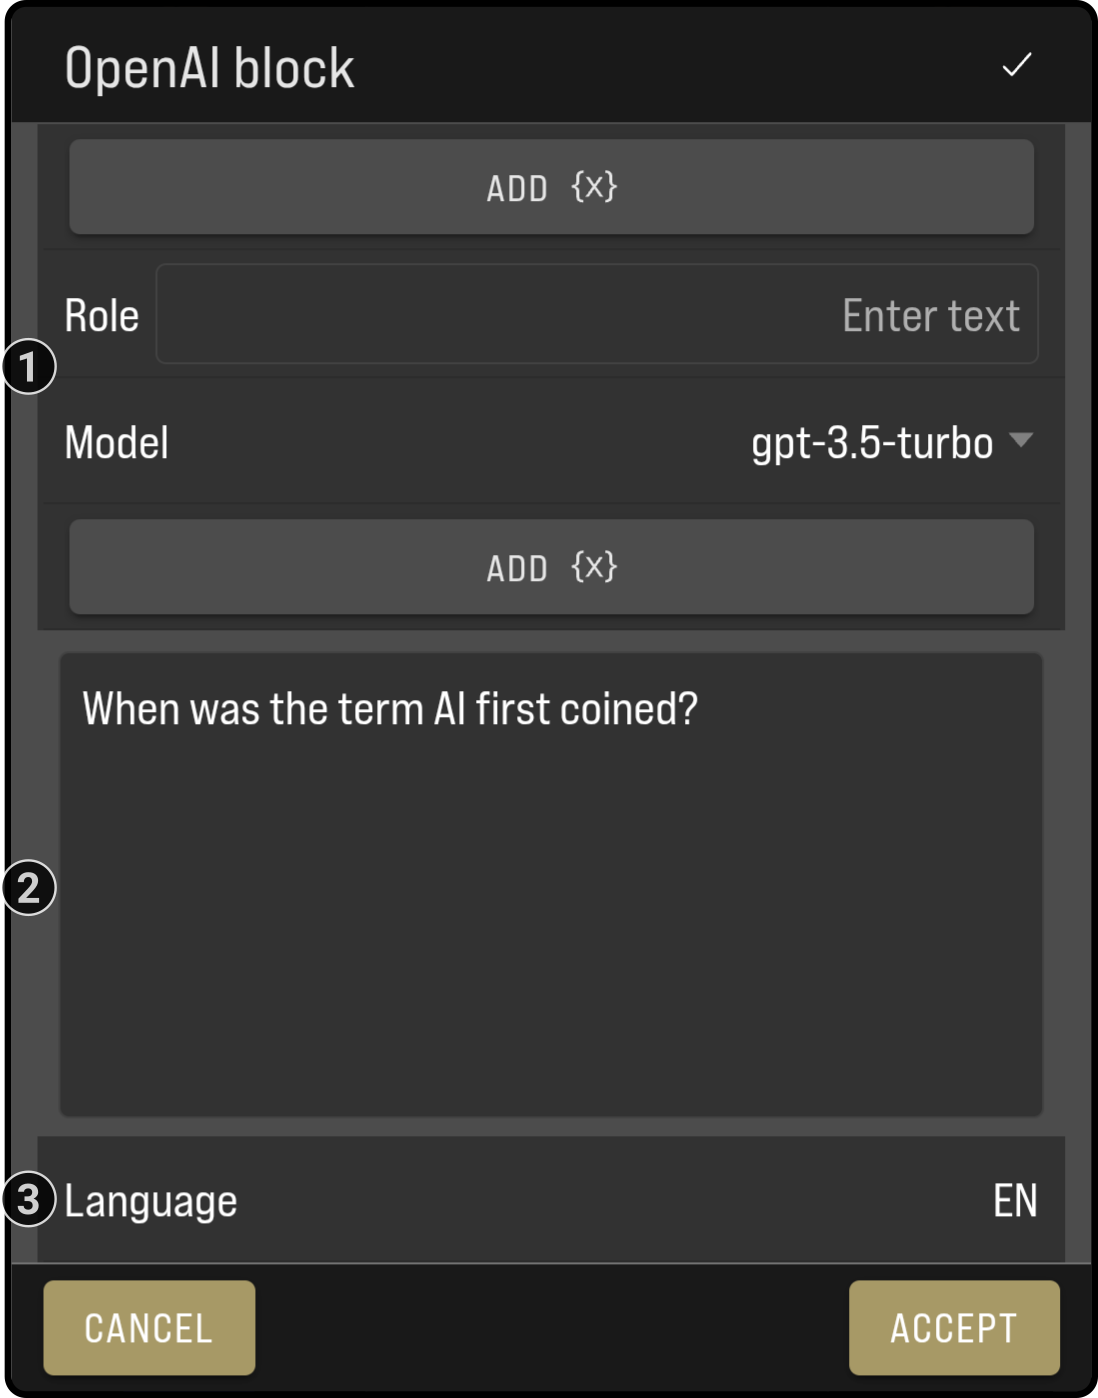
Optionally, select the model and the role for the AI to use(1).
-
Enter the question or statement for the ChatGPT engine to respond to.
-
Select a language for the response (English will be selected by default).
(1): See the documentation for the openAI or roles for chatGPT for more information on your subscription.
The response will be made available in the variable 'openai' for the next blocks in the composition.
For example:
{
synthesisId: "0ee7ce80-b327-4840-8d66-74432be93dff"
queryText: "When was the term AI first coined?"
responseSsml: "<?xml version="1.0"?><speak><s>The term "artificial intelligence" was first coined in 1956 at a conference at Dartmouth College by John McCarthy and his colleagues.</s></speak>"
responseText: "The term "artificial intelligence" was first coined in 1956 at a conference at Dartmouth College by John McCarthy and his colleagues."
languageTag: "en-US"
}
Map view
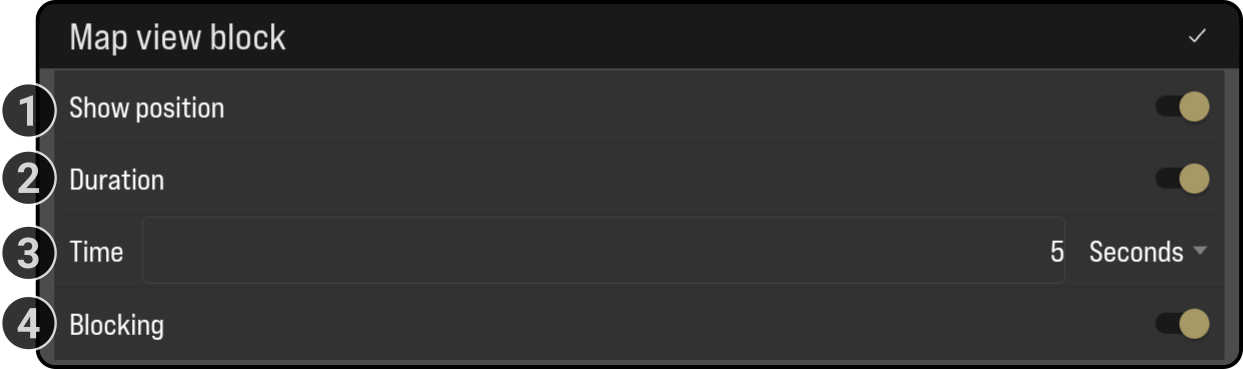
Function: Display a map view on the display
Available settings:
-
Toggle whether the device’s current position should also be shown on the display.
-
Toggle the option 'Duration' to have the image be shown for a set period of time.
-
Set the time for the overlay to remain on screen.
-
Toggle the option 'Blocking' to prevent the composition from continuing until the set time has elapsed.
 Multimedia block
Function
This block will display a media file on the device. The settings vary based on the media type of the selected file (e.g. image, audio or video).
See the chapter Multimedia for more information about multimedia files and storage.
General settings
The general multimedia block will display the following options:
-
Select the location of the file (stored on the device or the cloud).
-
The currently selected file is shown at the top of the screen.
-
Enter a search term and/or sort the list for an easier selection of the file.
-
Tap the file to be used in the composition.
-
Set the options for how the media should be shown. The available settings vary based on the type of file selected (image, audio or video).
Settings for image files
After selecting an image file in the list, the following options are shown:
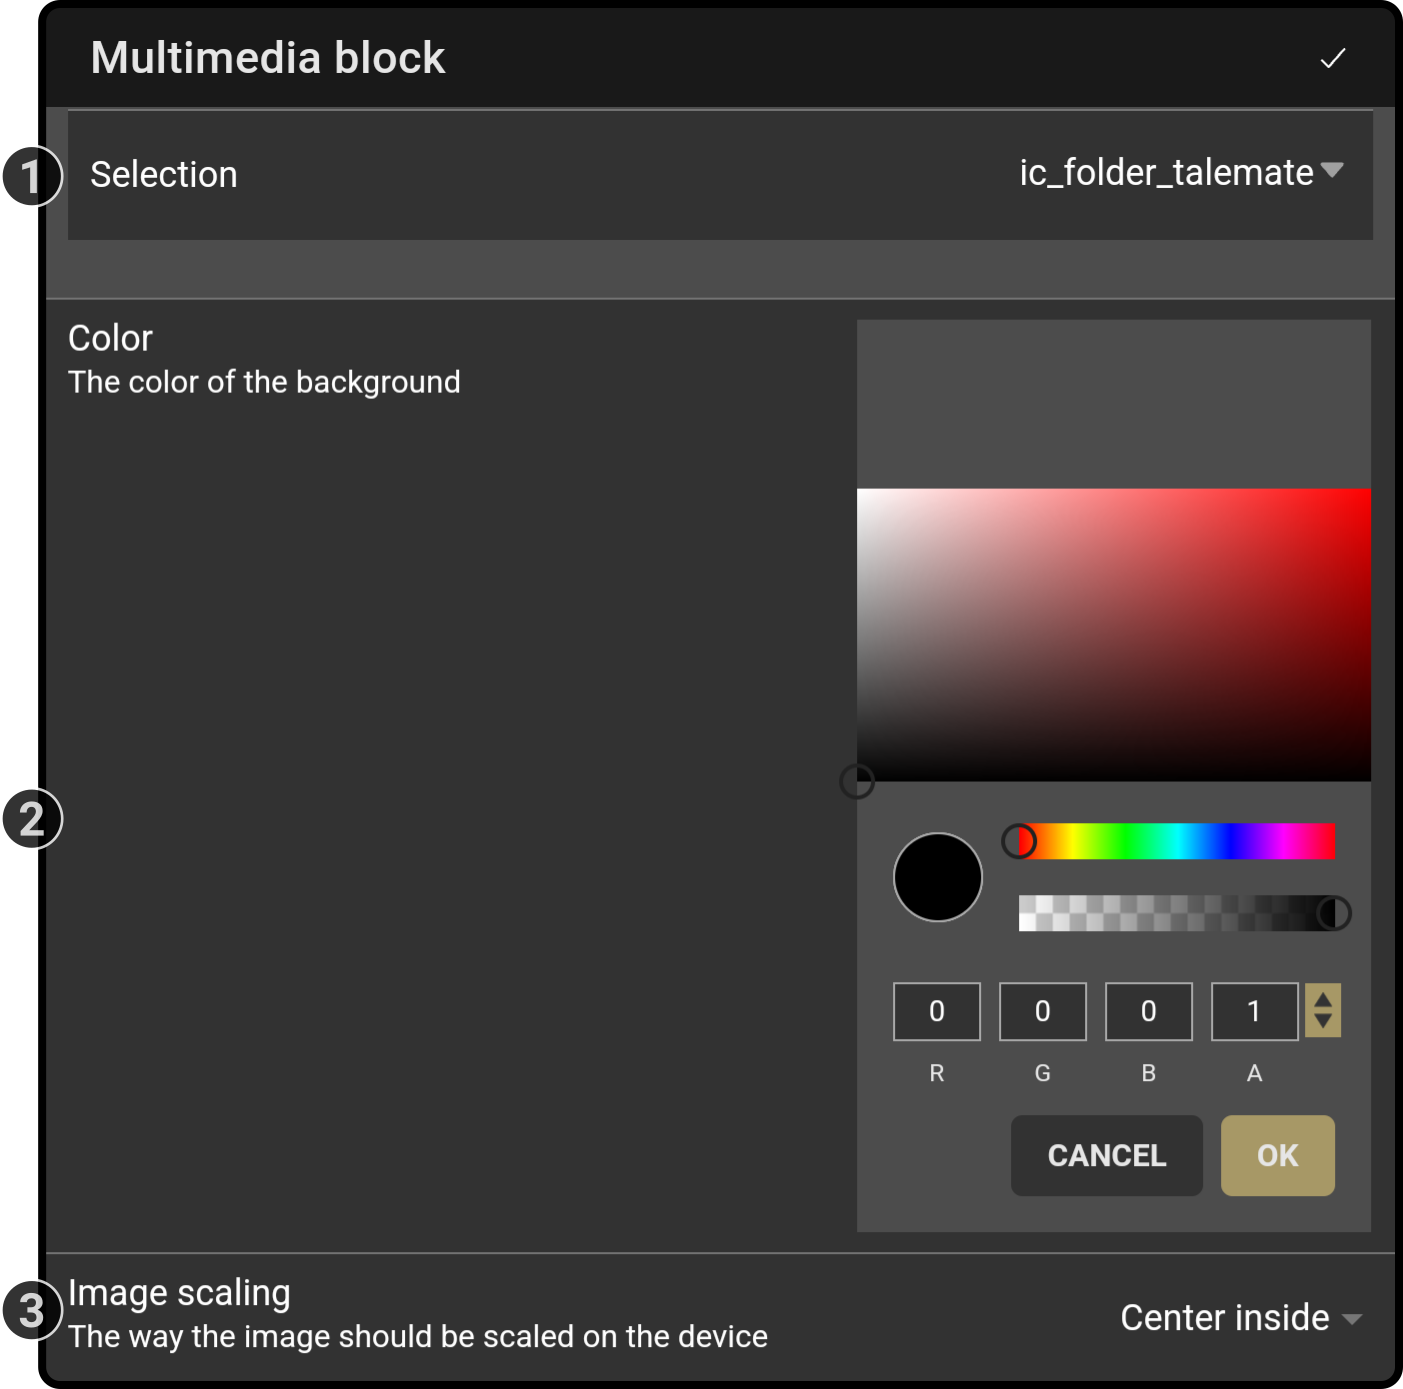
-
Tap the option 'Screen' to select the display where the image will be displayed.
-
Tap the option 'Color' to set a background color for the image. Note that the transparency of the selected color will be applied on top of a black background.
-
Tap the option 'Image scaling' to select the scaling for the image (i.e. 'Center crop', 'Center inside' or 'Fit center').
-
Toggle the option 'Duration' to have the image be shown for a set period of time.
-
Set the time for the image to be shown(1).
-
Toggle the option 'Blocking' to prevent the composition from continuing until the set time has elapsed(1).
(1): These options will only be shown if the option 'Duration' has been toggled on.
| If a duration is used, the image will stop being shown after the set time has elapsed. |
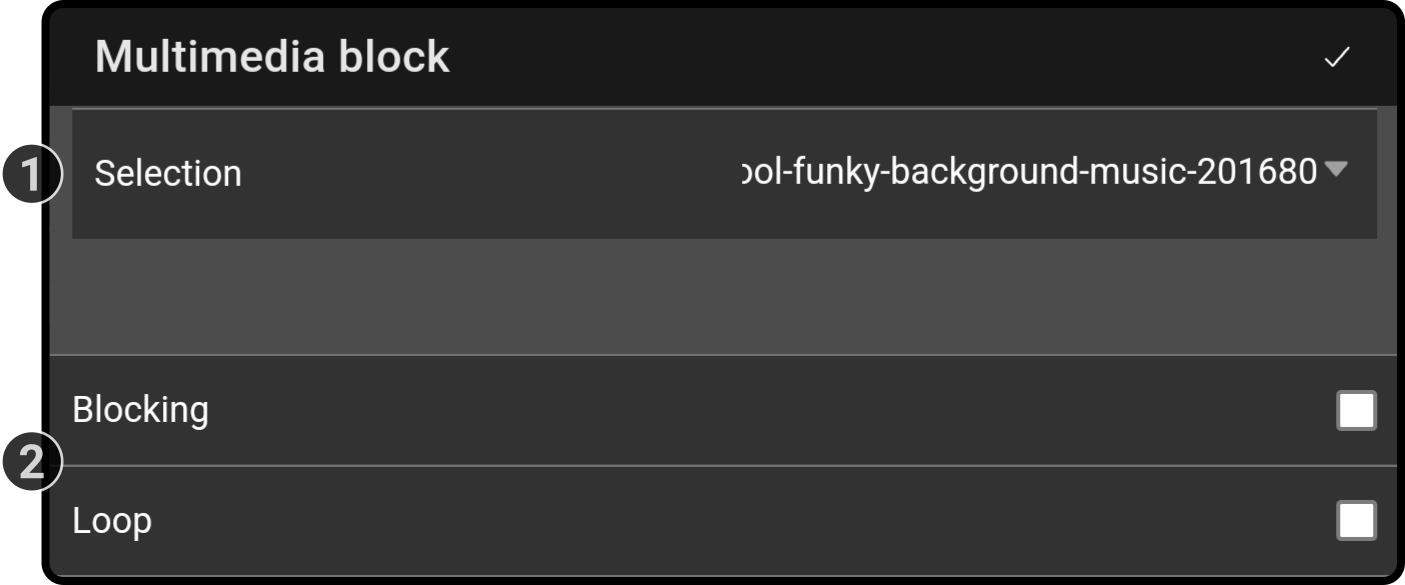
Settings for audio files

-
Check the option 'Blocking' to prevent the composition from continuing until the video has stopped playing. If this option is unchecked, the composition will continue while the audio file is playing.
-
Check the option 'Loop' to repeat the audio file until the end of the composition or until a 'Stop audio' block is started.
|
By default, the option 'Loop' will be checked for an audio file. If the option 'Blocking' is checked, the option 'Loop' will be disabled. |
Settings for video files
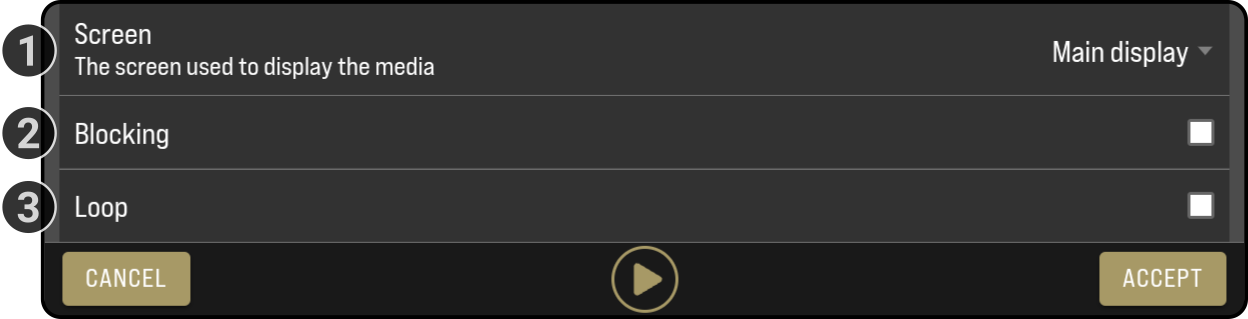
-
Tap the option 'Screen selection' to select the display for the video to play.
-
Check the option 'Blocking' to prevent the composition from continuing until the video has stopped playing. This option is enabled by default.
-
Check the option 'Loop' to repeat the video file until the end of the composition or until a 'Stop video' block is started.
| By default, the option 'Blocking' will be checked for a video file. If the option 'Blocking' is checked, the option 'Loop' will be disabled. |
 Start app block
Function
This block will start an app installed on the device
Settings
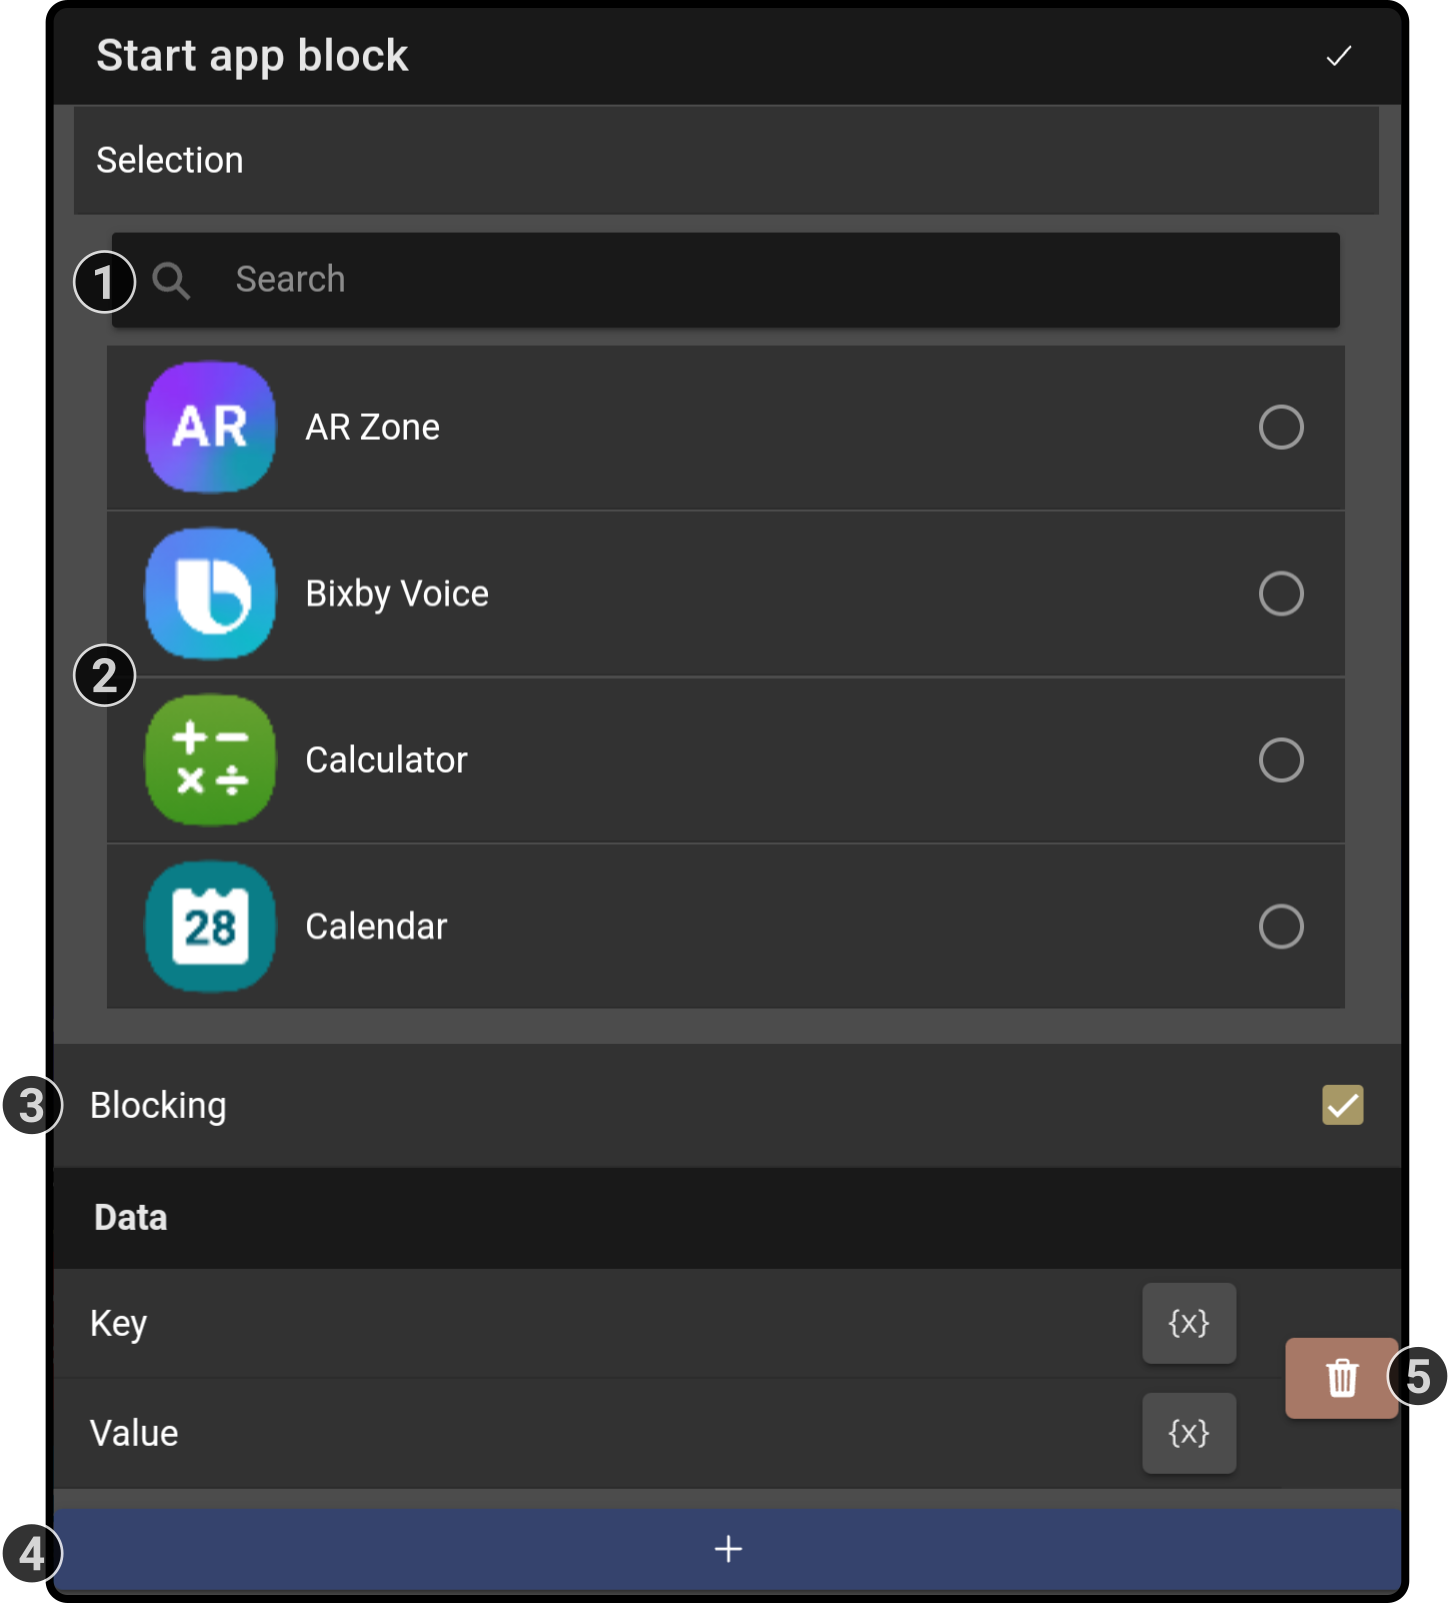
-
Enter a search term to narrow the list of available apps
-
Tap the app to start from the (searched) list
-
Check the option 'Blocking' to stop the composition from continuing while the app is being shown
-
Tap the button to add a key/value pair to send to the app
Enter the required values in the newly available options (e.g. key:'data_source'; value:'example') -
Tap the icon to remove the added data from the block
 Change kiosk block
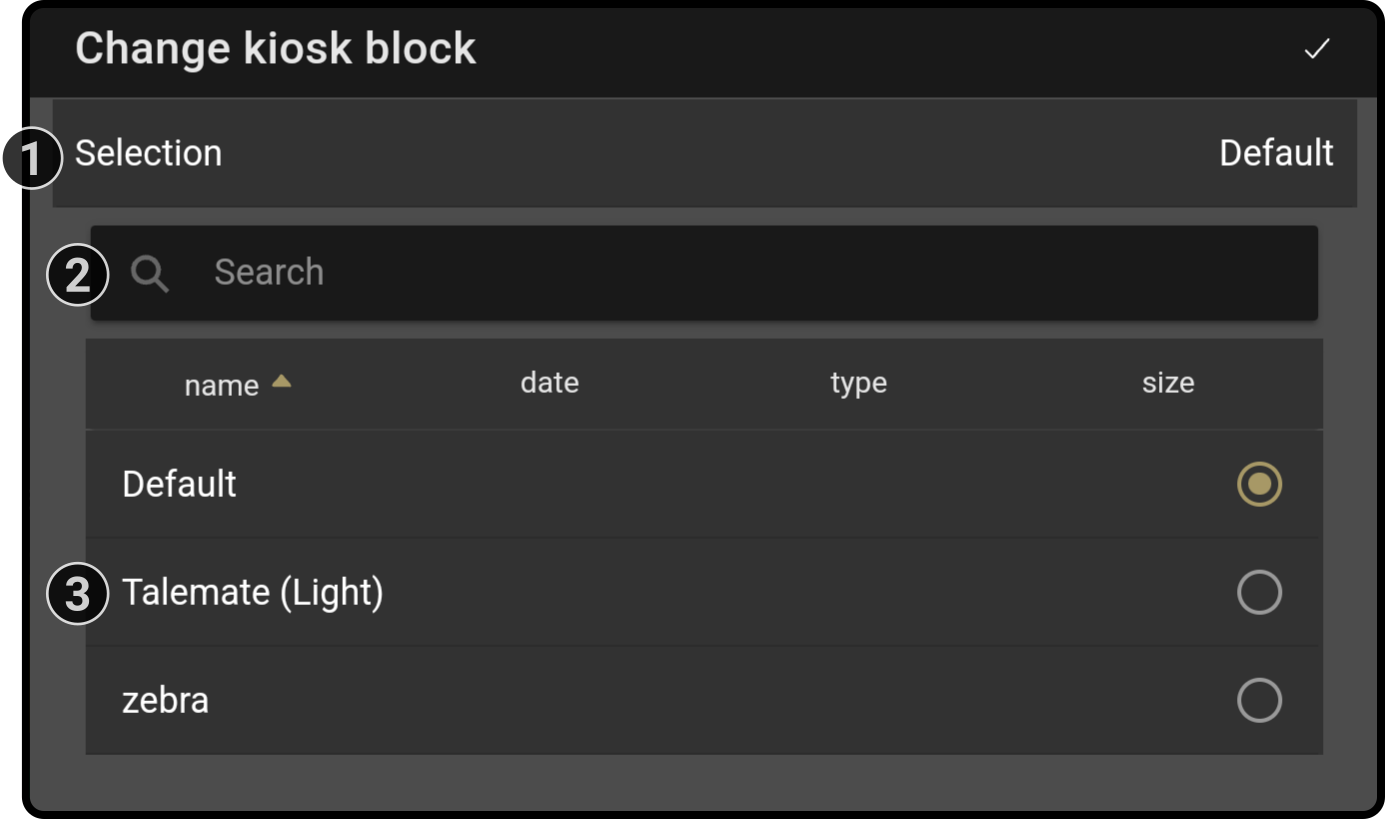
Function
This block will change the current dataset used by the kiosk.
Settings
| It is highly recommended to add a 'wait' block after the 'Change Kiosk' block to allow the device to apply the new dataset before the composition ends. |
-
The currently selected dataset to apply is shown at the top of the list
-
Enter a search term to narrow the list of available datasets on the connected device
-
Tap a dataset in the (searched) list to select it
 Stop media block
Function
This block stops the currently playing media-type
Settings
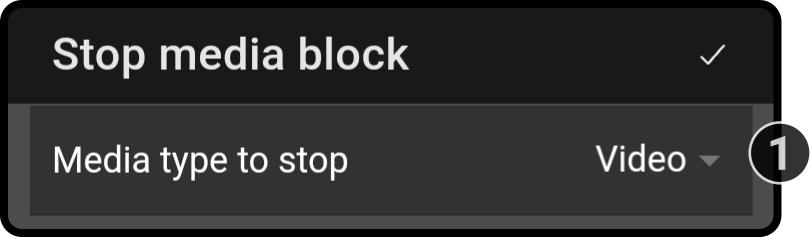
-
Tap the type of media to stop to display a modal with the following options:
-
Audio
-
Video
-
Image
-
Text overlay
-
 Domotics action block
Function
This block allows the ZBOS device to send a command to (a) device(s) registered on a home automation system.
See the chapter Home Automation for more information on configuring domotics.
Settings
The following settings will be shown when the block is added to the timeline (or when the settings are opened for the first time):
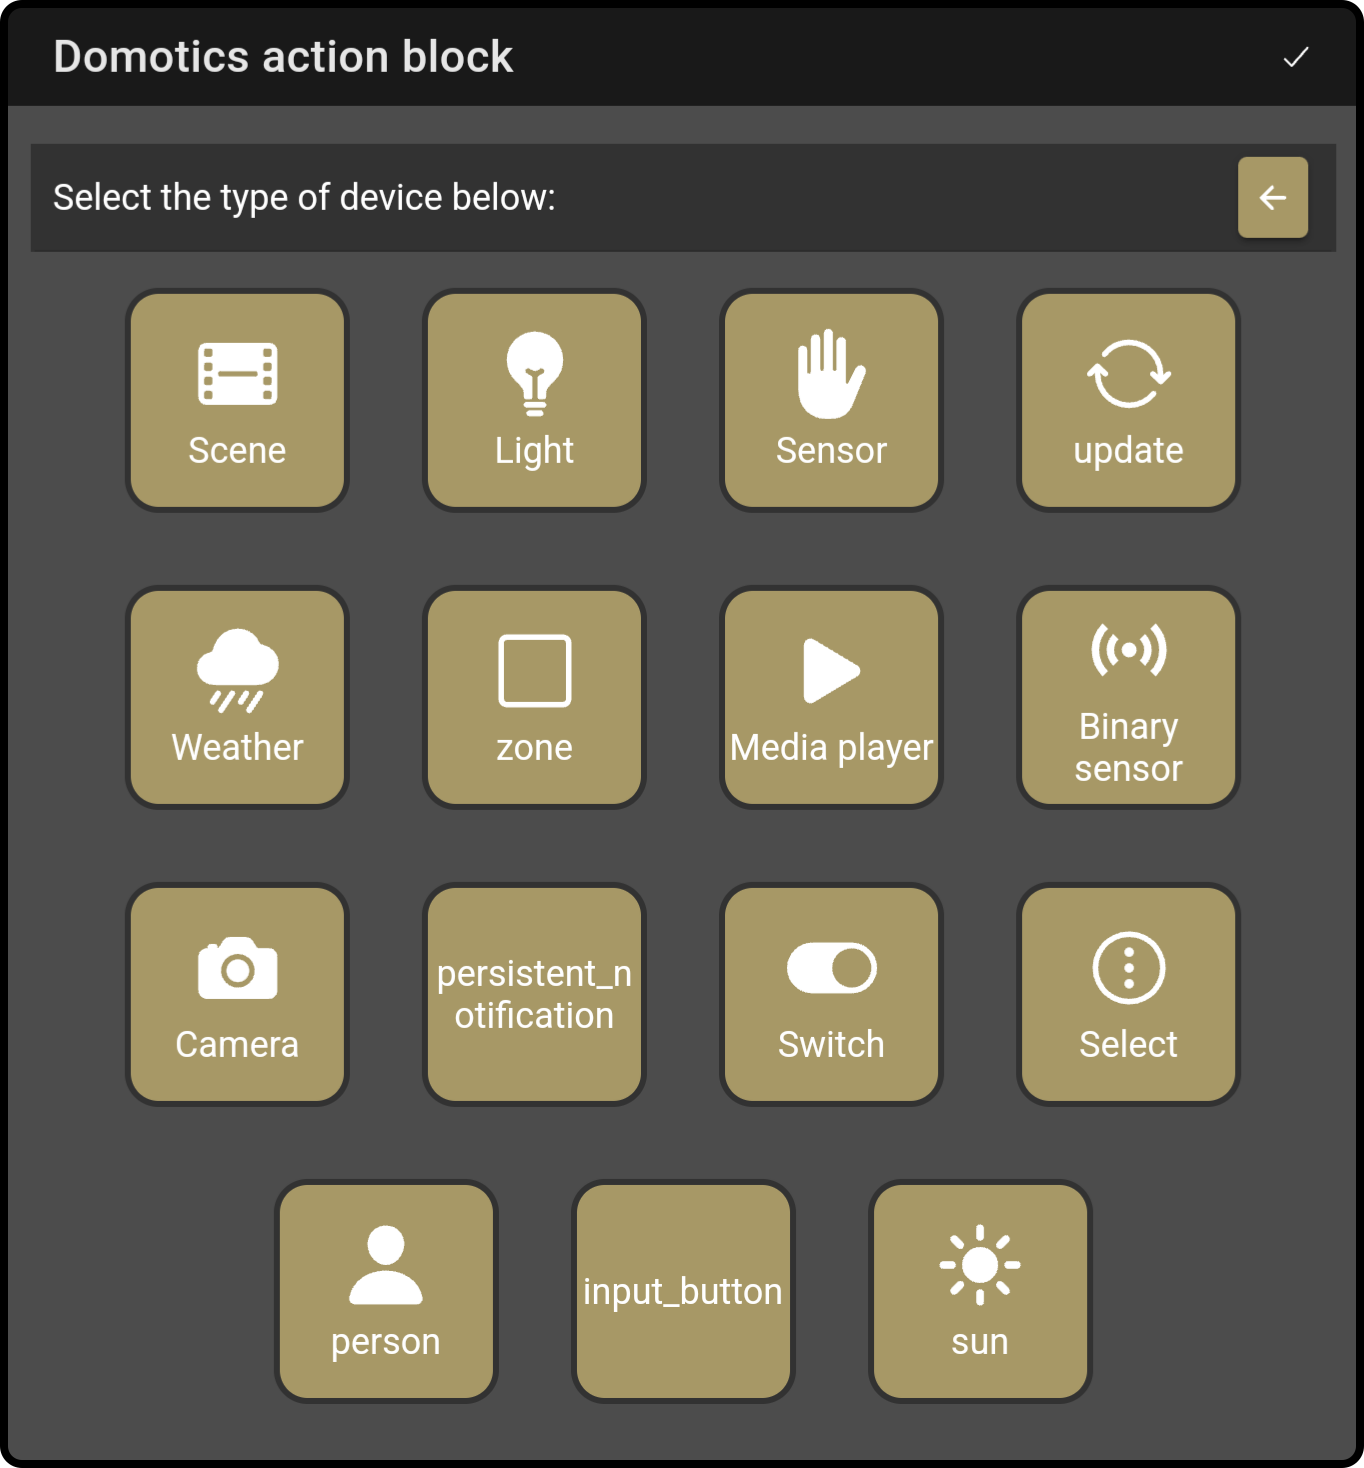
| The shown categories are collected across the configured domotics services (for example, home assistant + tuya configuration). |
Tap the category to view the list of registered devices (e.g. 'Lights'):

-
Tap the button to return to the category selection screen
-
Optionally, enter a search term to narrow the list
-
Navigate to the configured domotics system (if applicable)
-
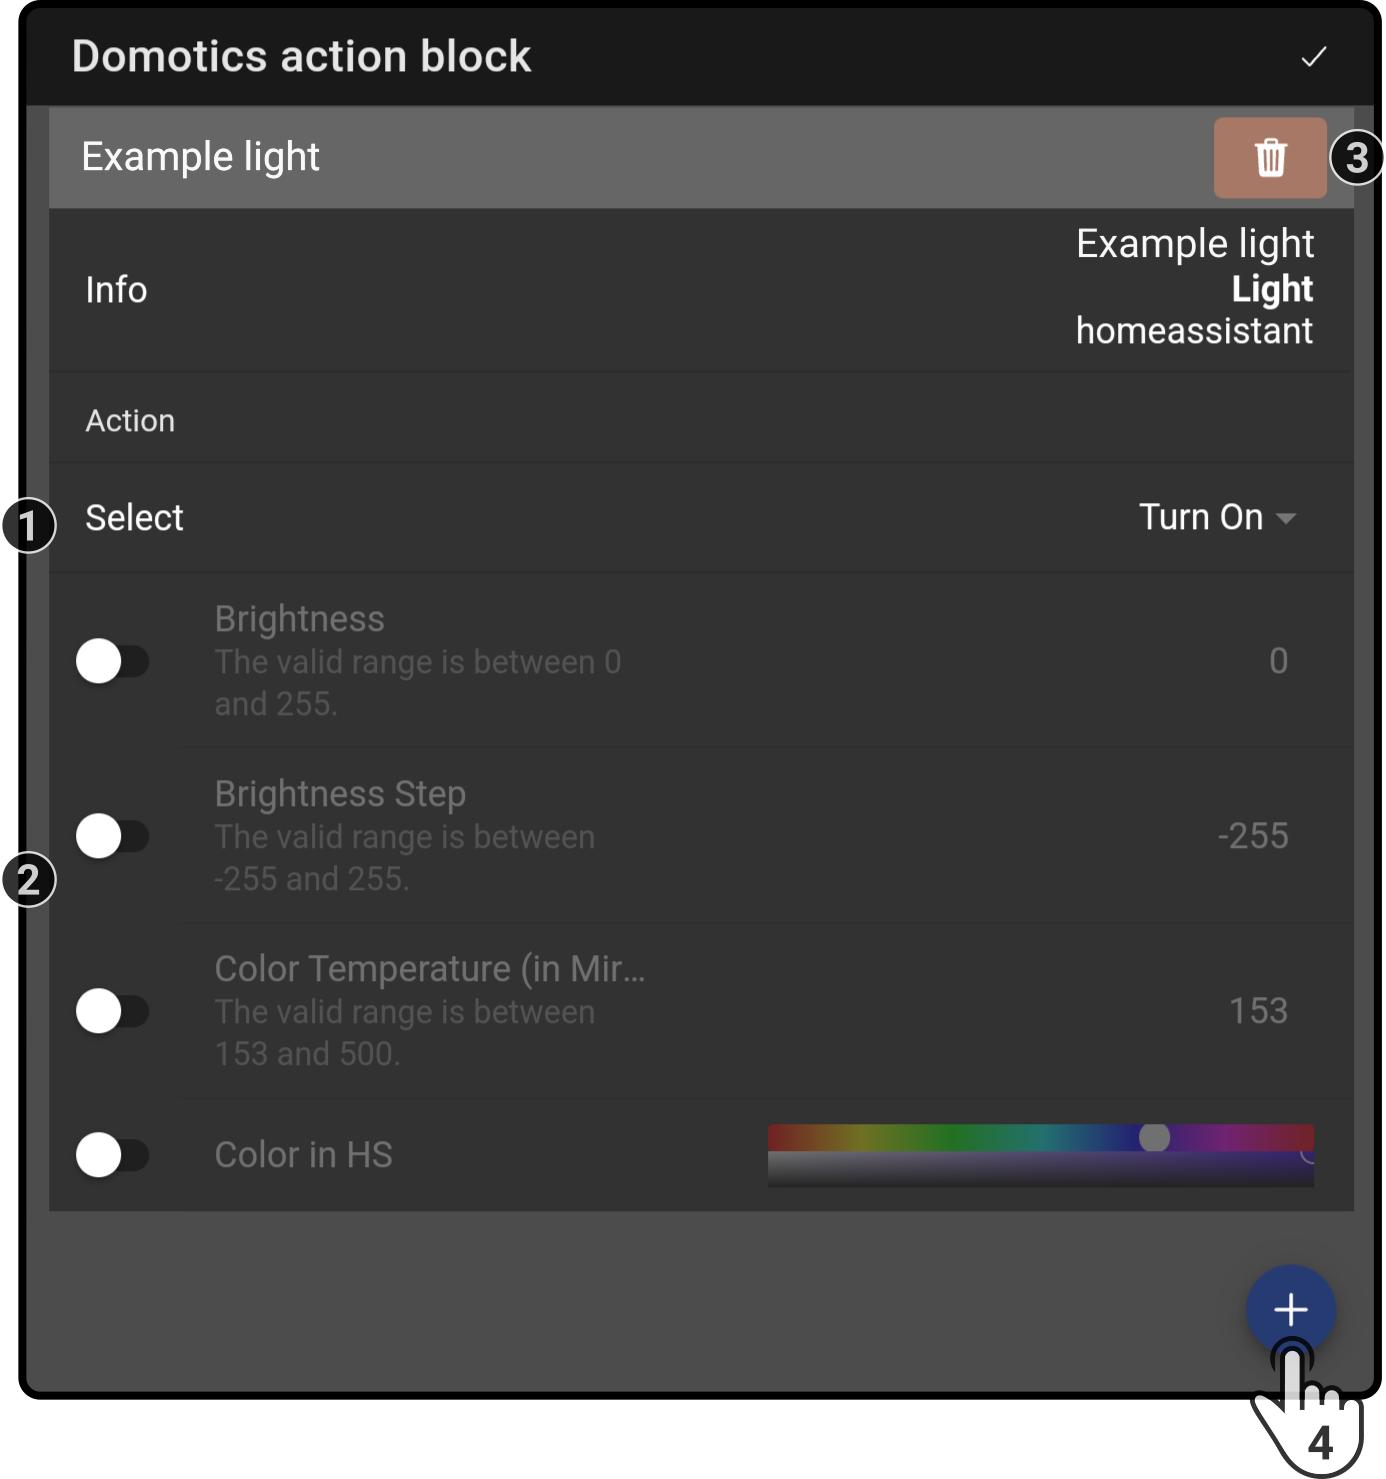
Tap the button next to the device to add it to the composition block and view the configurable options
-
Tap which action should be taken (e.g. 'turn device on', 'toggle', …)
-
Configure additional properties for the configuration (e.g. toggle the option on for color in HS to allow additional color configuration the color of an rgb light)
-
Tap the button next to the device to remove it from the list
-
Optionally, tap the button to add an additional domotics action to the same block
 Domotics wait block
Function
This block allows the ZBOS device to wait for a change in a device registered on a home automation system before continuing with the composition.
See the chapter Home Automation for more information on configuring domotics.
Settings
The following settings will be shown when the block is added to the timeline (or when the settings are opened for the first time):
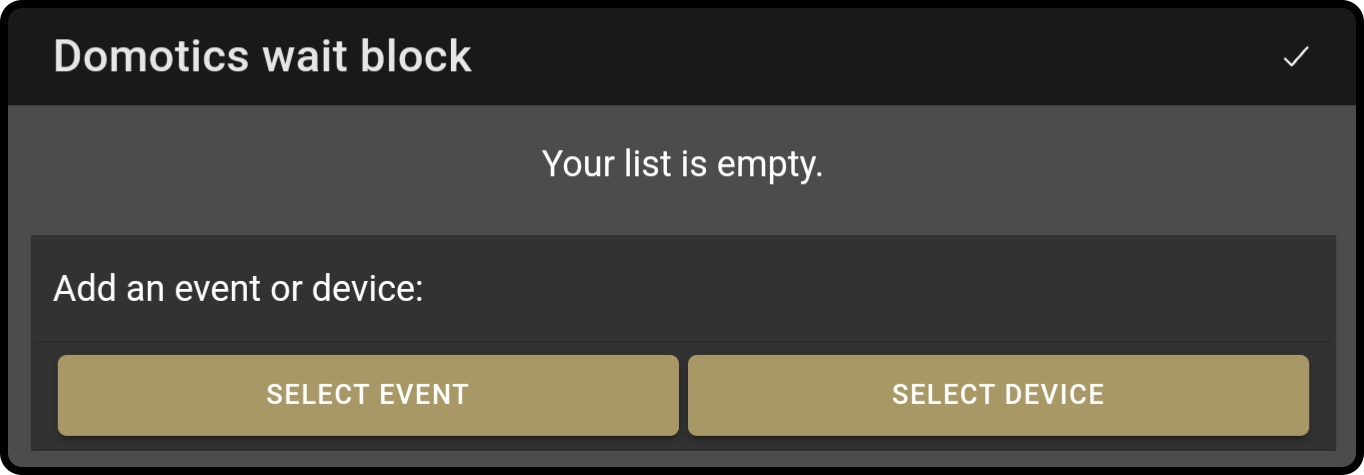
Tap the device or event for the composition block to view the available categories:
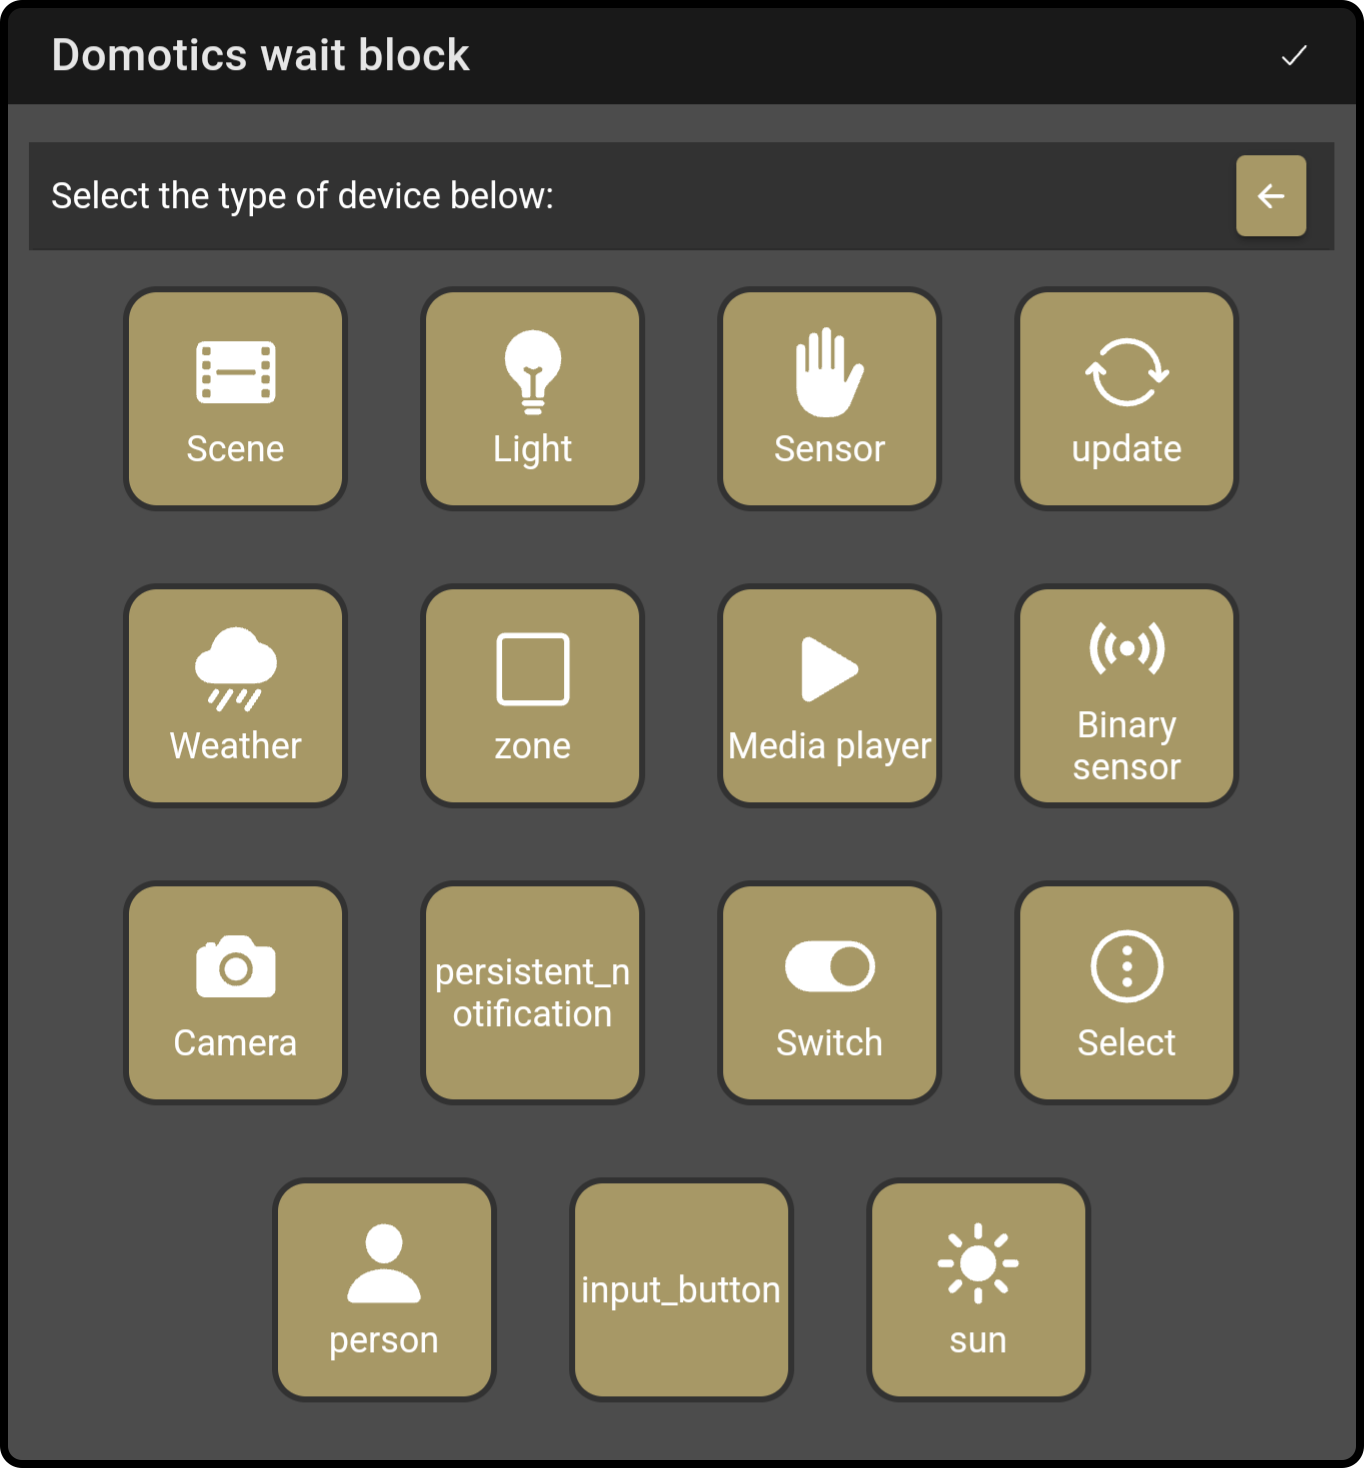
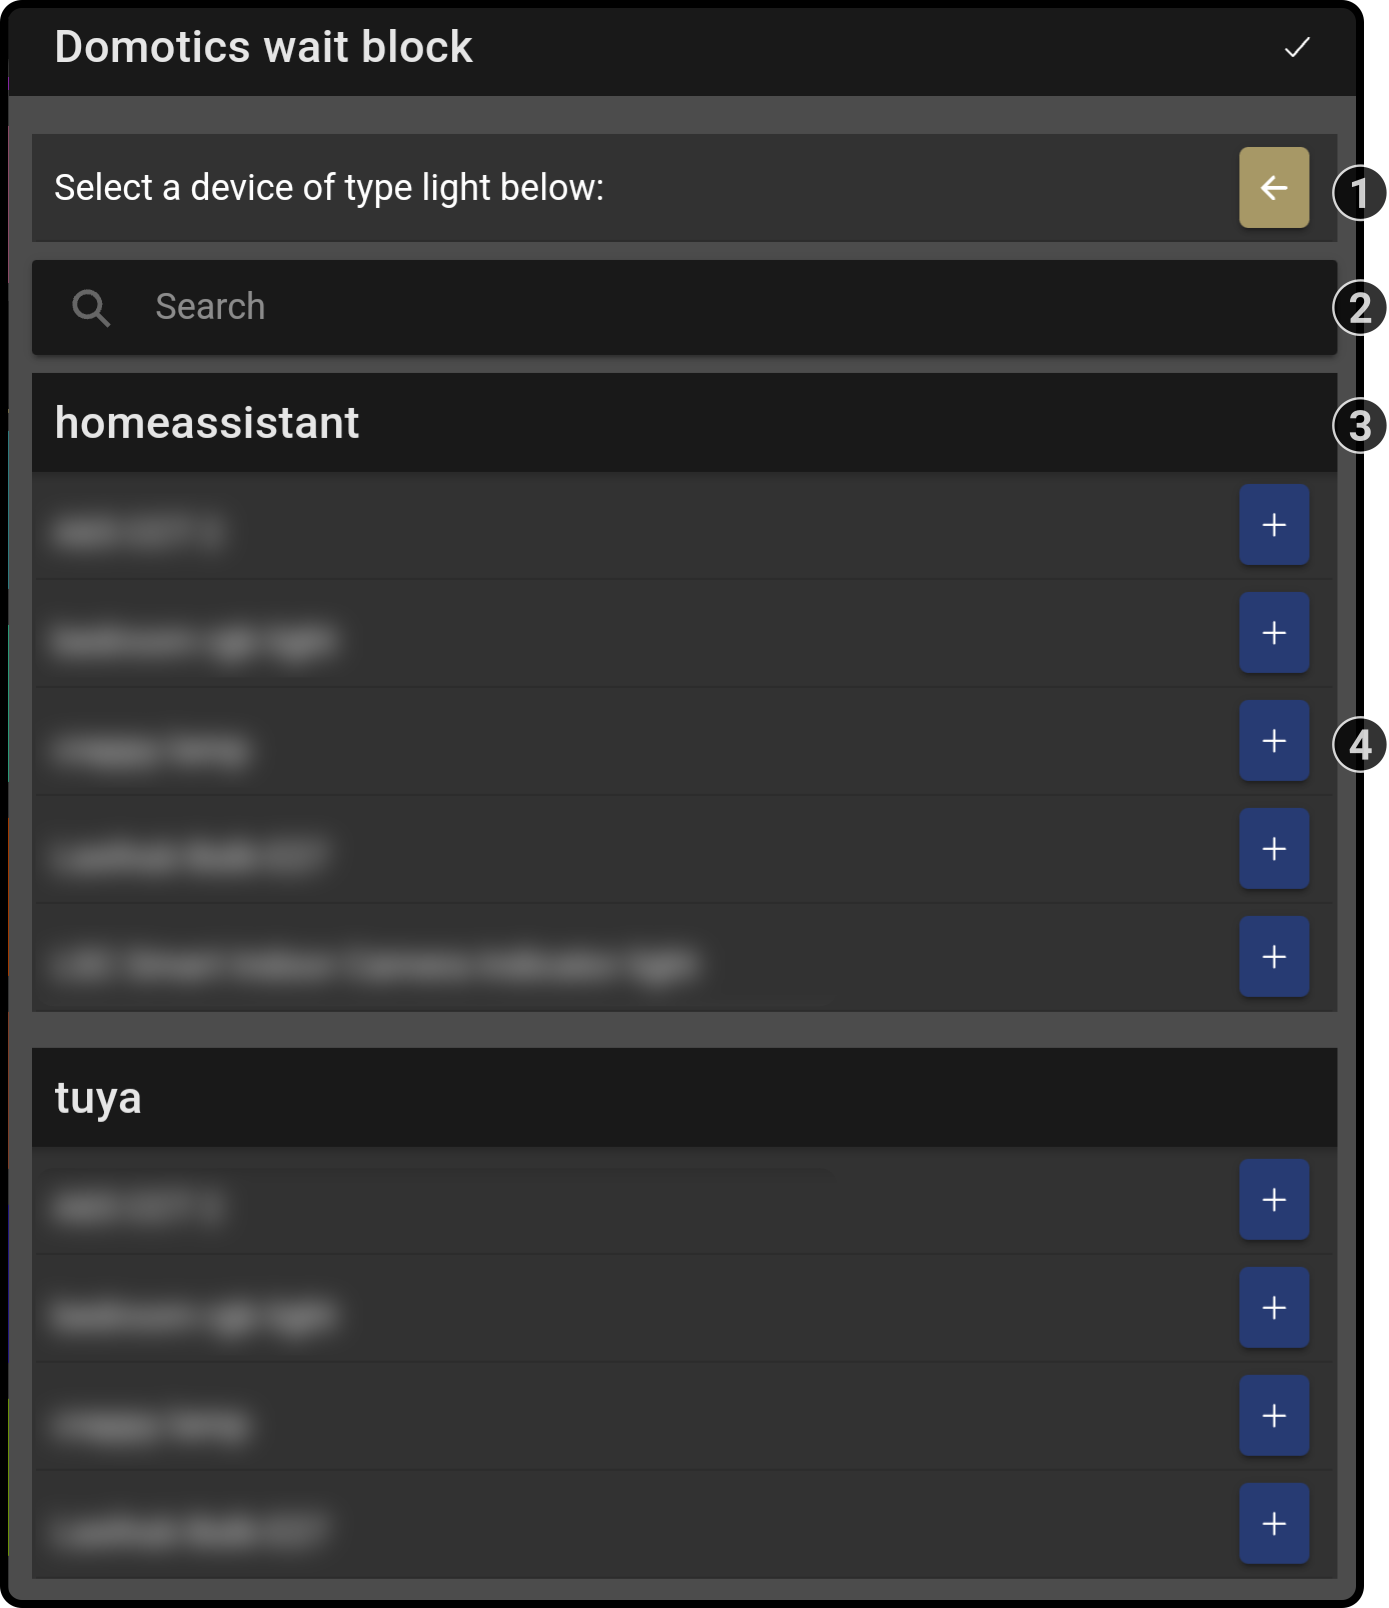
Tap the category to view the list of registered devices (e.g. 'Lights'):
-
Tap the button to return to the category selection screen
-
Optionally, enter a search term to narrow the list
-
Navigate to the configured domotics system (if applicable)
-
Tap the button next to the device to add it to the composition block and view the configurable options
-
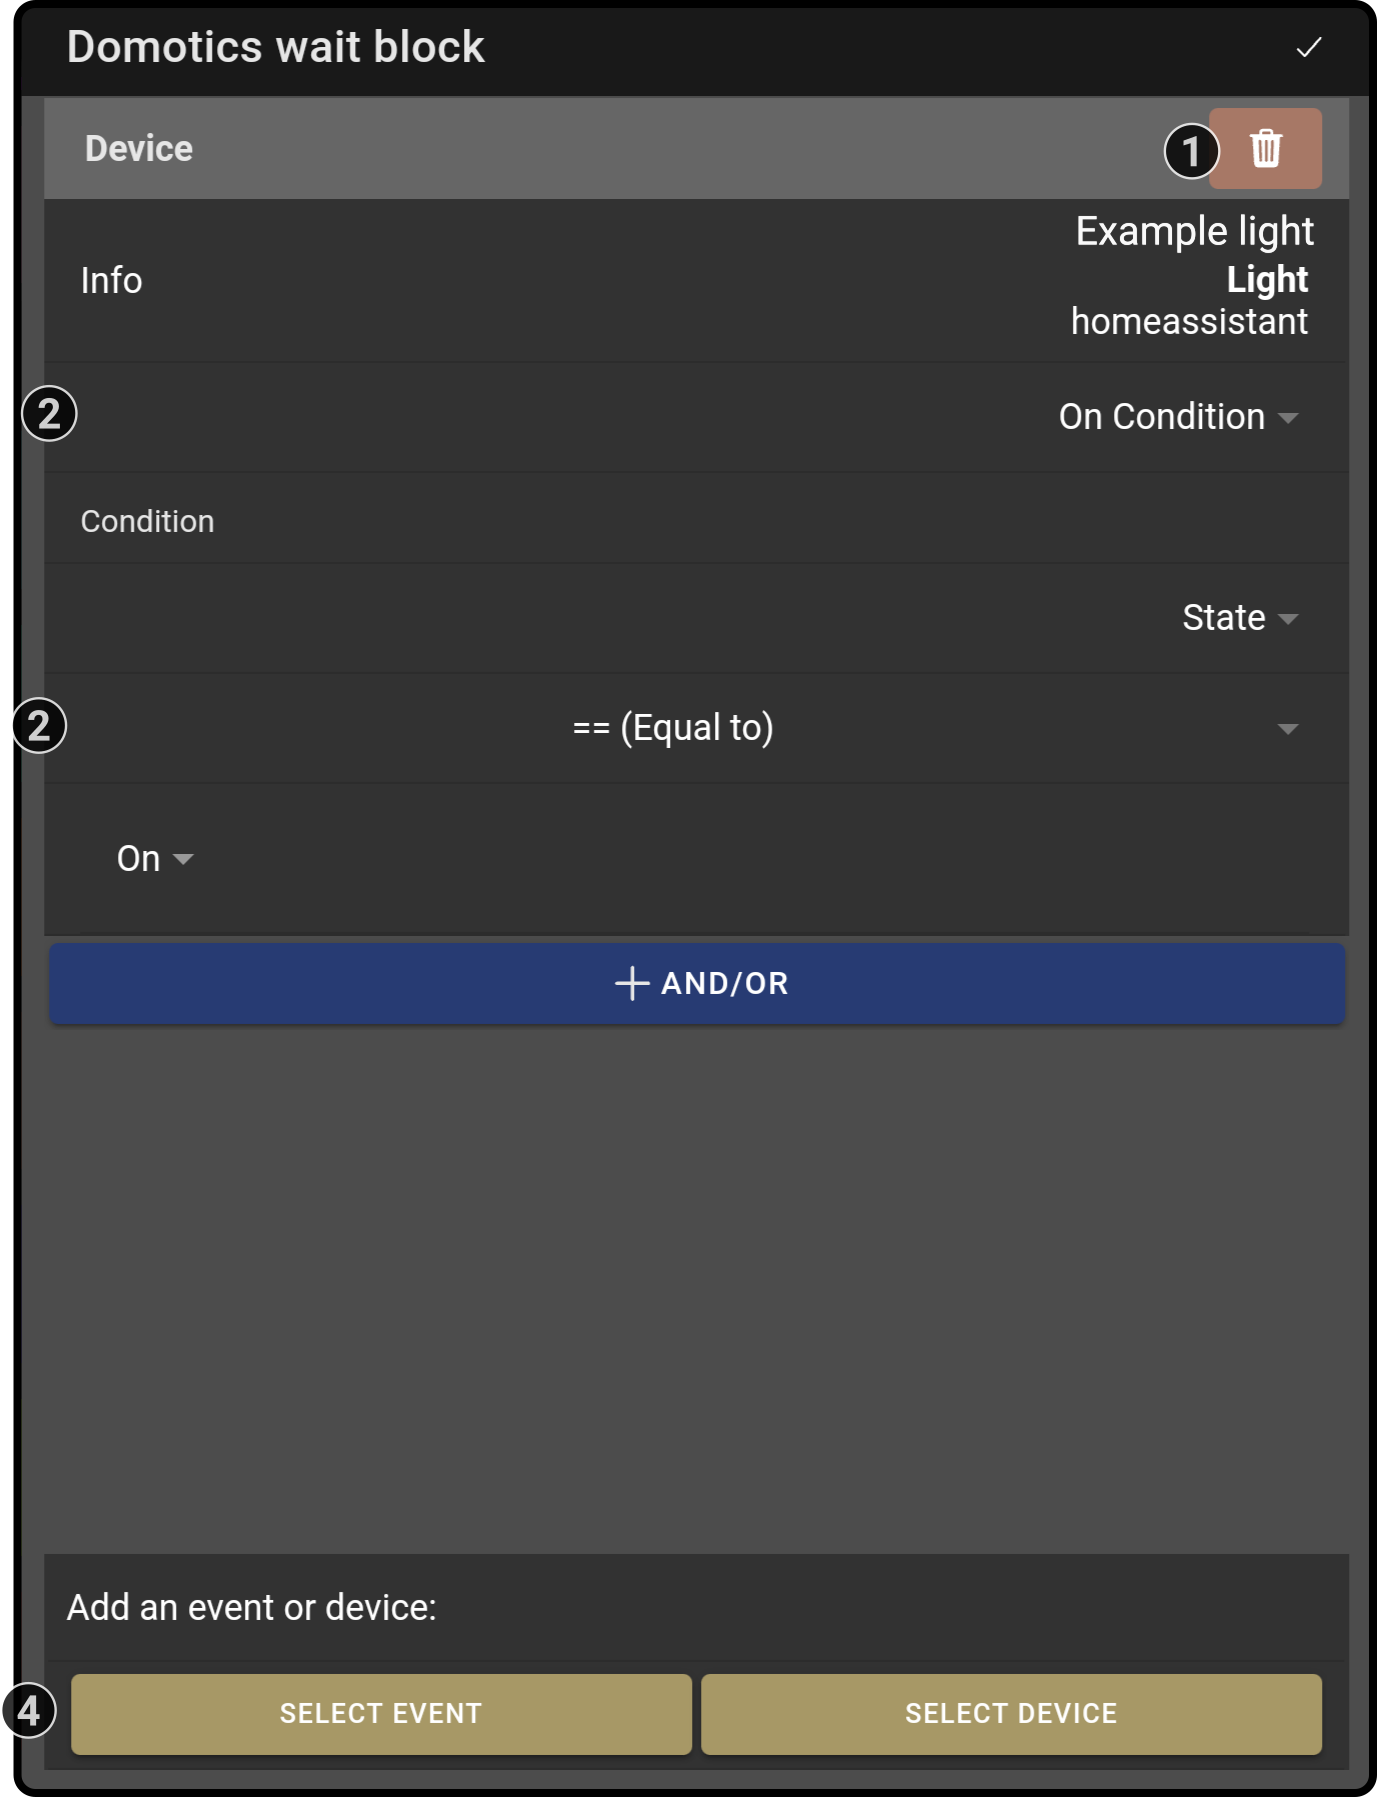
Tap the button next to the device to remove it from the list
-
Select whether the block should continue on any change in the device ('on change') or if specific conditions need to be met ('on condition') before the composition will continue
-
Enter the (optional) conditions for the composition to continue (including additional and/or options).
-
Add an additional 'OR' device for the composition to wait on
| A device can only be registered once per domotics wait block |
Example
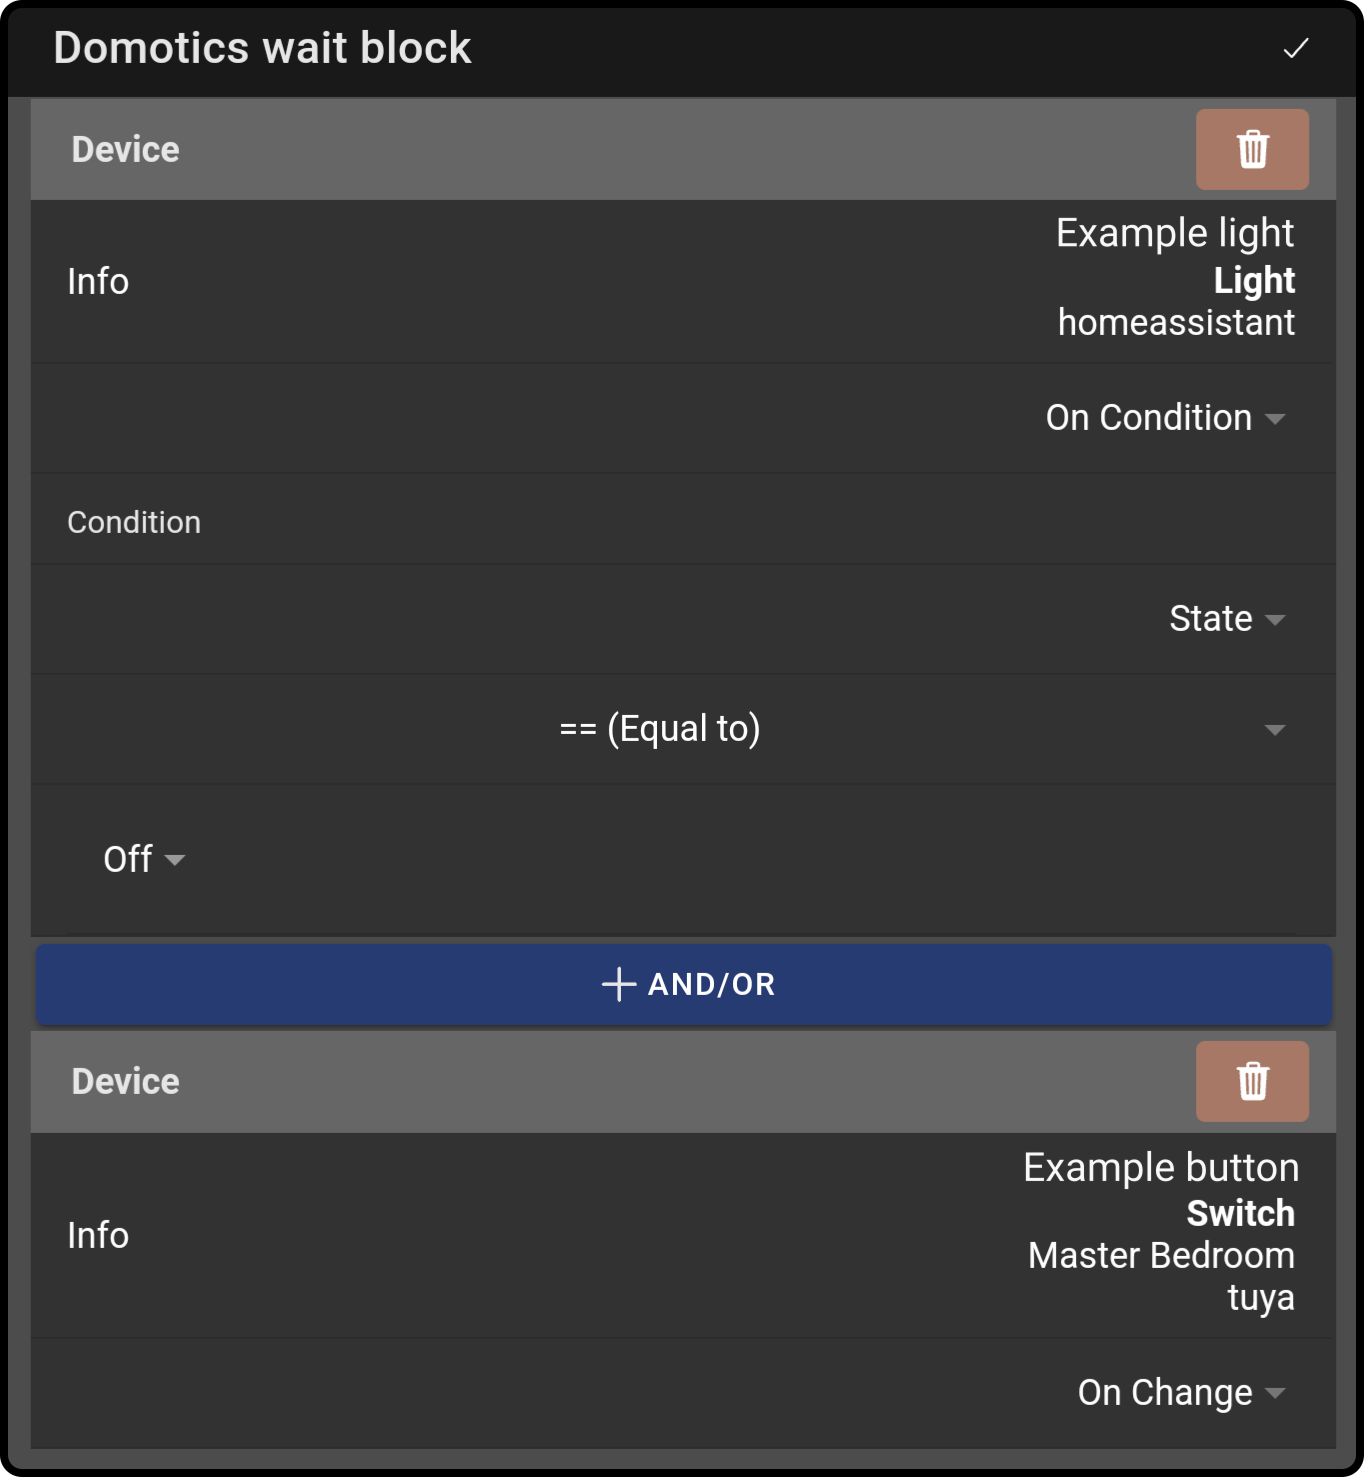
In the example above, the composition will continue íf:
-
The 'Example light' is (turned) off OR
-
The 'Example button' is pushed
 Domotics state block
Function
This block allows the ZBOS device to retrieve the state of a current device registered on a home automation system. This information can be retrieved in a new variable in the rest of the composition.
See the chapter Home Automation for more information on configuring domotics.
Settings
The following settings will be shown when the block is added to the timeline (or when the settings are opened for the first time):
| The shown categories are collected across the configured domotics services (for example, home assistant + tuya configuration). |
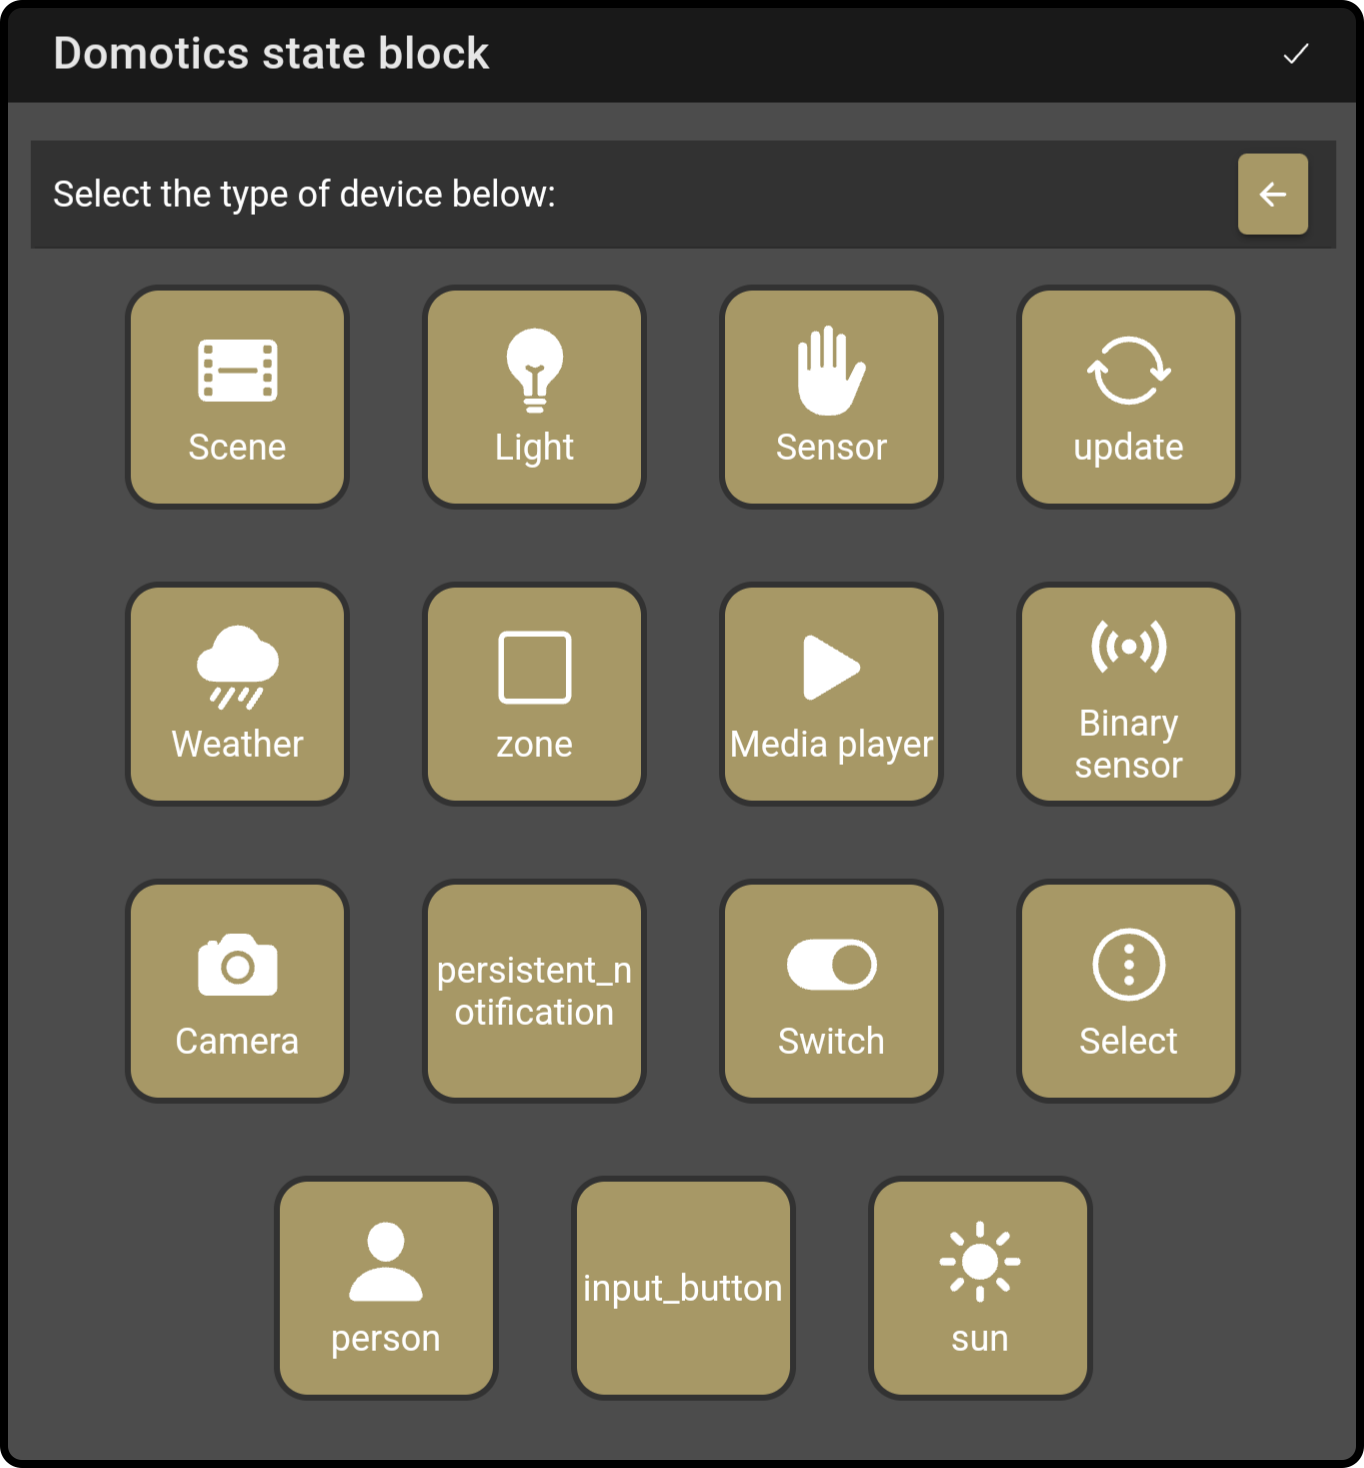
Tap the category to view the list of registered devices (e.g. 'Lights'):
-
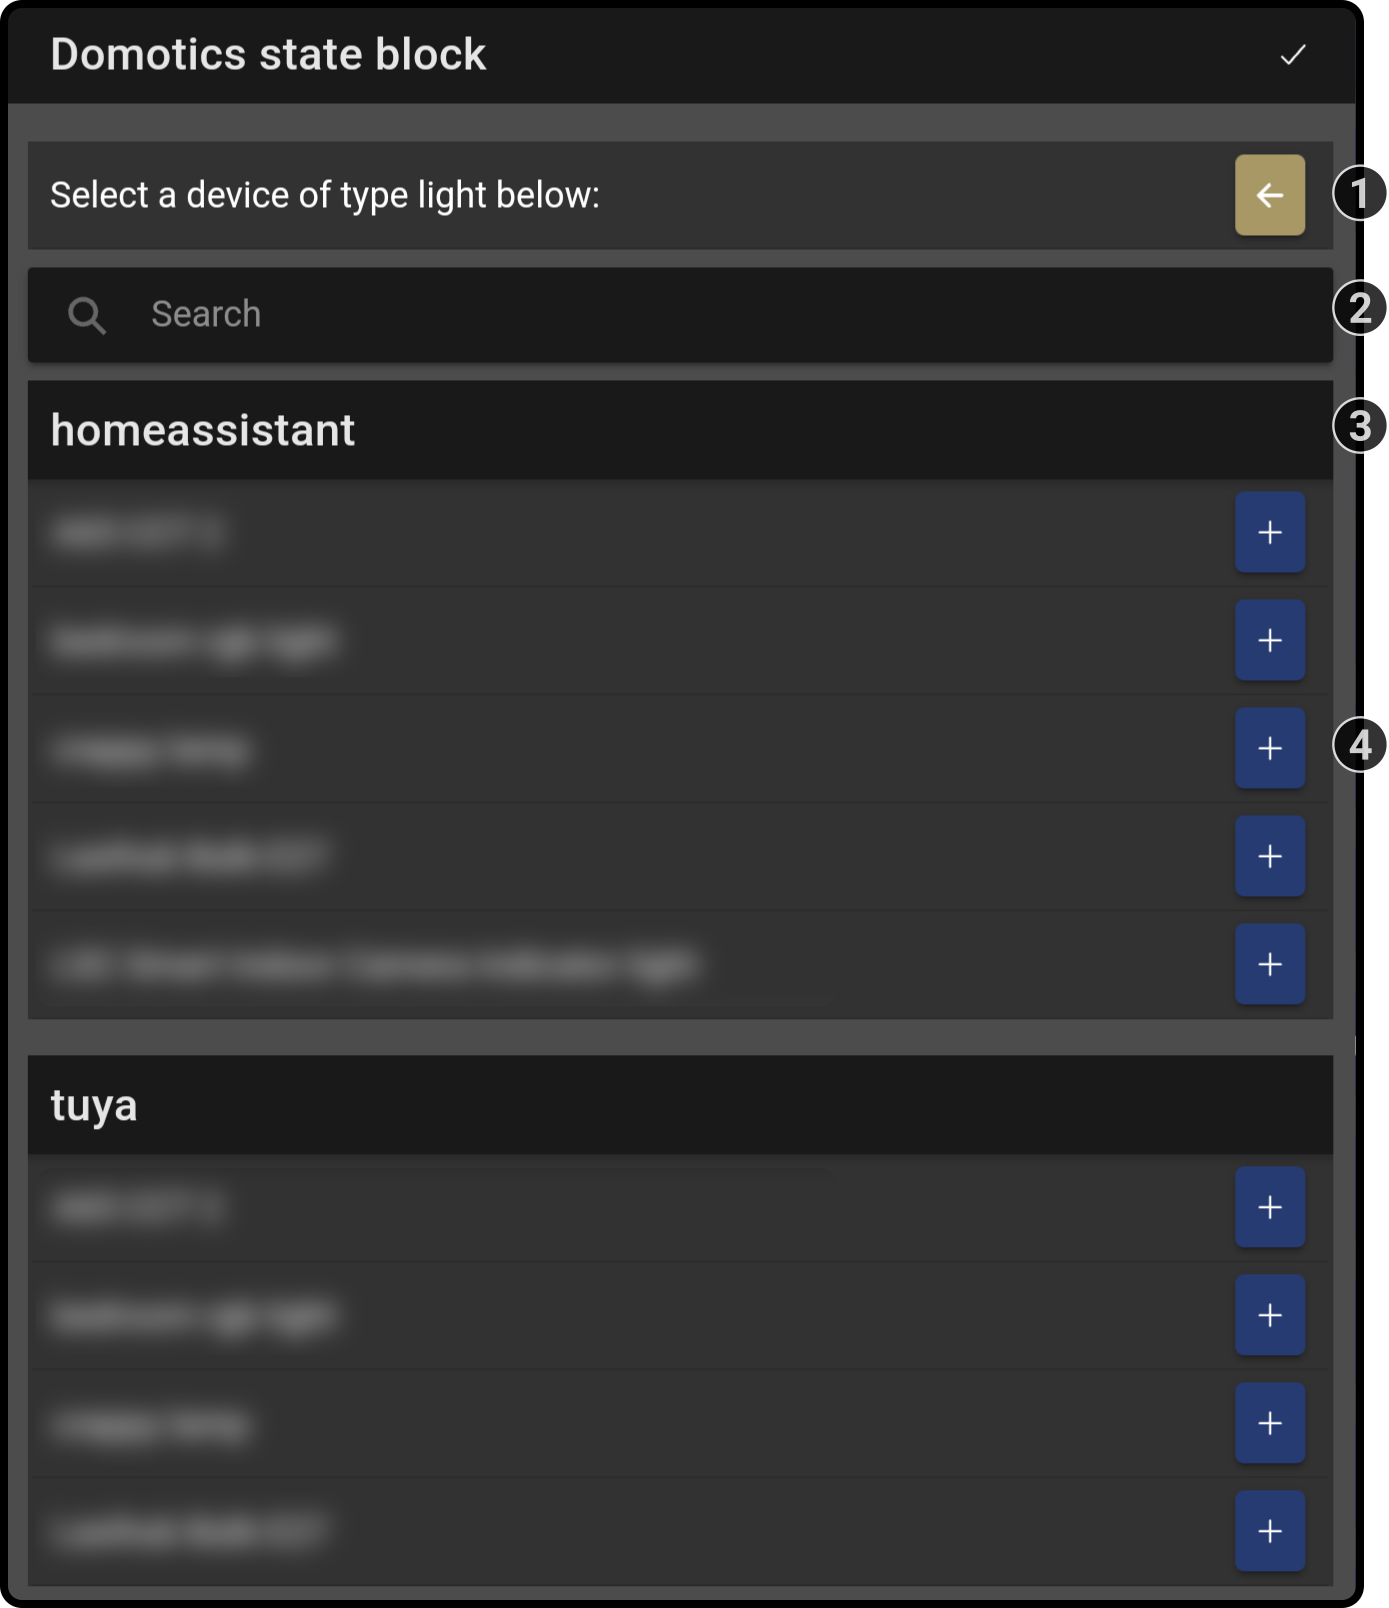
Tap the button to return to the category selection screen
-
Optionally, enter a search term to narrow the list
-
Navigate to the configured domotics system (if applicable)
-
Tap the button next to the device to add it to the composition block and view the configurable options
-
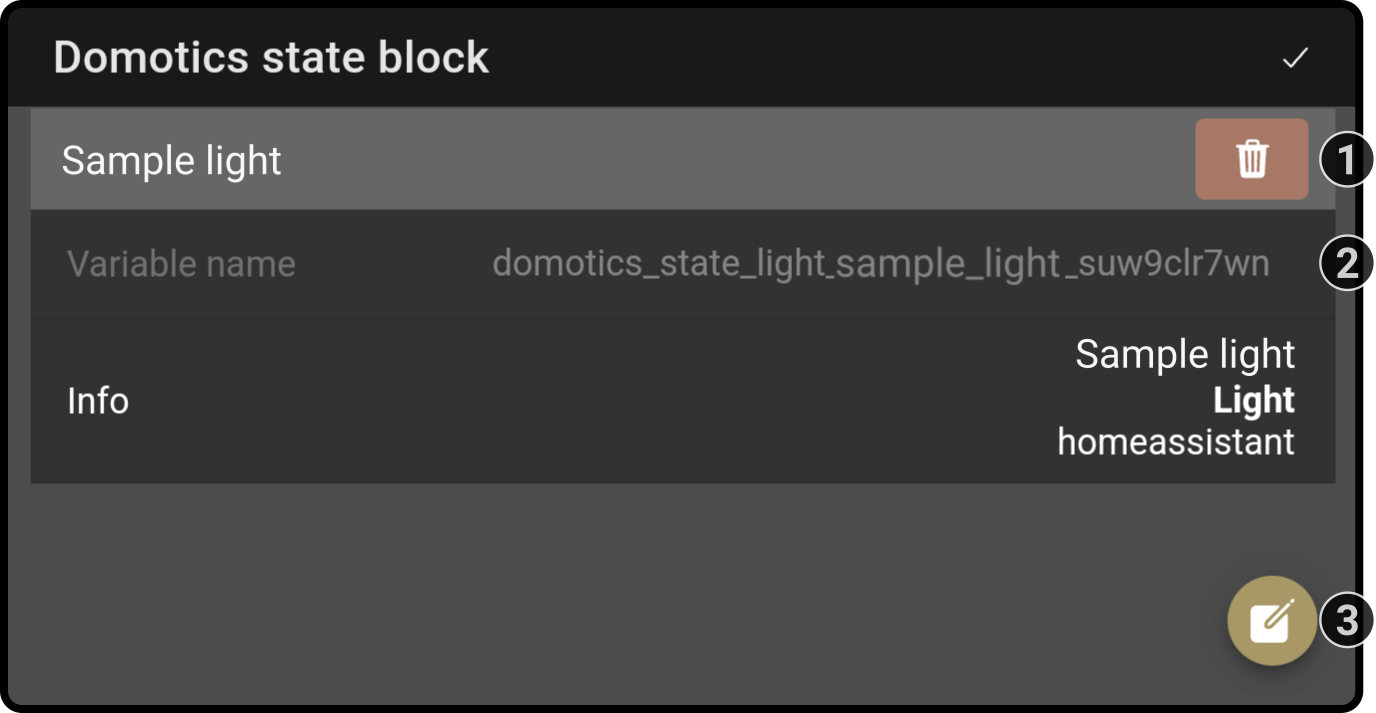
Tap the button to remove the device from the list
-
The name of the variable containing the current state of the selected device is shown
-
Tap the icon to select a different device
Advanced blocks
 If Else
Function
This block will create multiple paths for the composition to take based on an if/else equation.
| For more information, see wikipedia |
Settings
-
Enter the first if/else equation (e.g. 'if user says good morning')
-
Tap the '+ And/Or' to add an additional to first if/else equation (e.g. 'if the current time is before noon')
Tap the icon to remove the additional condition(s). -
Optionally, tap the button 'Else if' to add a another path for the composer
-
Optionally, enter the second if/else equation for the path to tak (e.g. 'if it is currently noon')
Tap the icon to remove the equation. -
Finally, the path for the composition to take if none of the equations are matched is shown
Samples
High-low game
The following instance shows a case of how to program a basic game of high-low:
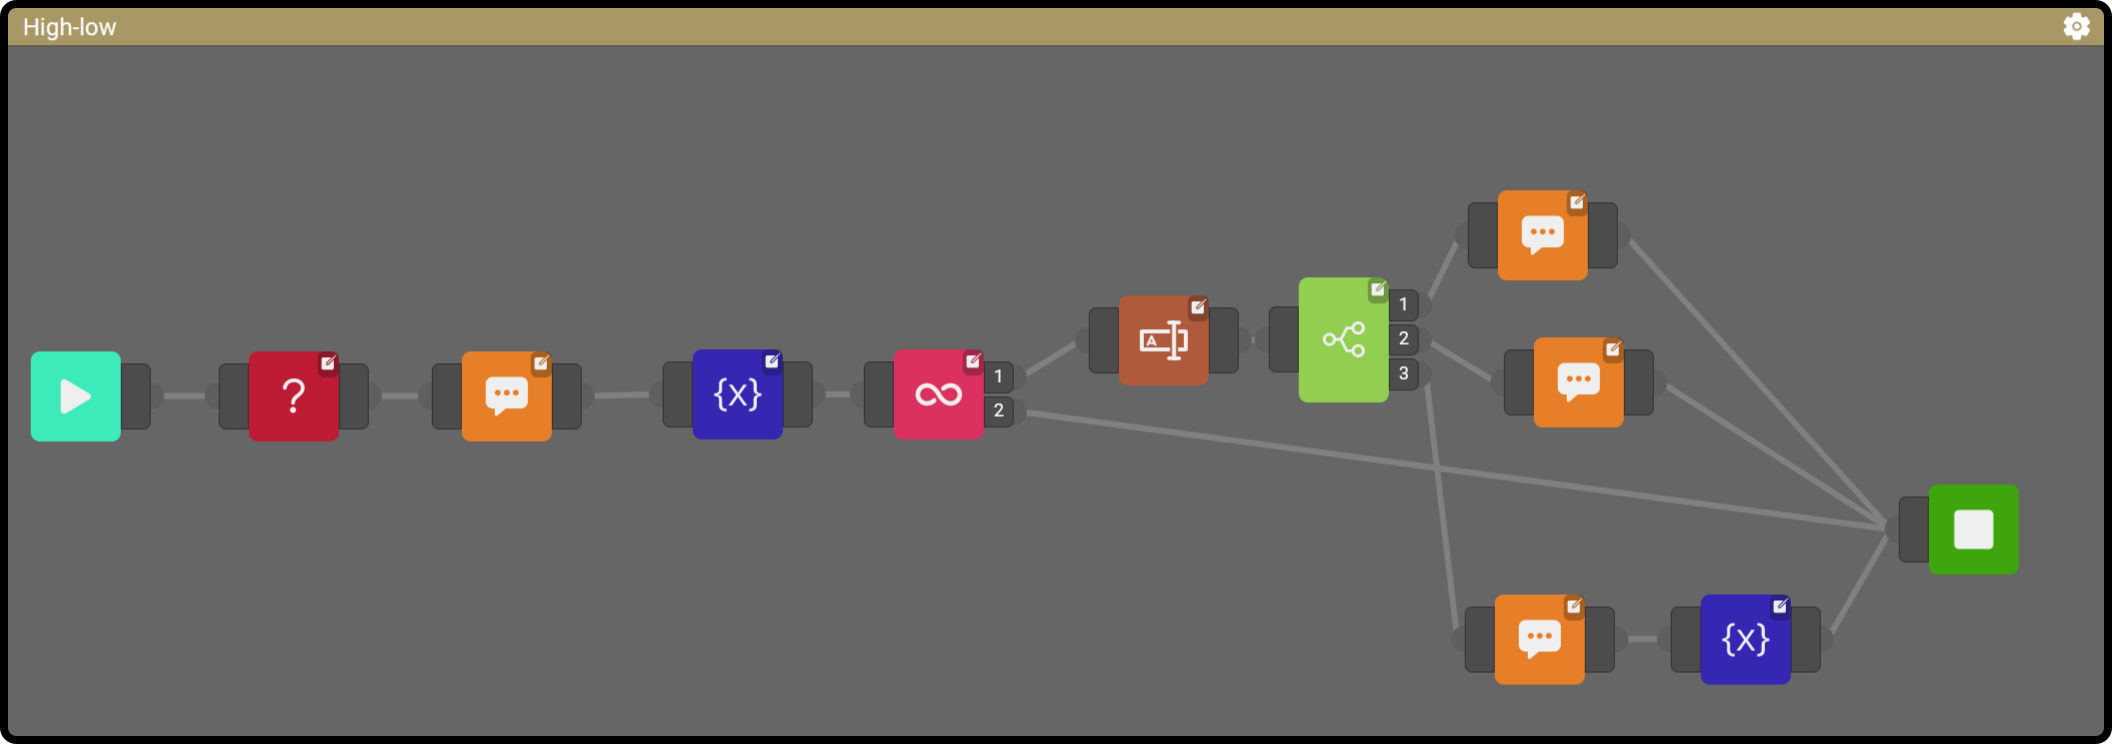
The composition can be downloaded here
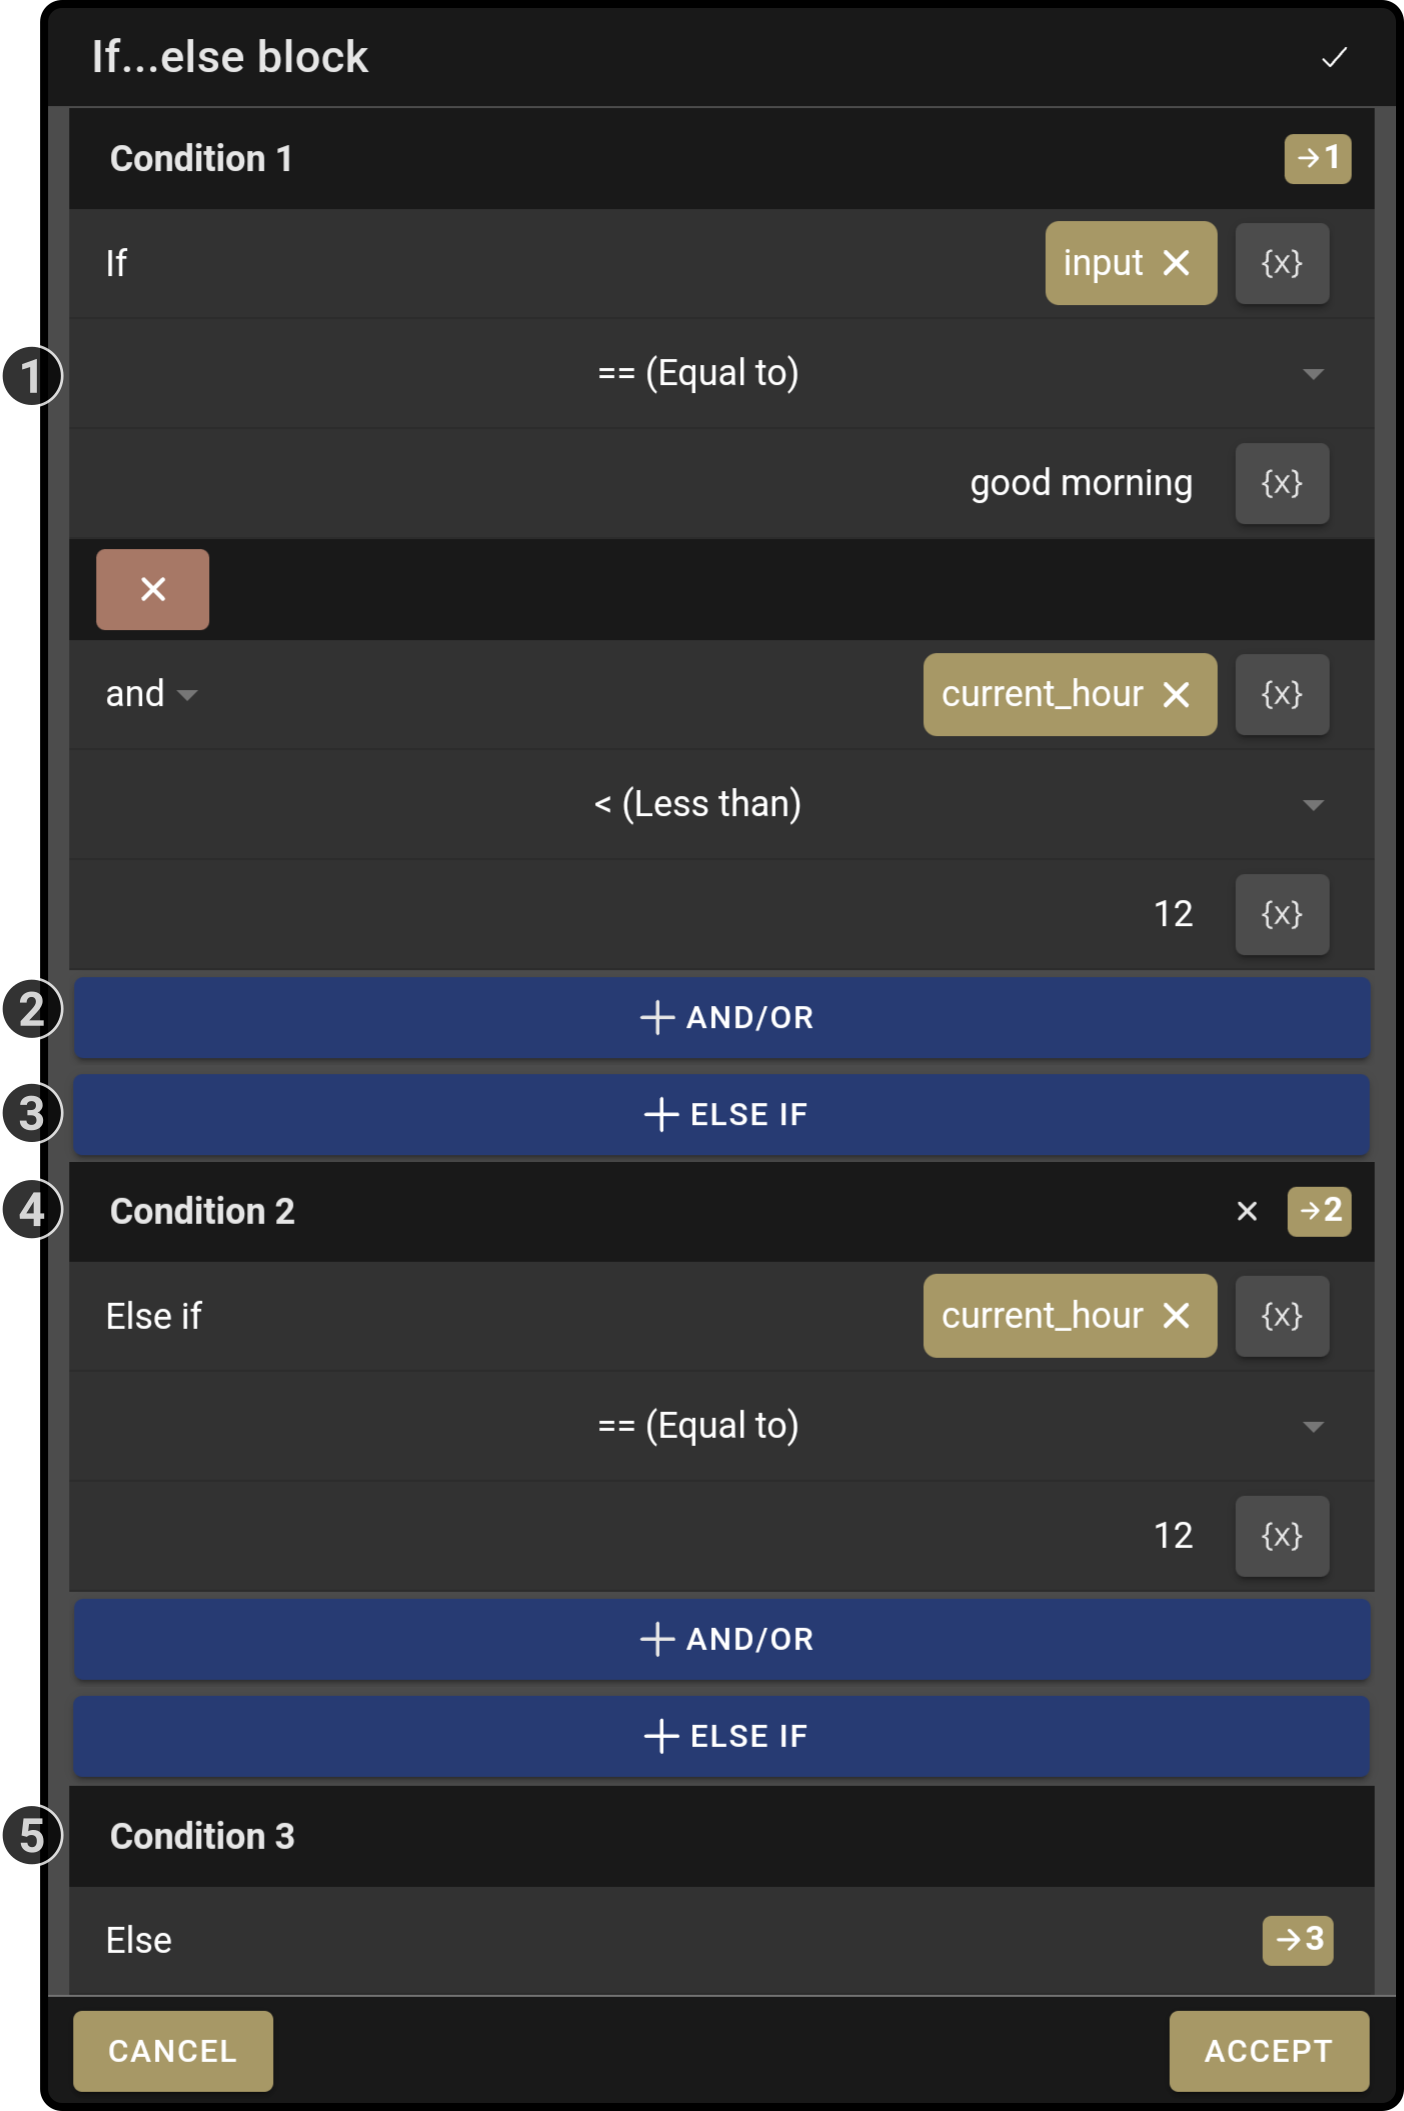
The setting for the if/else block in this case is the following:
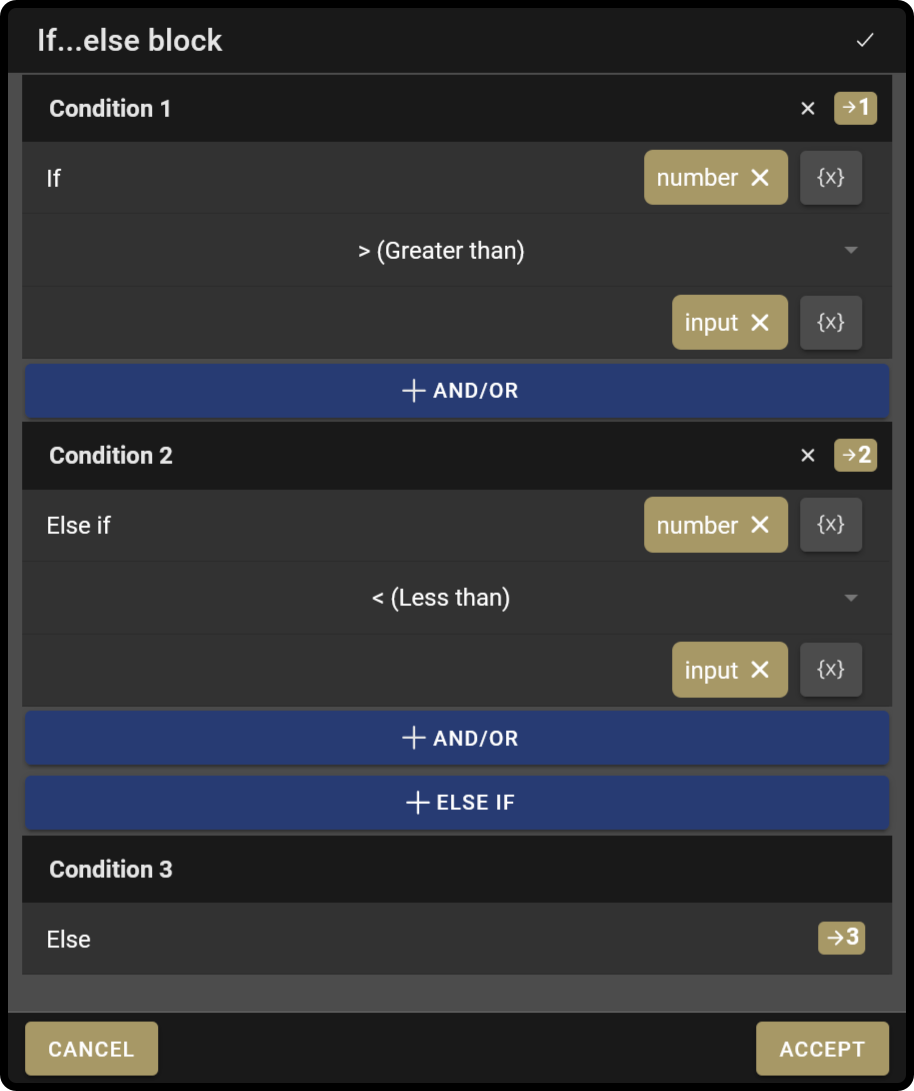
The first equation translates to: 'If the generated number is higher than the input from the user, use path 1'.
The second equation translates to: 'If the generated number is lower than the input from the user, use path 2'.
If none of the equations above are matched, Path 3 will be taken (and the composition will end).
 Advanced Loop
Function
This block will use loop 'path 1' while the condition is met.
The blocks linked to 'Path 1' will repeat while the conditions of the loop are met. Afterward, the blocks linked to path 2 will be played.
Settings
-
For loop (default)
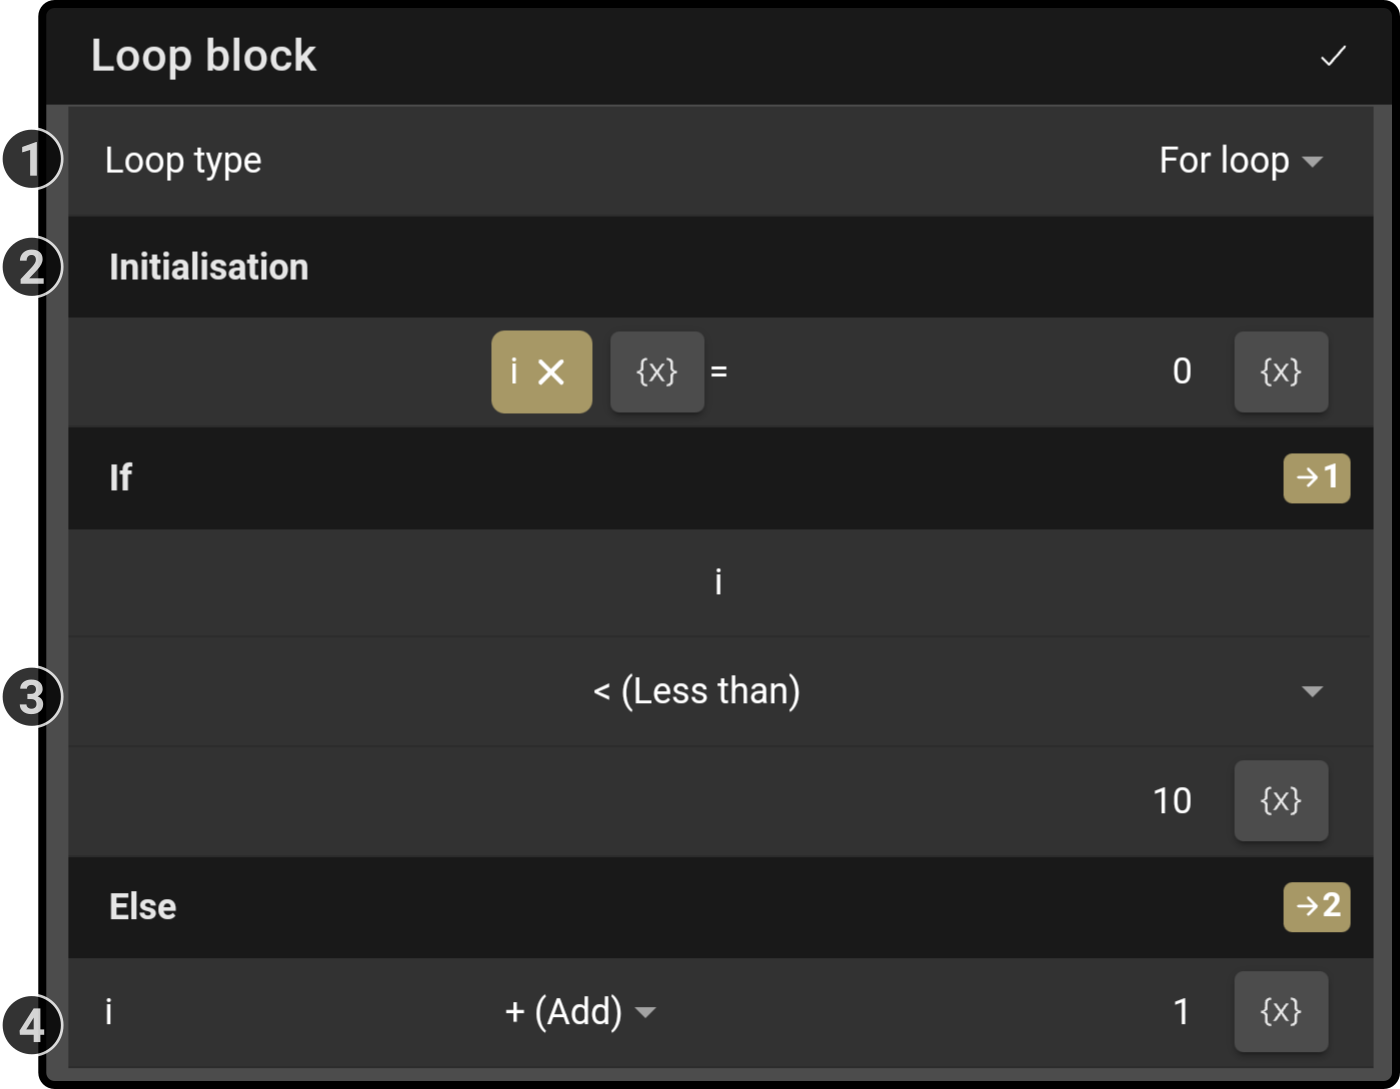
-
Select the option 'For loop' at the top of the modal
-
Enter the name and initial value for the variable (e.g. i = 0)
Tap the {x} icon to view the list of linked variables and add them to the required fields. -
Enter the condition for the loop (e.g. i < 5)
Tap the currently selected operator to change it (e.g. '+' or '-')
Tap the {x} icon to view the list of linked variables and add them to the required fields. -
Enter the operator to apply at the end of the loop (e.g. i+1 ) Tap the currently selected operator to change it (e.g. '+' or '-')
Tap the {x} icon to view the list of linked variables and add them to the required fields.-
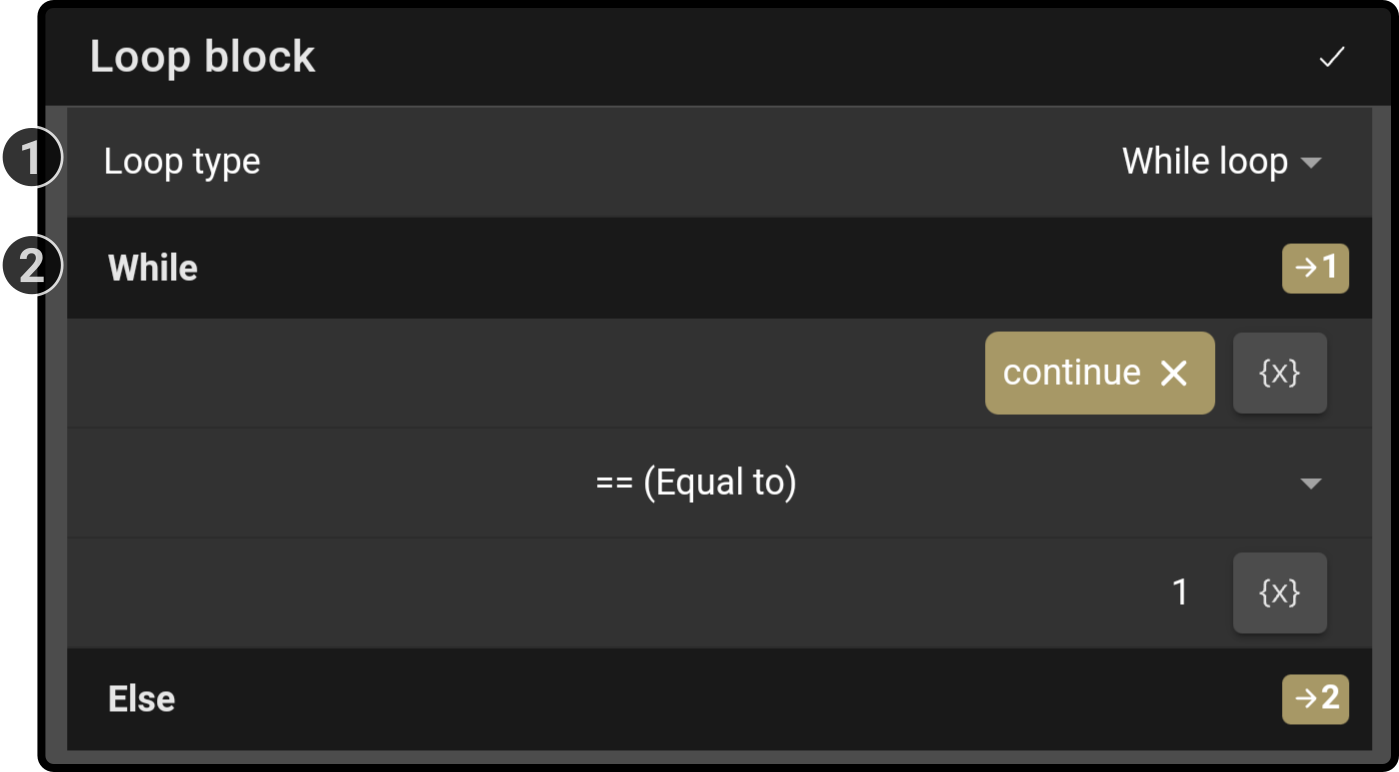
While loop
-
-
Select the option 'While loop' at the top of the modal
-
Enter the condition for the while-loop (e.g. 'while loop == '1')
Tap the currently selected operator to change it (e.g. '+' or '-')
Tap the {x} icon to view the list of linked variables and add them to the required fields.
Usage
-
Link up all earlier blocks containing variables to be used in the loop (e.g. a variable set to '0' for the while loop)
-
Set the loop-conditions
-
Link the blocks to be looped to path 1 and place a Stop-block at the end
-
Link path 2 for the rest of the composition
| The name of the variable used for the loop condition must be unique and can only be used by the blocks in path 1. |
Loop block samples
For loop
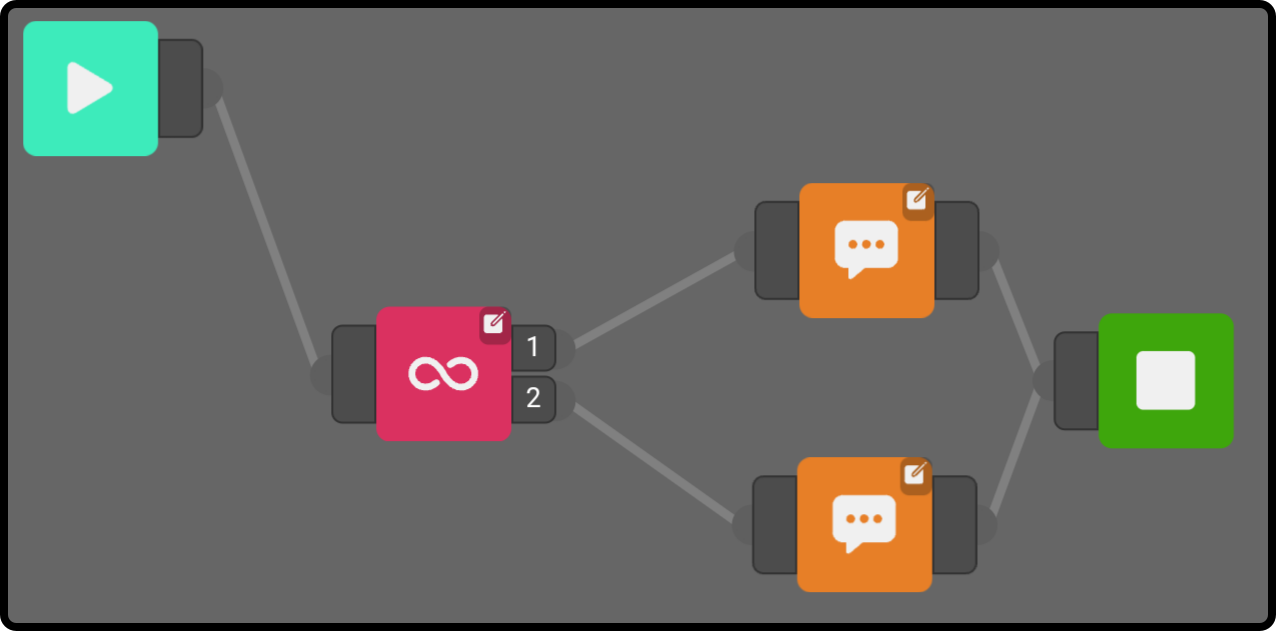
This sample will play the looped block four times:

The composition can be found here
The settings for the loop block are:
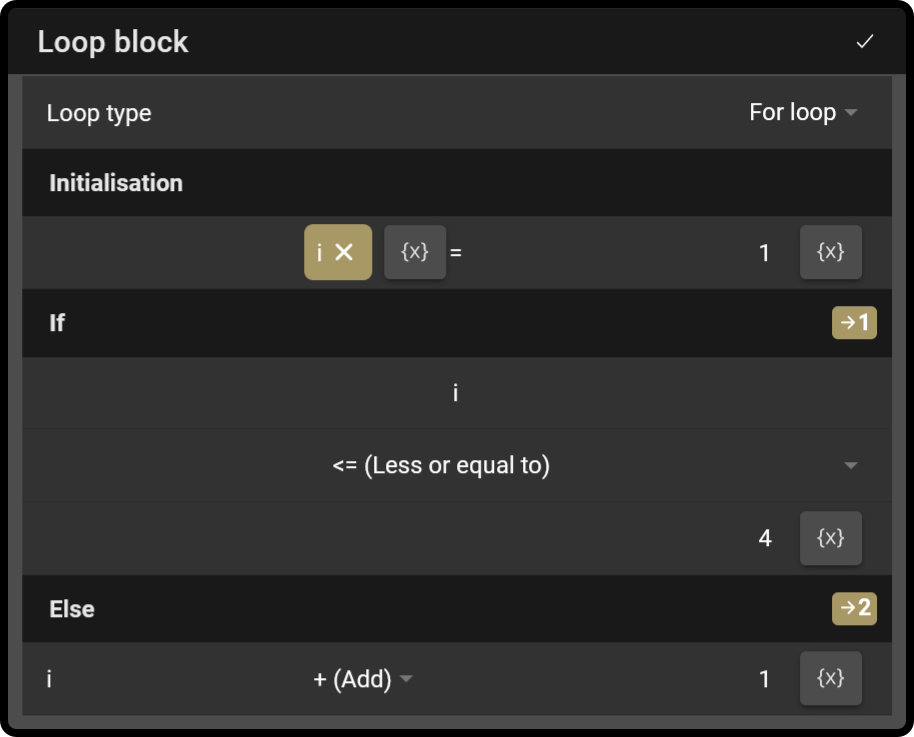
The equivalent of the code for(i=1;i⇐5;i++) has been entered in the block.
While loop
This example will play the loop while the user hasn’t entered the 'lucky number':
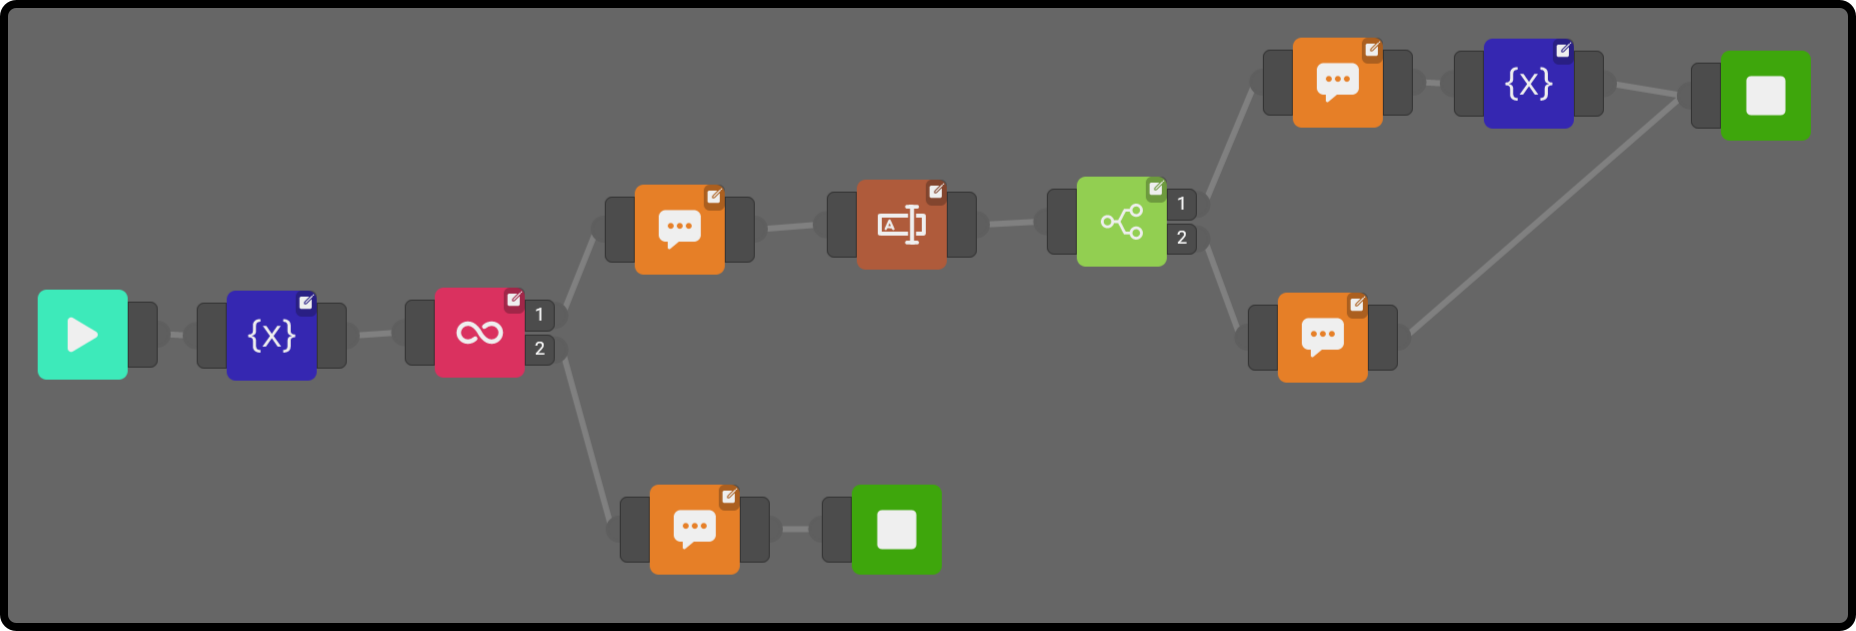
The composition can be found here
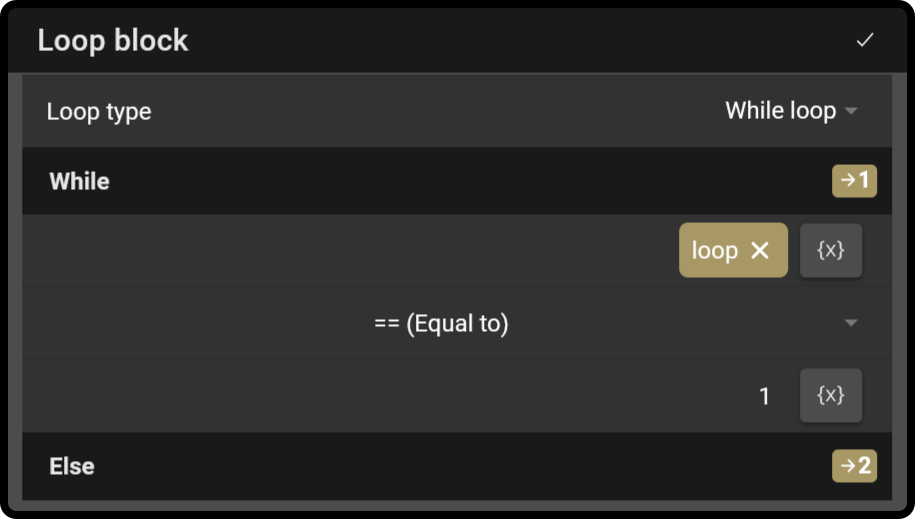
The equivalent of 'while (loop==true)' is shown in this example.
| The variable 'loop' has been defined in the variable-block as a '1' (or the equivalent 'true') in the variable-block at the start of the composition. |
 Health Certificate
Function
This block is used to scan health certificate QR codes, such as the EU Digital COVID Certificate.
The aim of the EU Digital COVID Certificate is to facilitate travel, helping to exempt holders from restrictions such as quarantine and to provide safe access to areas like concerts, festivals, theaters and restaurants.
The EU Digital COVID Certificate serves as proof that a person has been vaccinated against COVID-19, has recently received a negative COVID-19 test, or is protected against the disease after being infected (recovery valid for up to 6 months).
Settings
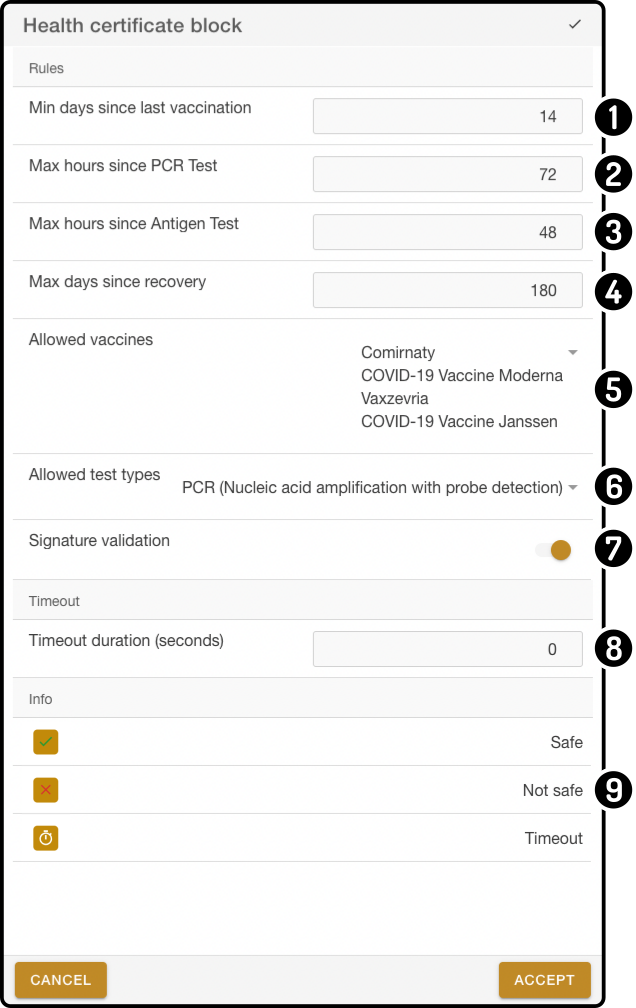
The settings for the health certificate block can be tweaked to conform with local requirements, as these tend to vary depending on the country or region of use.
-
Minimum number of days since the last vaccination
-
Maximum hours since last PCR test
-
Maximum hours since the last antigen test
-
Maximum days since recovery from infection
-
Allowed vaccine types
(this list will be need to be updated via a software update in case new vaccines become available) -
Allowed test types
(this list will be need to be updated via a software update in case new tests become available) -
Signature validation: verify the validity of a QR code by checking if it is officially signed (requires internet connection).
-
Timeout: how many seconds to wait until reading of the QR code is cancelled when not QR code is presented.
-
Info section, describes the different outputs of this block:
-
First output is the flow for when the contents of the QR code is considered safe;
-
Second output is the flow for unsafe QR code;
-
Third output is the flow when a timeout occurs (when no QR code was presented).
-
Usage
A demo composition is available on ZBOS powered devices (with RAIL 2.5.0+ installed), displaying the default options for vaccination records as used in Belgium:
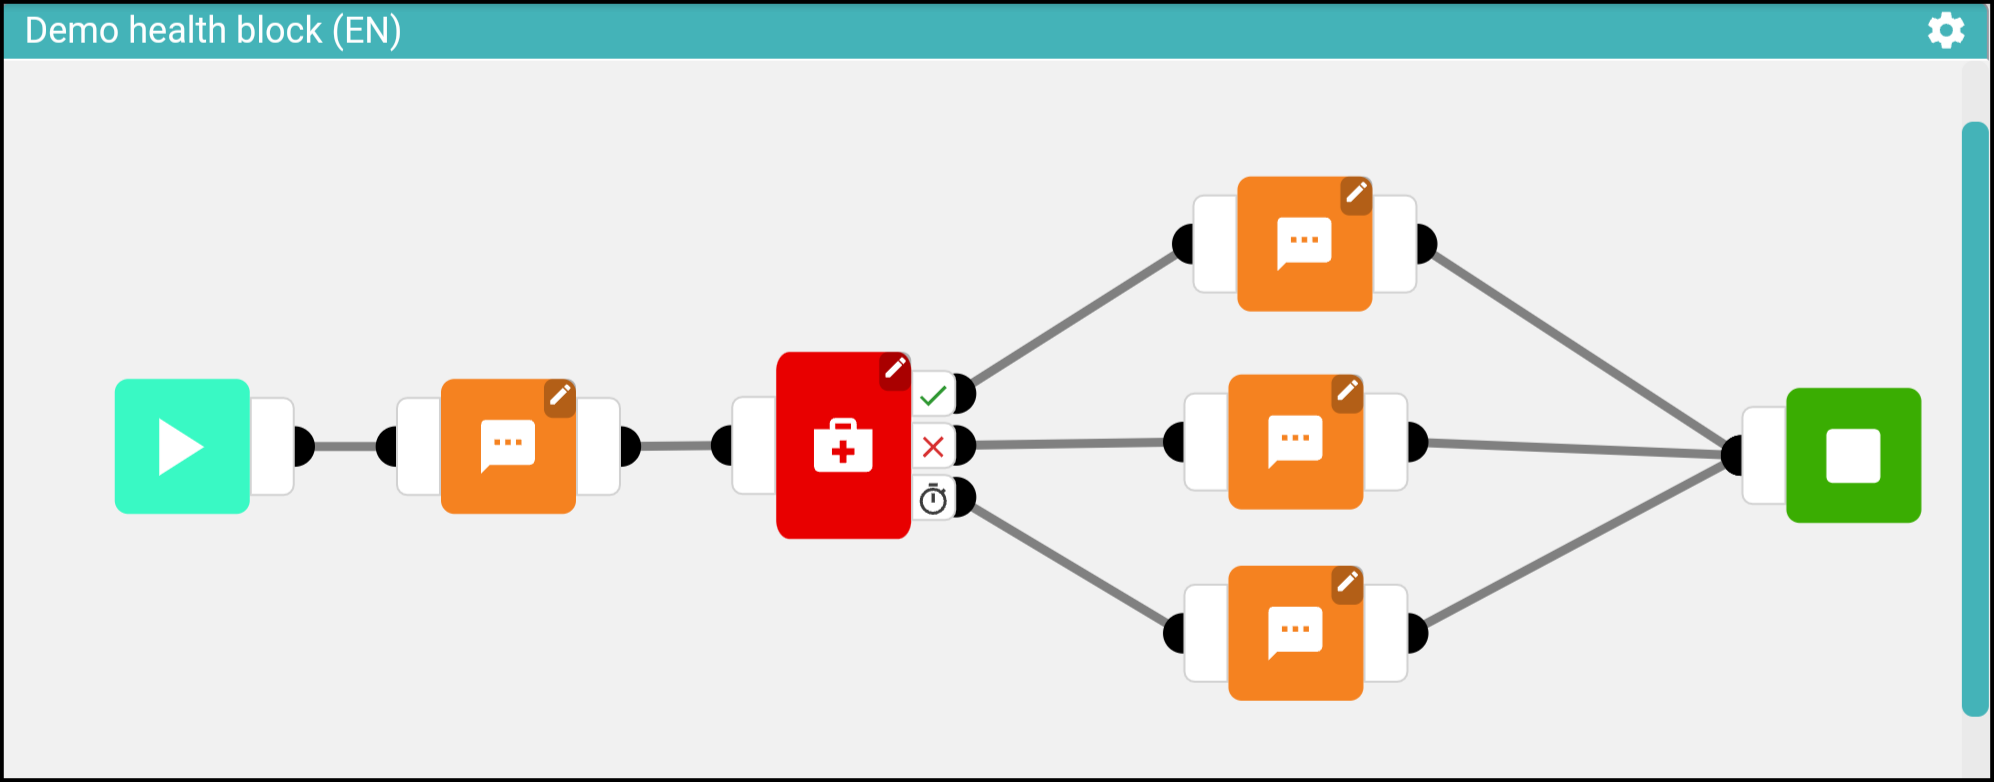
The health certificate has 3 output connectors:
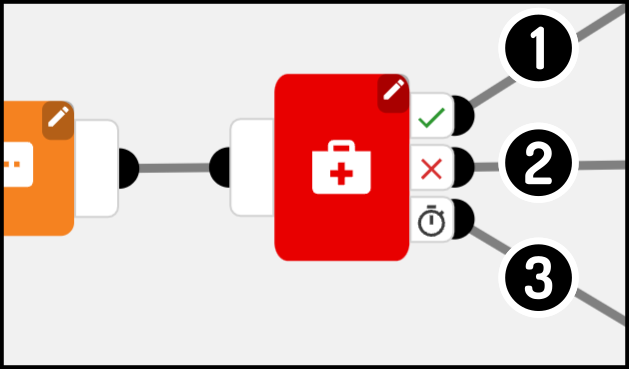
-
If the certificate is safe, the output
 will be used.
 -
If the certificate is unsafe, the output
 will be used.
 -
If no certificate is shown within the set time range, the output
 will be used.
Information in the certificate
Information in the payload
When the QR is read out by ZBOS Composer, the information is placed in a {health_certificate} variable which can be used for further processing or user feedback.
The data structure goes like this:
{
	"health_certificate": {
		"raw_content": {

		},
		"formatted_content": {
			"person": {
				"given_name": "The person's given name",
				"family_name": "The person's family name",
				"given_name_transliterated": "A transliterated version of the person's given name",
				"family_name_transliterated": "A transiterated version of the persons family name",
				"name_mrz_type1": "MRZ Type 1 version of the name",
				"name_mrz_type2": "MRZ Type 2 version of the name",
				"name_mrz_type3": "MRZ Type 3 version of the name",
				"name_mrz_be": "MRZ version of the name as used on Belgian ID",
				"name_mrz_sk": "MRZ version of the name as used on Slovakian ID",
				"name_mrz_fr": "MRZ version of the name as used on a French ID",
				"date_of_birth": "The person's date of birth"
			},
			"vaccination": {
				"target_disease": "Which disease this certificate is about",
				"vaccine": "The name of the vaccine",
				"medicinal_product": "The contents of the vaccine",
				"manufacturer": "The manufacturer of the vaccine",
				"dose_number": "Dose number",
				"dose_total": "Dose total",
				"date": "Date of the vaccine",
				"country_code": "Issueing country code",
				"country": "Issueing country"
			},
			"test": {
				"target_disease": "Which disease this certificate is about",
				"test_type": "The type of test taken",
				"test_name": "The name of the test",
				"manufacturer": "The manufacturer of the test",
				"sample_date": "The date of the test",
				"test_result": "The result of the test",
				"testing_centre": "The testing centre where the test was taken",
				"country_code": "Issueing country code",
				"country": "Issueing country"
			},
			"recovery": {
				"target_disease": "Which disease this certificate is about",
				"first_result": "Date of the first negative test result",
				"valid_from": "Start date of recovery certificate",
				"valid_until": "End date of recovery certificate",
				"country_code": "Issueing country code",
				"country": "Issueing country"
			}
		}
	}
}
The formatted content can be used in Composer to perform further actions, for example display the name of the person, or compare to identity information.
For compatibility with a broad variety of international travel documents, different types of MRZ name formats are provided:
| Key | Type | Location (0 based, not incl. last) | Max. length | Example |
|---|---|---|---|---|
|
Type 1 |
Row 2, column 0-30 |
30 |
SOME<SURNAME<<FIRSTNAME<SECOND |
|
Type 2 |
Row 0, column 5-36 |
31 |
SOME<SURNAME<<FIRSTNAME<SECONDN |
|
Type 3 (eg.: internation passport) |
Row 0, column 5-44 |
39 |
SOME<SURNAME<<FIRSTNAME<SECONDNAME<THIR |
|
Belgian (similar to Type 1, but always truncates the third name regardless of available space) |
Row 2, column 0-30 |
30 |
SOME<SURNAME<<FIRSTNAME<SECOND |
|
Slovak |
Row 0, column 5-34 |
29 |
SOME<SURNAME<<FIRSTNAME<SECON |
|
French |
Surname: row 0, column 5-30 |
25 |
SOME<SURNAME |
For using these values in a composition, use variable names like this: {health_certificate.formatted_content.person.name_mrz_type1}.
 Start
Start
Function
This block is used to indicate the start of the composition.
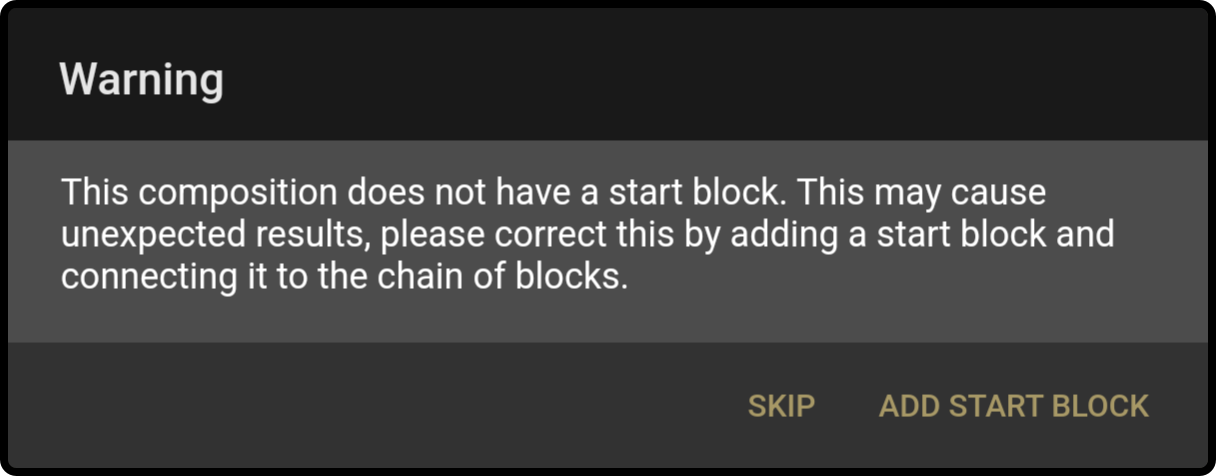
| This block is required for each advanced composition, and has no settings. |
A warning will be shown if no start-block is present when starting an advanced composition.
 Stop
Stop
Function
This block is used to indicate the stop of (a branch of) the composition.
| This block can be linked to multiple times. |
 API Call
Function
This block will retrieve information using an API Call. (See here for more information on API)
Settings
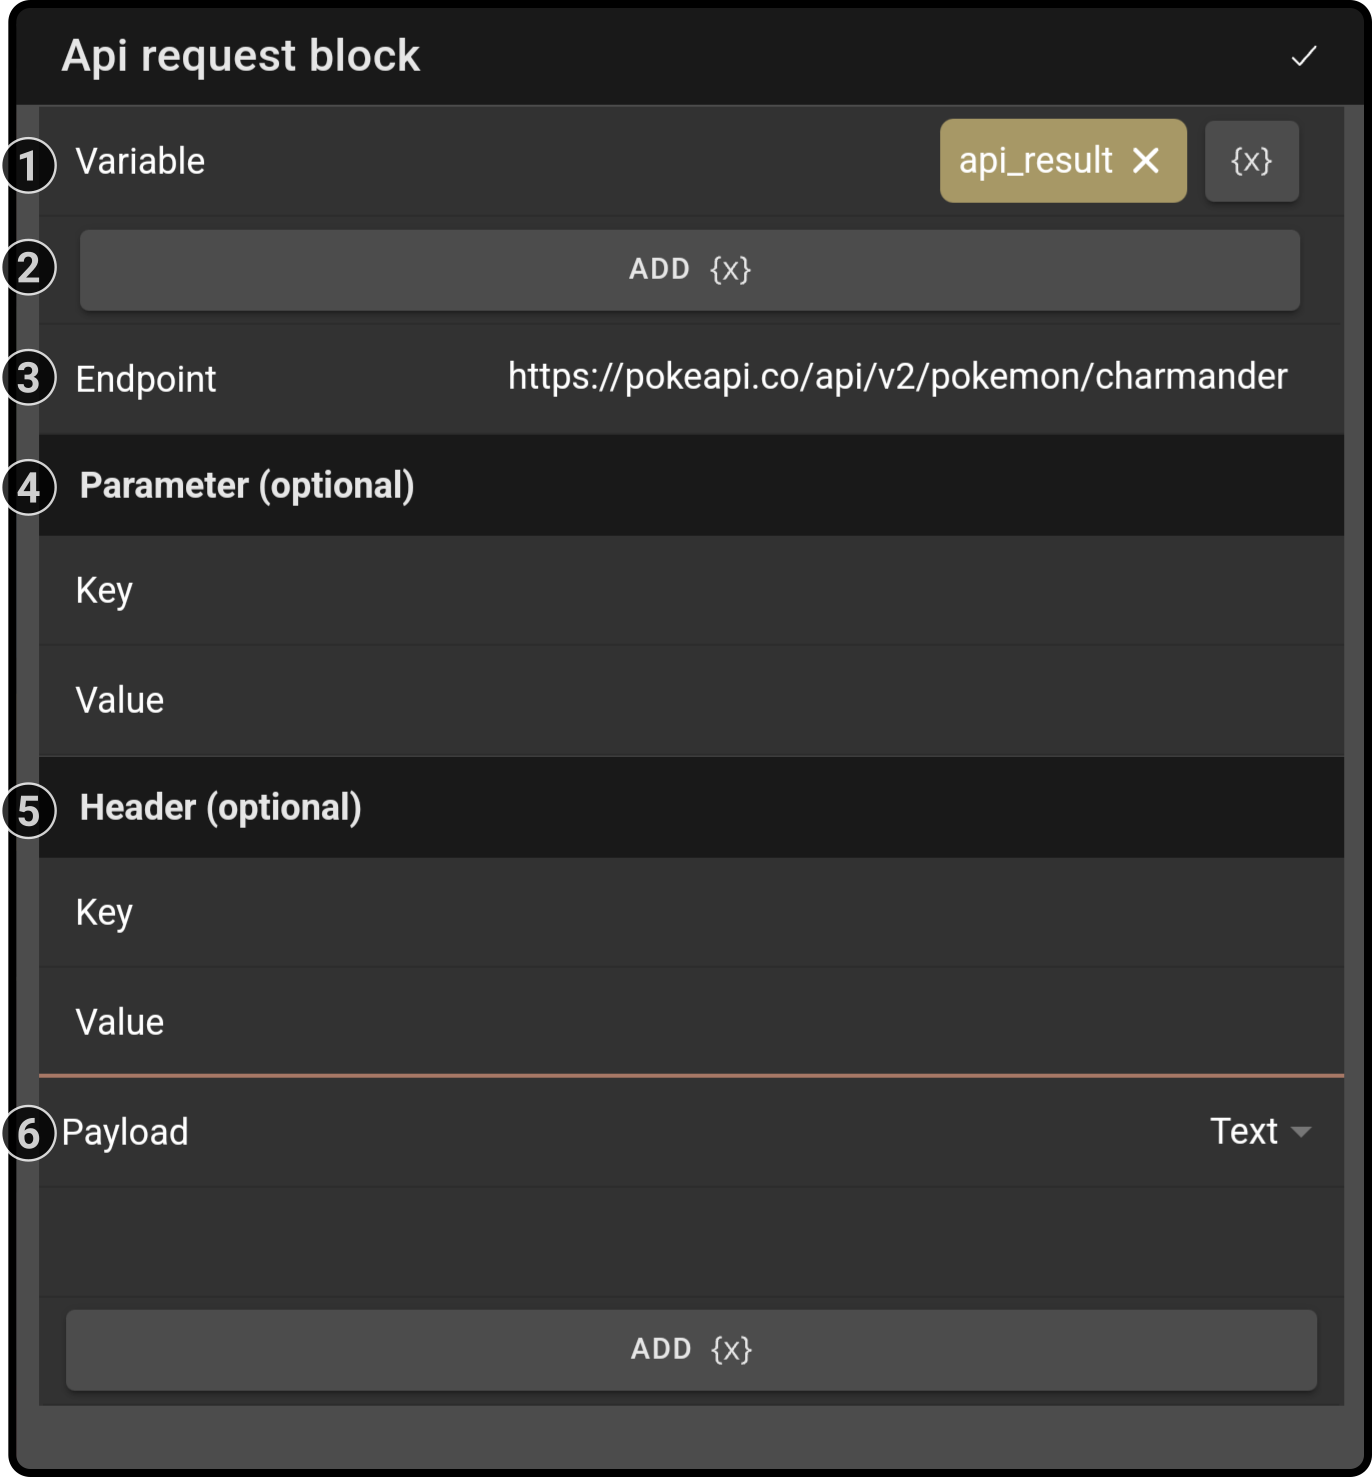
-
Enter the name of the variable containing the reply of the API request (e.g. 'api_result')
Tap the button {x} to insert a variable at the cursor location. -
Tap the button 'Add {x}' to insert a variable at the cursor location
-
Complete the API endpoint using plain text and/or variables
-
Enter optional parameters for the API request (optional).
-
Enter optional header information for the API request (optional).
-
Enter a message for the API request (optional).
| The list of parameters will expand or shrink once a parameter has been entered or removed. |
Usage
-
Enter a variable name
-
Enter the endpoint and other required information (i.e. parameters and header)
-
If the response is JSON-formatted, the information retrieved can be used in other blocks (see further).
| The website http://www.mocky.io can be used to send/receive API calls for testing/evaluation purposes. |
A possible example of a JSON-file the API will return:
{
   "location": "Oostende",
   "company":
   {
	"name": "Talemate",
	"address": "Archimedesstraat 17",
       "field":"Robotics, IoT and metaverse",
       "hours":
       {
           "mondays":"08:00 - 18:00",
           "tuesdays":"08:00 - 18:00",
           "wednesdays":"08:00 - 18:00",
           "thursdays":"08:00 - 18:00",
           "fridays":"08:00 - 18:00",
           "saturdays":"closed",
           "sundays":"closed"
       }
   }
}
Data retrieval
The following variables can be used in the following blocks of the composition to retrieve specific JSON-related data:
| Variables | Output |
|---|---|
{test.location} |
Oostende |
{test.company.name} |
Talemate |
{test.company.hours.mondays} |
08:00 - 18:00 |
{test.company.hours[0]} |
08:00 - 18:00 |
 Math Formula
Function
This block will calculate a variable based on the math formula entered.
| If the math formula isn’t valid, the composition will skip this block altogether. |
Settings
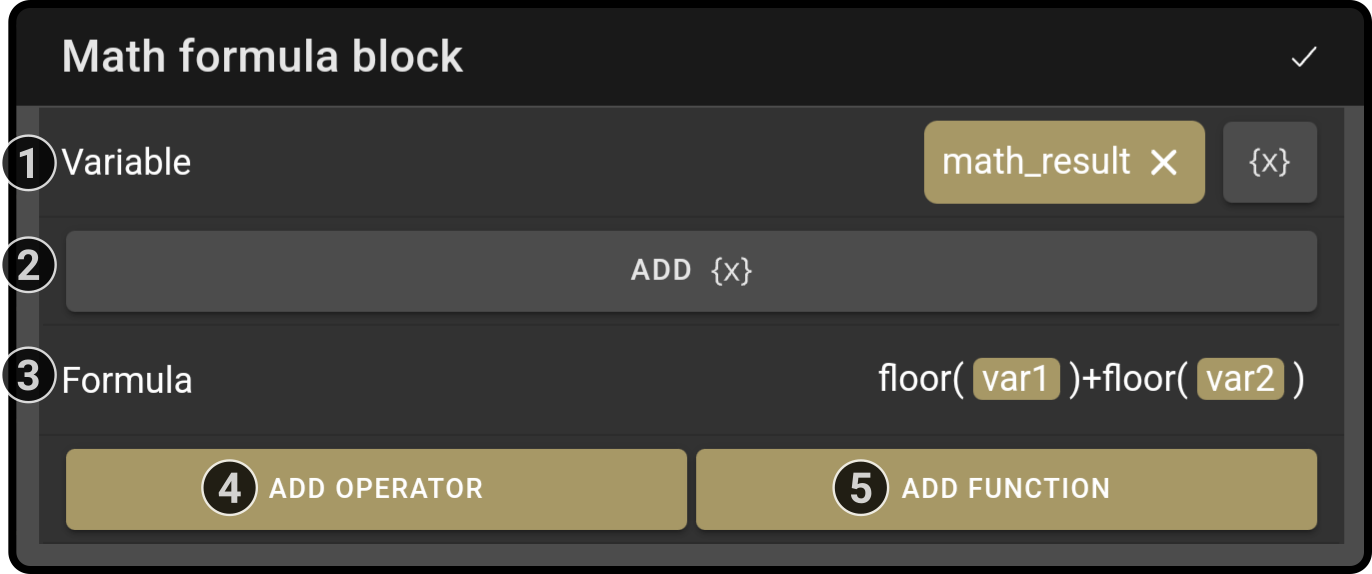
-
Enter the name of the variable to contain the value of the math operation (e.g. 'math_result')
Tap the button {x} to insert a variable at the cursor location. -
Tap the button 'Add {x}' to insert a variable at the cursor location
-
Enter the equation for the variable in the formula field
-
Tap the button 'Add operator' to add a valid math operator to the equation
-
Tap the button 'Add function' to add a valid math function to the equation
| Only the listed operators and functions are supported. |
Allowed operators
Some operators can be used directly (e.g. {variable} * {variable}). The following list details all operators that can be used directly.
| Operator | Function |
|---|---|
+ |
addition |
- |
subtraction |
* |
multiplication |
/ |
division |
- |
sign operator (e.g. -4) |
% |
modulo |
Built-in functions
Other than using mathematical operators, the following functions can also be used to calculate a result. These functions must be used as follows: <function>(<argument>). E.g. sqrt(4) will result in a variable with the value 2.
| Function | Calculates |
|---|---|
abs |
absolute value |
acos |
arc cosine |
asin |
arc sine |
atan |
arc tangent |
cbrt |
cubic root |
ceil |
nearest upper integer |
cos |
cosine |
cosh |
hyperbolic cosine |
exp |
Euler’s number raised to the power (e^x) |
floor |
nearest lower integer |
log |
logarithmus naturalis (base e) |
log10 |
logarithm (base 10) |
log2 |
logarithm (base 2) |
sin |
sine |
sinh |
hyperbolic sine |
sqrt |
square root |
tan |
tangent |
tanh |
hyperbolic tangent |
signum |
signum function |
| To use already existing variables, enter them between curly brackets (e.g. {variable 1}) to use them in the equation. |
| Leave spaces between the operators to calculate the correct values. |
Samples
Calculate the circumference of a circle
In the following composition, the device will calculate the circumference of a circle up to two decimal points.

The user is asked to input the radius of the circle and the device will calculate the circumference of the circle.
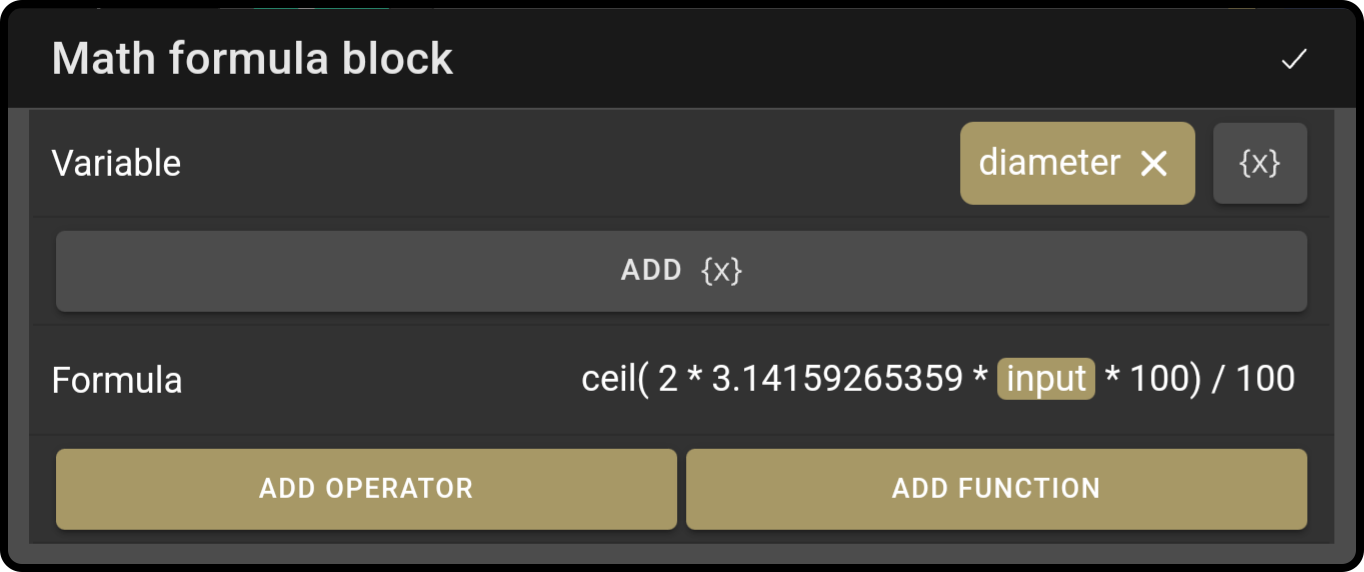
To trim the result down to two decimal points, the function ceil() is used on the result * 100 to round it up and then divided by 100 to return the digits after the decimal point.
 Math Operations
Function
This block will perform basic calculations on 2 variables. For example: <Var3> = <Var2> + <Var1>.
Settings
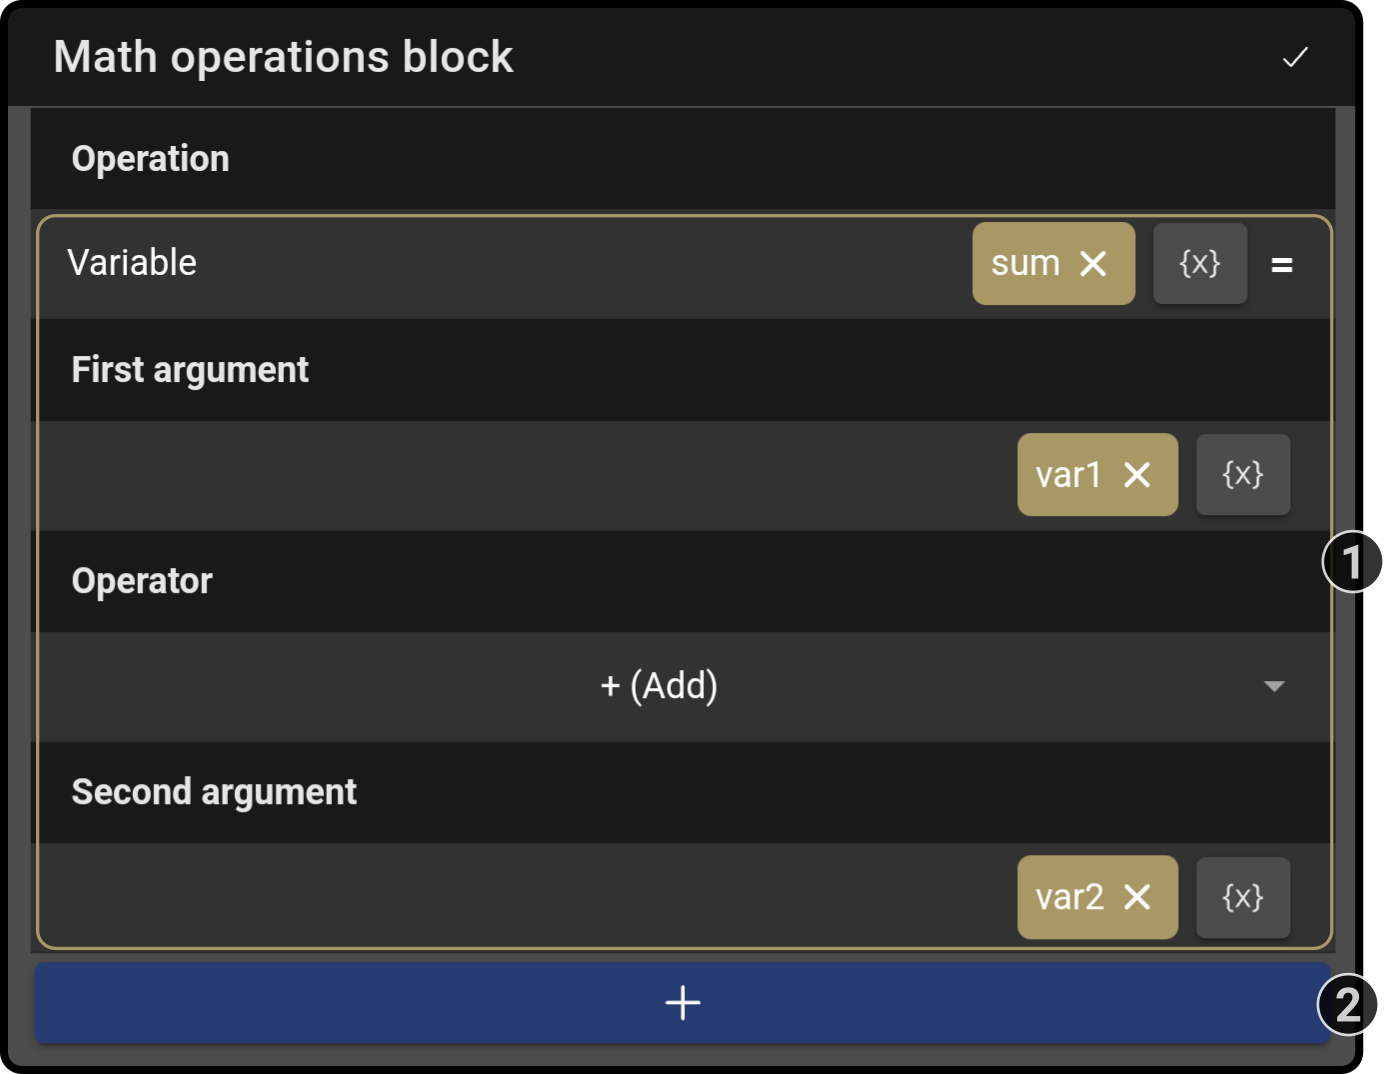
-
Enter the equation for the operation (e.g. 'sum' = 'var1' + 'var2')
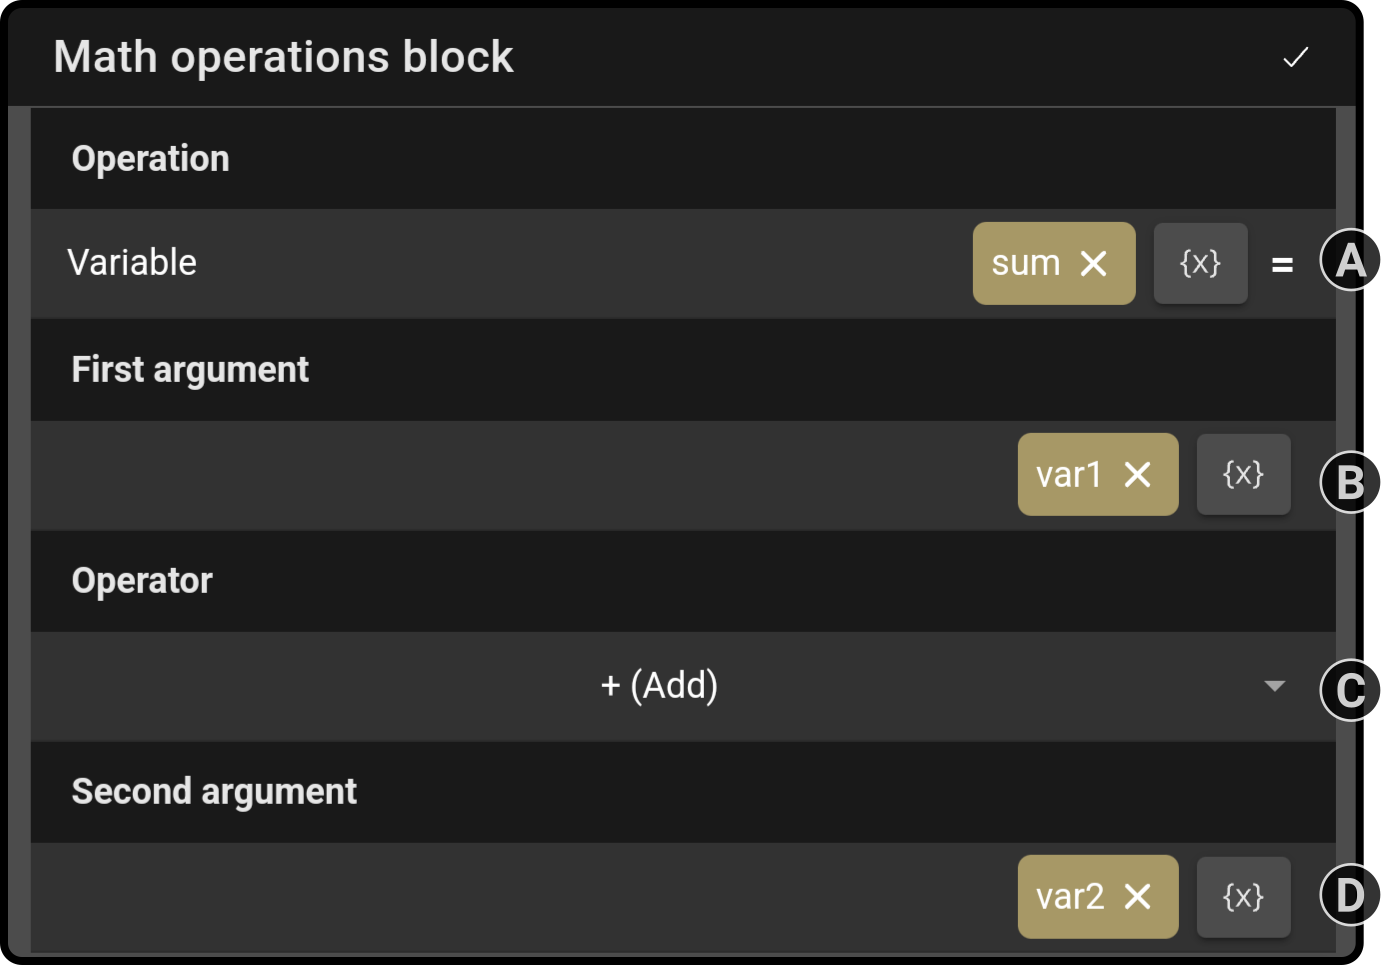
-
Enter the name for the variable containing the result of the equation
Tap the {x} icon to view the list of linked variables and add them to the required fields. -
Enter a number or variable for the first operand
Tap the {x} icon to view the list of linked variables and add them to the required fields. -
Enter the operator (+,-,*,/,mod or ^)
-
Enter a number or variable for the second operand Tap the {x} icon to view the list of linked variables and add them to the required fields.
-
-
Tap the button to add another equation to the list
Samples
Even/Odd
The following example calculates whether a number entered by the user is odd or even:
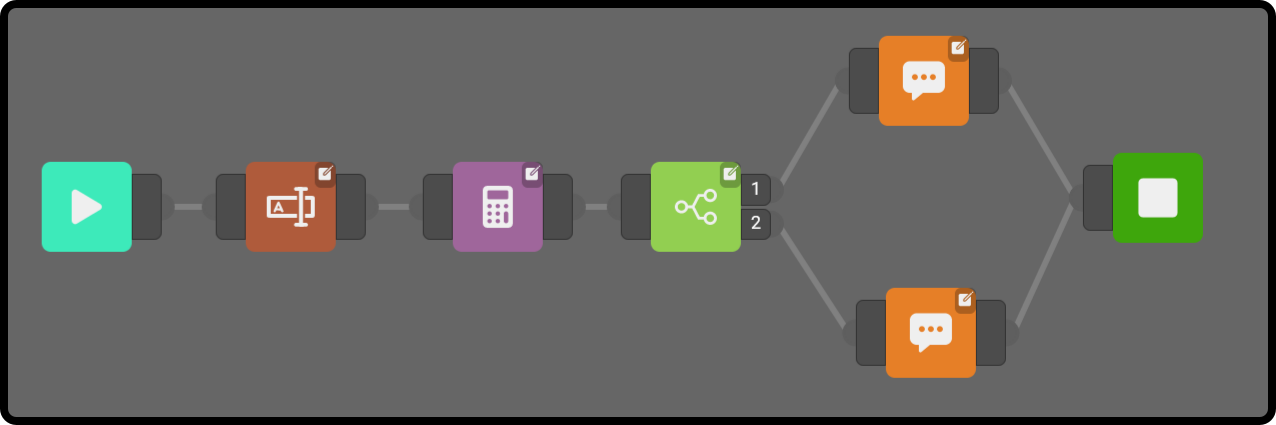
The composition can be found here
The current operation is shown as:

-
The result of the equation is stored in the variable 'result'
-
The input from the user is used as the first operand from the equation
-
The 'mod' operator is used to calculate the result
-
The second operand is '2' to determine if a variable can be divided by 2
 Random number
Function
This block will generate a number between a minimum and maximum value.
Settings
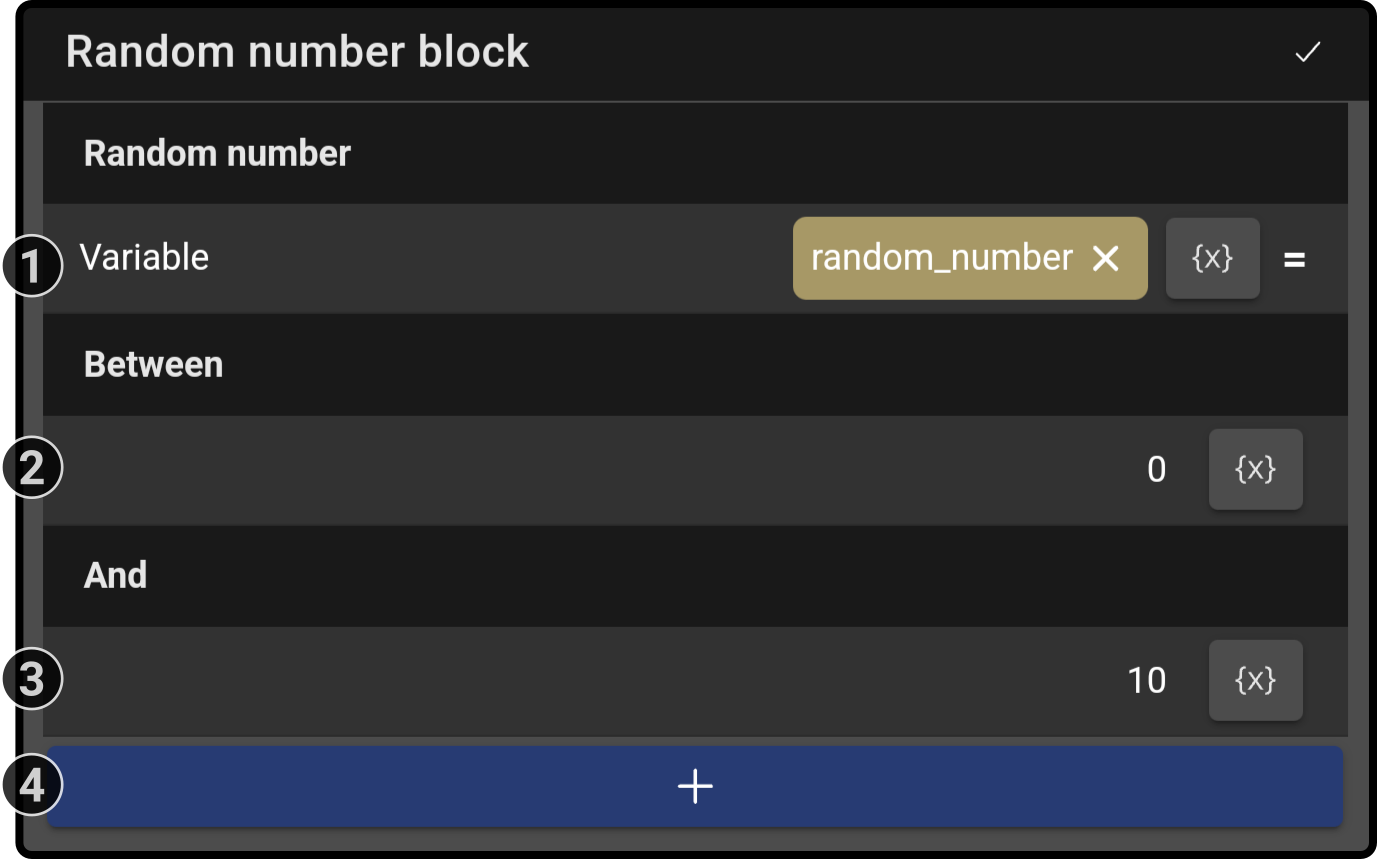
-
Enter the name of the variable containing the randomly generated result
Tap the {x} icon to view the list of linked variables and add them to the required fields. -
Enter a number or variable for the minimum value to be used by the generator
Tap the {x} icon to view the list of linked variables and add them to the required fields. -
Enter a number or variable for the maximum value to be used by the generator
Tap the {x} icon to view the list of linked variables and add them to the required fields. -
Tap the to add another number to be generated
| The minimum and maximum value are included as possible results of the generator. |